
English Manual
Page 2
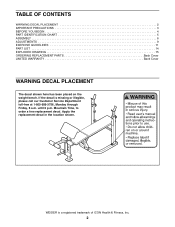
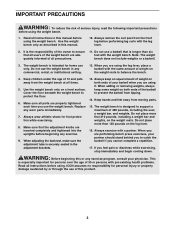
Mountain Time, to order a free replacement decal. WEIDER is missing or illegible, please call our Customer Service Department toll-free at 1-800-999-3756, Monday through Friday, 6 a.m. until 6 p.m. TABLE OF CONTENTS WARNING DECAL ... EXPLODED DRAWING 15 ORDERING REPLACEMENT PARTS Back Cover LIMITED WARRANTY Back Cover WARNING DECAL PLACEMENT The decal shown here has been placed on the weight bench. Apply the replacement decal in the location shown. If the decal is a registered trademark of ICON Health & Fitness, Inc. 2
Mountain Time, to order a free replacement decal. WEIDER is missing or illegible, please call our Customer Service Department toll-free at 1-800-999-3756, Monday through Friday, 6 a.m. until 6 p.m. TABLE OF CONTENTS WARNING DECAL ... EXPLODED DRAWING 15 ORDERING REPLACEMENT PARTS Back Cover LIMITED WARRANTY Back Cover WARNING DECAL PLACEMENT The decal shown here has been placed on the weight bench. Apply the replacement decal in the location shown. If the decal is a registered trademark of ICON Health & Fitness, Inc. 2
English Manual
Page 3
...use only. When you use of this manual before using it. Replace any exercise. 9. Always wear athletic shoes for home use the weight bench in the adjustment brackets. 13. When adjusting the backrest, make sure the adjustment tube is the responsibility of the owner to support a maximum... sure that 210 pounds, including a weight bar and weights, on the weight rests to prevent the barbell from moving parts. 15. The weight bench is intended for foot protection while exercising. 8. If you are inserted completely and tightened into the uprights before using the leg lever, place a...
...use only. When you use of this manual before using it. Replace any exercise. 9. Always wear athletic shoes for home use the weight bench in the adjustment brackets. 13. When adjusting the backrest, make sure the adjustment tube is the responsibility of the owner to support a maximum... sure that 210 pounds, including a weight bar and weights, on the weight rests to prevent the barbell from moving parts. 15. The weight bench is intended for foot protection while exercising. 8. If you are inserted completely and tightened into the uprights before using the leg lever, place a...
English Manual
Page 4
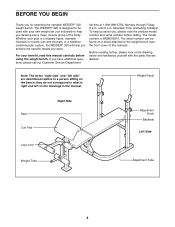
...) to a person sitting on the drawings in muscle size and strength, or a healthier cardiovascular system, the WEIDER® 320 will help you for selecting the versatile WEIDER® 320 weight bench. Before reading further, please look at 1-800-999-3756, Monday through Friday, 6 a.m. they do not ...you , please note the product model number and serial number before using the weight bench. Note: The terms "right side" and "left on the bench; For your goal is WEBE09310. The WEIDER® 320 is right and left side" are labeled. Whether your benefit, read this manual...
...) to a person sitting on the drawings in muscle size and strength, or a healthier cardiovascular system, the WEIDER® 320 will help you for selecting the versatile WEIDER® 320 weight bench. Before reading further, please look at 1-800-999-3756, Monday through Friday, 6 a.m. they do not ...you , please note the product model number and serial number before using the weight bench. Note: The terms "right side" and "left on the bench; For your goal is WEBE09310. The WEIDER® 320 is right and left side" are labeled. Whether your benefit, read this manual...
English Manual
Page 6
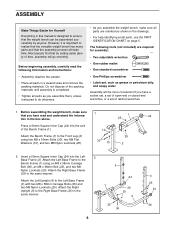
...Base Frame (35) in the drawings. • For help identifying small parts, use the PART IDENTIFICATION CHART on page 5. Before assembling the weight bench, make sure all parts in a cleared area and remove the packing materials. Most people find that you have read the following tools (not included...in this manual is completed. • Tighten all parts as you assemble them, unless instructed to do otherwise. • As you assemble the weight bench, make sure 1 that by anyone. Attach the Right Upright (5) to the Left Base Frame (3) with two M8 x 58mm Carriage Bolts (36) and...
...Base Frame (35) in the drawings. • For help identifying small parts, use the PART IDENTIFICATION CHART on page 5. Before assembling the weight bench, make sure all parts in a cleared area and remove the packing materials. Most people find that you have read the following tools (not included...in this manual is completed. • Tighten all parts as you assemble them, unless instructed to do otherwise. • As you assemble the weight bench, make sure 1 that by anyone. Attach the Right Upright (5) to the Left Base Frame (3) with two M8 x 58mm Carriage Bolts (36) and...
English Manual
Page 8
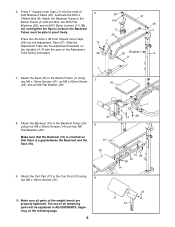
...there is a gap between the Backrest and the Seat (16). 8 15 16 9. Lubricate the M10 x 39 168mm Bolt (8). Attach the Backrest Tubes to the Bench Frame (1) with the pins on the following page. 8 31 17 13 The use of all parts of 6 both Backrest Tubes (20). the Backrest 5 Tubes ... M6 Flat Washers (26). Press 1" Square Inner Caps (7) into the Adjustment Tube (37). Do not overtighten the Nylon Locknut; Attach the Backrest (15) to the Bench Frame (1) using two M6 x 16mm Screws (31), an M6 x 62mm Screw 7 16 (38), and an M6 Flat Washer (26). 8. Attach the Seat (16)...
...there is a gap between the Backrest and the Seat (16). 8 15 16 9. Lubricate the M10 x 39 168mm Bolt (8). Attach the Backrest Tubes to the Bench Frame (1) with the pins on the following page. 8 31 17 13 The use of all parts of 6 both Backrest Tubes (20). the Backrest 5 Tubes ... M6 Flat Washers (26). Press 1" Square Inner Caps (7) into the Adjustment Tube (37). Do not overtighten the Nylon Locknut; Attach the Backrest (15) to the Bench Frame (1) using two M6 x 16mm Screws (31), an M6 x 62mm Screw 7 16 (38), and an M6 Flat Washer (26). 8. Attach the Seat (16)...
English Manual
Page 9
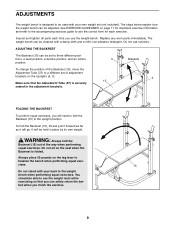
...go. Inspect and tighten all parts each exercise. It will be cleaned with a damp cloth and a mild, non-abrasive detergent. The weight bench can be held in the adjustment brackets. 37 FOLDING THE BACKREST To perform squat exercises, you use solvents. Do not sit on the Uprights (4,...9 Replace any worn parts immediately. cises. 15 Do not stand with your back to a different set (not included). ADJUSTMENTS The weight bench is designed to be adjusted. ADJUSTING THE BACKREST The Backrest (15) can be able to see the correct form for important exercise information and...
...go. Inspect and tighten all parts each exercise. It will be cleaned with a damp cloth and a mild, non-abrasive detergent. The weight bench can be held in the adjustment brackets. 37 FOLDING THE BACKREST To perform squat exercises, you use solvents. Do not sit on the Uprights (4,...9 Replace any worn parts immediately. cises. 15 Do not stand with your back to a different set (not included). ADJUSTMENTS The weight bench is designed to be adjusted. ADJUSTING THE BACKREST The Backrest (15) can be able to see the correct form for important exercise information and...
English Manual
Page 10
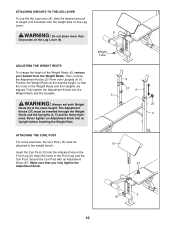
... CURL POST For some exercises, the Curl Post (13) must be inserted through the Weight Rests and the Uprights (4, 5) and be attached to the weight bench. Never tighten an Adjustment Knob into the Weight Rests and the Uprights. Insert the Curl Post (13) into the indicated hole in the Weight Rests...
... CURL POST For some exercises, the Curl Post (13) must be inserted through the Weight Rests and the Uprights (4, 5) and be attached to the weight bench. Never tighten an Adjustment Knob into the Weight Rests and the Uprights. Insert the Curl Post (13) into the indicated hole in the Weight Rests...
English Manual
Page 14
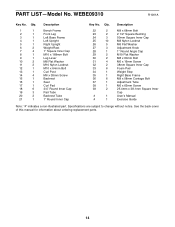
... Inner Cap User's Manual Exercise Guide Note: "#" indicates a non-illustrated part. Qty. 1 1 2 1 3 1 4 1 5 1 6 2 7 4 8 1 9 1 10 2 11 2 12 1 13 1 14 4 15 1 16 1 17 1 18 6 19 3 20 2 21 1 Description Bench Frame Front Leg Left Base Frame Left Upright Right Upright Weight Rest 1" Square Inner Cap M10 x 168mm Bolt Leg Lever M8 Flat Washer M10 Nylon...
... Inner Cap User's Manual Exercise Guide Note: "#" indicates a non-illustrated part. Qty. 1 1 2 1 3 1 4 1 5 1 6 2 7 4 8 1 9 1 10 2 11 2 12 1 13 1 14 4 15 1 16 1 17 1 18 6 19 3 20 2 21 1 Description Bench Frame Front Leg Left Base Frame Left Upright Right Upright Weight Rest 1" Square Inner Cap M10 x 168mm Bolt Leg Lever M8 Flat Washer M10 Nylon...
English Manual
Page 16
... vary from state to give the following information when calling: • The MODEL NUMBER of the product (WEBE09310) • The NAME of the product (WEIDER® 320 weight bench) • The SERIAL NUMBER of the product (see the front cover of this manual) • The KEY NUMBER and DESCRIPTION of the desired part...
... vary from state to give the following information when calling: • The MODEL NUMBER of the product (WEBE09310) • The NAME of the product (WEIDER® 320 weight bench) • The SERIAL NUMBER of the product (see the front cover of this manual) • The KEY NUMBER and DESCRIPTION of the desired part...


