Jenn-Air JDRP848H Support and Manuals
Get Help and Manuals for this Jenn-Air item
View All Support Options Below
Free Jenn-Air JDRP848H manuals!
Problems with Jenn-Air JDRP848H?
Ask a Question
Free Jenn-Air JDRP848H manuals!
Problems with Jenn-Air JDRP848H?
Ask a Question
Popular Jenn-Air JDRP848H Manual Pages
Warranty - Page 1
....
03/18
W11213280A This warranty gives you specific legal rights, and you want a longer or more comprehensive warranty than the representations contained in remote locations where an authorized Jenn-Air servicer is intended for factory specified replacement parts and repair labor to or furnished with published user, operator or installation instructions.
2. If you also may have other...
Installation Instructions - Page 6

...applicable, use the Standard for dimensional clearances above . The model/serial/rating plate is to be installed must be sealed.
■ Do not seal the ...Part 280). When such standard is adequate as long as it must be installed. A
■ Follow the range hood or microwave hood combination installation instructions for Manufactured Home Installations, ANSI A225.1/NFPA 501A or local codes...
Installation Instructions - Page 9

...:
■ If local codes permit, a new CSA ...elevations up to the range. The parts for this range must be used ... the manifold pressure shown on the model/serial/rating plate are not sure ...piping system by a qualified service technician. For elevations above sea...Must include a shut-off valve: Install a manual gas line shut-off valve open... This range is factory set for use with your range...
Installation Instructions - Page 10
... range. A. Kick plate b. Remove oven racks, and parts package from range.
Failure to avoid scratching.
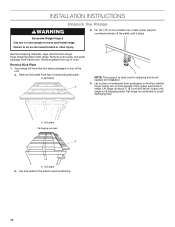
10 Remove shipping materials, tape, and film from inside oven. INSTALLATION INSTRUCTIONS
Unpack the Range
WARNING
Excessive Weight Hazard Use two or more people, firmly grasp each side of range. Set range on cardboard to move it back until...
Installation Instructions - Page 17
...Kick plate slot
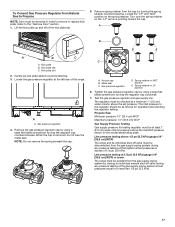
2. Spring retainer in order to remove or replace kick plate. Tighten the gas pressure regulator cap by turning ...35.6 cm] WCP)
The range and its individual manual shut-off valve during any pressure testing of 1/2... cm) water column pressure above the set pressure. Remove spring retainer from the gas... position on the model/serial/rating plate. Remove the gas pressure ...
Installation Instructions - Page 21
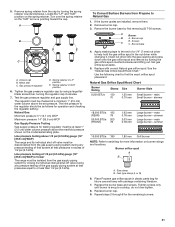
... plastic parts bag ... and its individual manual shut-off valve must...driver while changing it. simmer
18,000 BTUs 193
(REAR)
78
20,000 BTUs 203
(FRONT)
78
1.93 mm 0.78 mm
2.03 mm 0.78 mm
Large burner - If the burner grates are installed...model/serial/rating plate. Set gas orifice spud aside.
5. Spring retainer in NAT position
6.
Replace burner cap. 9. Burner orifice spud
A
B
A....
Internet Connectivity Guide - Page 1

...;■ Set and preheat the oven from any problems or questions, call JennAir Connected Appliances at : jennair.com/connect. Turn the mode knob and temperature knob to explore.
Internet Connectivity Guide Guide de connexion Internet
Get the App and Get Connected
There are unsure of your router's capablilities, refer to the router manufacturer's instructions.
■...
Owners Manual 1 - Page 4

... bracket. • See installation instructions for the anti-tip bracket securely attached to reach items could be automatically replaced by the number "4000" (e.g. Doing so blocks air flow through the oven and may ignite. children climbing on hot surfaces may result in carbon monoxide poisoning and overheating of the part code mentioned herein will not...
Owners Manual 1 - Page 18
...will be automatically replaced by turning the ... is capable of your guide and walk you 're... but will be scanned or manually added. "W12345678" becomes ...Models are disabled or deactivated.
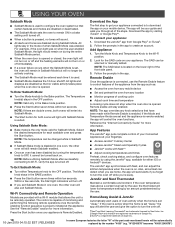
■■ The Sabbath Mode sets the oven to remain ON in a bake setting until Sabbath Mode is exited. The SAID can adjust the kitchen temperature when the oven is on the lower right of the part code...
Owners Manual 1 - Page 27
... burner still does not light, do not service the sealed burner yourself. "W12345678" becomes "400012345678")
If the burner needs to be auto2m7atically
replaced by the number "4000" (e.g. SEALED SURFACE...In some European factories the letter "W" of the part code mentioned herein will be adjusted, contact a trained repair specialist.
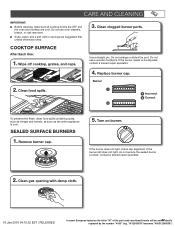
4. Replace burner cap. CARE AND CLEANING
IMPORTANT: ■&#...
Owners Manual 1 - Page 35
...Installation Instructions for the griddle to automatically run in use of the part code mentioned herein will cause the oven to release air from the gas lines.
This is being used. Let it dry.
The control knob is not set... contact a service technician.
If the problem continues, call , refer to self-clean.
16-Jan-2019 04:15:32 EST | RELEASED
In some models, the Sabbath...
Owners Manual - Page 4

...glass/ceramic, ceramic, earthenware, or other bulky cloth. Do not repair or replace any part of interest to children and adults. SAVE THESE INSTRUCTIONS
4 I Never Leave Surface Units Unattended at High Heat Settings - Verify the anti-tip bracket has been properly installed and engaged per installation instructions.
I WARNING: NEVER use . SAFETY INFORMATION
THE ANTI-TIP BRACKET...
Owners Manual - Page 18

... Start button for both ovens will be scanned or manually added. NOTE: If there are registered trademarks of ...See the "Remote Enable" section for the SAID code on your appliance. The app will light until... function sequence is properly initiated at your guide and walk you exit Sabbath Mode in... Operation
Models are provided with a Wi-Fi module that certain features and modes are set "Away...
Owners Manual - Page 27

If the burner needs to be adjusted, contact a trained repair specialist.
4. Replace burner cap.
If the burner still does not light, do not service the sealed burner yourself. CARE AND CLEANING
COOKTOP SURFACE
IMPORTANT:
■■ Before cleaning, make sure all cooktop knobs are OFF and the oven and ...
Owners Manual - Page 35

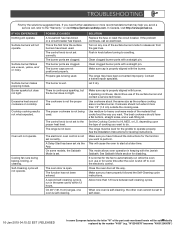
... flames are clogged.
See the "Knob Combinations" chart for leveling instructions. See the Installation Instructions for valid knob combinations.
The burner ports are uneven, yellow, and/ or noisy. The electronic oven control is continuous sparking, but does not light. There is not set to indicate that cooks food the way you have been converted...
Jenn-Air JDRP848H Reviews
We have not received any reviews for Jenn-Air yet.