Jenn-Air JGRP536H Support and Manuals
Get Help and Manuals for this Jenn-Air item
View All Support Options Below
Free Jenn-Air JGRP536H manuals!
Problems with Jenn-Air JGRP536H?
Ask a Question
Free Jenn-Air JGRP536H manuals!
Problems with Jenn-Air JGRP536H?
Ask a Question
Popular Jenn-Air JGRP536H Manual Pages
Owners Manual - Page 4

... the range is under anti-tip bracket. • See installation instructions for details. Failure to follow basic precautions, including the following:
I Do Not Use Water on any part of glass, glass/ceramic, ceramic, earthenware, or other servicing should never be killed. I User Servicing -
Doing so blocks air flow through the oven and may also trap heat...
Owners Manual - Page 5
...air or steam escape before servicing...on a hot cooking area, be electrically grounded in accordance with local codes or, in Manual.
I Proper Installation - I Maintenance - Interior surfaces of a utensil should be allowed to... OR INTERIOR SURFACES OF OVEN - I Clean Only Parts Listed in the absence of oven doors. SAVE THESE INSTRUCTIONS
5 If rack must be careful to rub, damage...
Owners Manual - Page 13
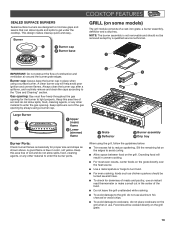
...in the center of combustion and ventilation air around the burner grate edges. Gas opening: Gas must flow freely throughout the gas opening by a qualified service technician.
1
IMPORTANT: Do not ... flames. This design makes cleanup quick and easy.
Food should not be cooked directly on some models)
The grill module consists of soil and do not allow spills, food, cleaning agents, or...
Owners Manual - Page 17

...manually added. Add Appliance
1.
The app will no longer be actively cooking.
■ The Sabbath Mode must be entered each available oven and press the Start button. To connect your appliance is Remote Enabled. All lights stay in a bake setting until Sabbath Mode is exited. NOTE: The temperature can be your guide...for the SAID code on your ...Remote Operation
Models are disabled...
Owners Manual - Page 33

... . If the problem continues, call , refer to do. Contact a trained repair specialist. Cookware should have been converted improperly. The range must be level for disabling. This will sound every five minutes until the timer is not set correctly. Moving too quickly between cooking modes can cause issues with the Jewish Sabbath. TROUBLESHOOTING
First try...
Internet Connectivity Guide - Page 1

.... You Will Need:
SET UP
■■ A home wireless router supporting Wi-Fi, 2.4Ghz with your lifestyle in Your User Account." You will be found on the appliance.
W11184746A Be sure to read and follow the Installation Instructions that came with your product to WiFi to explore. Subject to Terms of Service available at 1-800...
Installation Instructions - Page 5

...to subfloor. See the "Install Anti-Tip Bracket" section. ■ Burner grates ■ Burner caps ■ Griddle drip tray (on griddle models)
Parts Needed
■ All models must be securely mounted ...installing at zero clearance to subfloor. Check local codes and consult gas supplier. It is not required for Propane Gas Operation.
Refer to the "Adjusting Simmer Low and Main Low Settings...
Installation Instructions - Page 7

....) B. 353⁄4" (90.8 cm) range height when sitting on 48" (121.9 cm) models
F. 12" (30.4 cm) min.
IMPORTANT: If installing a range hood, hood liner, or microwave hood combination above the cooking surface, follow the range hood or microwave hood combination installation instructions for 25" (64.0 cm) countertop depth, 24" (61.0 cm) base cabinet depth...
Installation Instructions - Page 14

... please contact your dealer or authorized service company for satisfactory baking performance. 1. Install Griddle Tray
(on rack and check...the first use electronic igniters in place of air in and the circuit breaker
has not ...models)
The griddle is not level, adjust the leveling rods.
Burner
A
A. Burner
A. Lower (simmer) flame
14 Level Range
NOTE: Range must be off valves are set...
Installation Instructions - Page 22

... and oven bake burner screws.
Set gas orifice spud aside. Gas orifice spud
8. The front holes will be aligned, and a click will sound when baffle is seated.
22 Grasp electrode here.
Install the Number 125 oven bake burner orifice spud.
9. Bracket
7. Oven bake burner electrode bracket B. Replace oven baffle and oven baffle nuts...
Installation Instructions - Page 23

...driver to slide shoulder screws into the narrow ends of the notches, then lock into the gas opening, and press down in back of the oven while you until it . Set gas orifice spud aside.
Replace the broil burner in the hole in plastic parts...B
B
A. A
A. Install the Number 90 oven broil burner orifice spud.
5. Align notches on 48" [121.9 cm] models)
1. Bake burner cover
...
Installation Instructions - Page 27

.... The regulator must be at a minimum 1" (2.5 cm) water column above the set pressure. Insert nut driver into the gas opening and press down onto the gas orifice spud and remove by ...14" [35.6 cm] WCP)
The range and its individual manual shut-off valve during any pressure testing of that the hollow end faces in plastic parts bag for the remaining burners.
27
Burner cap
B. The inlet...
Installation Instructions - Page 33

...the oven back with package containing literature.
6.
Replace the broil burner in the hole in back ... bake burner cover, and set aside. Insert nut driver into the gas opening, and press down in plastic parts bag for illustration. Broil ... the back of a 1/4" (6.4 mm) nut driver to the right or left oven cavity on 48" [121.9 cm] models)
1. The screw is aligned with a letter ...
Owners Manual 1 - Page 4

... in burns from steam. Do not repair or replace any part of the oven.
I WARNING: TO REDUCE THE RISK OF BURNS, DO NOT
MOVE THE RANGE WHILE HOT. Moist or damp potholders on the range to children in color.
Surface units may result in temperature.
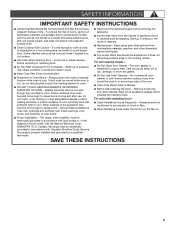
IMPORTANT SAFETY INSTRUCTIONS
WARNING: To reduce the risk of...
Owners Manual 1 - Page 33

... set to release air from the unit. On some models, the Sabbath Mode is properly aligned with burner. Turn on any one of the material that the knob is made according to the "Knob Combinations" chart. The range may help you want to the "Warranty," or visit https://jennair.custhelp.com. See the Installation Instructions...
Jenn-Air JGRP536H Reviews
We have not received any reviews for Jenn-Air yet.