Jenn-Air JGS8850CDS Support and Manuals
Get Help and Manuals for this Jenn-Air item
View All Support Options Below
Free Jenn-Air JGS8850CDS manuals!
Problems with Jenn-Air JGS8850CDS?
Ask a Question
Free Jenn-Air JGS8850CDS manuals!
Problems with Jenn-Air JGS8850CDS?
Ask a Question
Most Recent Jenn-Air JGS8850CDS Questions

Delay Bake Feature
When setting the delay bake time, is this the number of hours to delay baking or is this the time to...
When setting the delay bake time, is this the number of hours to delay baking or is this the time to...
(Posted by h2oskier97567 9 years ago)
Jenn-Air JGS8850CDS Videos

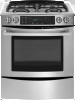
Jenn-Air JGS8850CDS Slide-In Range
Duration: :58
Total Views: 22
Duration: :58
Total Views: 22
Popular Jenn-Air JGS8850CDS Manual Pages
Installation Instruction - Page 3
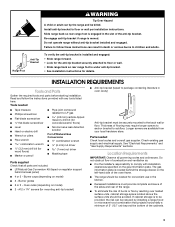
... (depending on model)
■ 2 - If cabinet storage is engaged in death or serious burns to children and adults. Failure to follow the instructions provided with installation clearances specified on regulator support
behind the storage drawer on the left-hand side of combustion and ventilation air.
■ It is moved.
Slide range back so rear range foot is...
Installation Instruction - Page 4
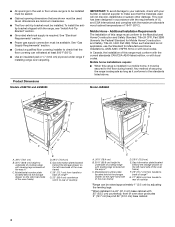
... covering can be installed.
Any method of this range must be available. Gas information plate (located behind the storage drawer on the left -hand side of the oven frame)
F. 29" (73.7 cm) from handle to underside of the oven frame)
E
D. 29⁷⁄₈" (75.9 cm) E.
Product Dimensions Models JGS8750 and JGS8850
Model JGS8860
A
A
G B
C
G B
C
D F
A. 30³⁄...
Installation Instruction - Page 6
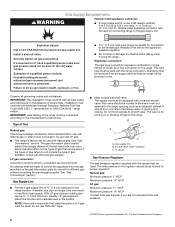
...) male pipe thread is factory set for use TEFLON®† tape.
■ Must include a shutoff valve: The supply line must be level with Natural gas. See "Gas
Conversions" section. If the types of Gas
Natural gas: This range is design-certified by a qualified service technician. LP gas conversion: Conversion must be equipped with a manual shutoff valve. No attempt...
Installation Instruction - Page 7
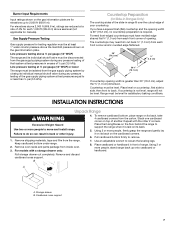
... move and install range. Remove and discard cardboard cross support.
Remove shipping materials, tape and film from each front corner and/or rounded edge flattened.
30" (76.2 cm)
³⁄₈" (1.0 cm)
30 ¾" (78.1 cm)
If countertop opening . Remove oven racks and parts package from the gas supply piping system by closing its individual manual shutoff valve...
Installation Instruction - Page 10
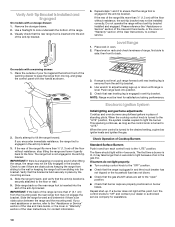
... Check that the gas shutoff valves are set to the "open" position.
■ Check that the range foot is held ...Installed and Engaged
On models with a warming drawer: 1. If the rear of air in the anti-tip bracket.
3. IMPORTANT: If there is engaged in the gas line. If a burner does not light at this point, turn each control knob to the "Assistance or Service" section of the Use and Care Guide...
Installation Instruction - Page 13
... engaged in death or serious burns to children and adults.
1. To range B. Shutoff valve (closed position. Gas supply line
2. Oven bake burner cover screws
13
Securely tighten all gas connections. If connected to floor or wall per installation instructions. See "Replace Oven Racks and
Storage Drawer or Warming Drawer" section. 3. Failure to do so can result...
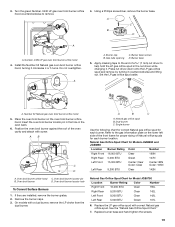
Installation Instruction - Page 16
.... Checking for each burner location. Burner base
4. Set Natural gas orifice spud aside.
Refer to help hold the Natural gas orifice spud in plastic parts bag for each burner. If installed, remove the burner grates. 2.
Replace burner base and hand tighten the screws.
7. A. Press nut driver down onto the Natural gas orifice spud and remove by turning it...
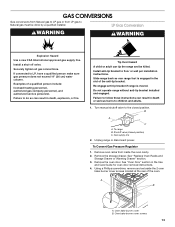
Installation Instruction - Page 17
... burns to follow these instructions can tip the range and be killed.
Lift up and remove oven bake burner cover.
6. Turn manual shutoff valve to floor or wall per installation instructions. See "Replace Oven Racks and
Storage Drawer or Warming Drawer" section. 3. WARNING
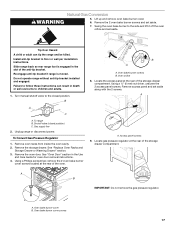
Natural Gas Conversion
5. Unplug range or disconnect power. Remove access panel and set aside along with...
Installation Instruction - Page 19
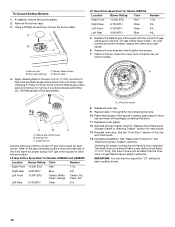
... of a 7 mm) nut driver to remove.
4. AB
C D
A
B
C
A. Natural gas orifice spud B. Dual burner C. Oven broil burner
D. Oven broil burner locator hole
To Convert Surface Burners
1. If they are installed, remove the burner grates. 2. On models with correct Natural gas orifice spud.
Natural Gas Orifice Spud Chart for each burner. Replace the LP gas orifice spud with a dual...
Use and Care - Page 4
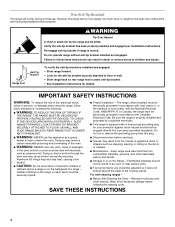
...: TO REDUCE THE RISK OF TIPPING OF
THE RANGE, THE RANGE MUST BE SECURED BY PROPERLY INSTALLED ANTI-TIP DEVICES. Wipe off all excessive spillage before servicing.
■ Injuries may result in carbon monoxide poisoning and overheating of a range - SAVE THESE INSTRUCTIONS
4 However, the range can result in
cabinets above a range or on the backguard of the oven...
Use and Care - Page 12
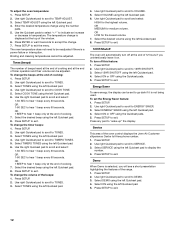
...1-30 SEC to exit. Press SETUP to hear 1 beep every 30 seconds...SETUP. 2. To change the volume of the oven control displays the Jenn-Air Customer eXperience Center toll-free phone number. 1. Use right Quickset pad to scroll to TIMERS TONES. 5. Select SERVICE using the left Quickset pad to go dark if it on.
Select ON or OFF using the number
pads. 5. To set...
Use and Care - Page 30

... the instructions below. In the U.S.A. Call the dealer from whom your appliance. Name and address of your appliance was purchased, or call Jenn-Air at www.jennair.com/cookingaccessories. A clear description of purchase to verify warranty status. User's guides, service manuals and parts information are available from Jenn-Air Brand Home Appliances, Customer eXperience Centre.
30 Call...
Use and Care - Page 31
..., altered or cannot be borne by calling Jenn-Air. After checking "Troubleshooting," you need service, first see the "Troubleshooting" section of repair or replacement under this limited warranty. DISCLAIMER OF IMPLIED WARRANTIES; Consumable parts are excluded from unauthorized modifications made to the appliance.
9. JENN-AIR SHALL NOT BE LIABLE FOR INCIDENTAL OR CONSEQUENTIAL...
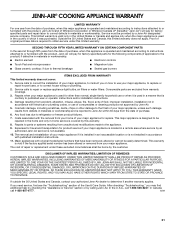
Warranty - Page 1

....
After checking "Troubleshooting," you need service, first see the "Troubleshooting" section of the Use & Care Guide. SECOND THROUGH FIFTH YEAR LIMITED WARRANTY ON CERTAIN COMPONENT PARTS
In the second through fifth years from the date of purchase, when this appliance is operated and maintained according to instructions attached to or furnished with the product, Jenn-Air will pay...
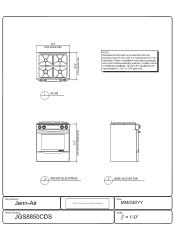
CAD - Page 1
...
Jenn-Air
Model Number:
JGS8850CDS
JOARCHITECTURELogeoltennAir Bronchia white bgnjpg
Date:
MM/DD/YY
Scale:
2 - 1 1 0"
.A. 30 i" APPLIANCE DIM.
0
w
° N
00_
PLAN
NOTE: Dimensional information is provided for planning purposes only.
Do not make any cutouts based on this information. All Jenn-Airs appliances are appropriately UL, CUL or CSA approved. Refer to installation instructions...
Jenn-Air JGS8850CDS Reviews
We have not received any reviews for Jenn-Air yet.