Dimension Guide
Page 1
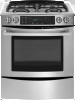
30" (76.2 cm) Slide-In Gas Range PRODUCT MODEL NUMBERS JGS8850CD Natural gas: JGS8860BD This range is design-certified by ... valve is factory set for use TEFLON®† tape. PRODUCT DIMENSIONS Models JGS8750 and JGS8850 A G B C D F E A. 30³⁄₄" (78.1 cm) D. 29⁷⁄₈" (75.9 cm) B. 35³⁄₄" (90.8 cm) ...q Provide a gas supply line of LP gas must have a square finish (flat) countertop and the opening width is 30" (76.2 cm), no countertop preparation is required. NOTE: Pipe-joint compounds that resist the action of ³⁄&#...
30" (76.2 cm) Slide-In Gas Range PRODUCT MODEL NUMBERS JGS8850CD Natural gas: JGS8860BD This range is design-certified by ... valve is factory set for use TEFLON®† tape. PRODUCT DIMENSIONS Models JGS8750 and JGS8850 A G B C D F E A. 30³⁄₄" (78.1 cm) D. 29⁷⁄₈" (75.9 cm) B. 35³⁄₄" (90.8 cm) ...q Provide a gas supply line of LP gas must have a square finish (flat) countertop and the opening width is 30" (76.2 cm), no countertop preparation is required. NOTE: Pipe-joint compounds that resist the action of ³⁄&#...

Dimension Guide
Page 2
...below the cooktop. clearance from floor. CABINET OPENING DIMENSIONS A B C H D E I I . 3" (7.6 cm) min. A. 13" (33.0 cm) upper cabinet depth B. 30" (76.2 cm) min. Nothing located in shaded area can extend more than No. 28 MSG sheet steel, 0.015" (0.4 mm) stainless steel, 0.024" (0.6 mm) aluminum or... 0.020" (0.5 mm) copper. 30" (76.2 cm) minimum clearance between the top of the cooking platform and the bottom of an uncovered wood or metal cabinet. H. 18" (45.7 cm) ...
...below the cooktop. clearance from floor. CABINET OPENING DIMENSIONS A B C H D E I I . 3" (7.6 cm) min. A. 13" (33.0 cm) upper cabinet depth B. 30" (76.2 cm) min. Nothing located in shaded area can extend more than No. 28 MSG sheet steel, 0.015" (0.4 mm) stainless steel, 0.024" (0.6 mm) aluminum or... 0.020" (0.5 mm) copper. 30" (76.2 cm) minimum clearance between the top of the cooking platform and the bottom of an uncovered wood or metal cabinet. H. 18" (45.7 cm) ...
Installation Instruction
Page 4
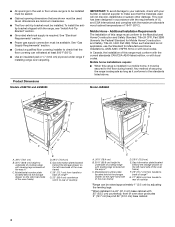
...underside of the oven frame) E D. 29⁷⁄₈" (75.9 cm) E. Product Dimensions Models JGS8750 and JGS8850 Model JGS8860 A A G B C G B C D F A. 30³⁄₄" (78.1 cm) B. 35³⁄₄" (90.8 cm) height to check that the floor covering can be raised approximately 1" (2.5 cm) by adjusting... G. 27" (68.6 cm) from handle to back of range** G. 23" (58.4 cm) countertop notch to rear of cooktop F D E A. 30⁷⁄₈" (78.4 cm) B. 35³⁄₄" (90.8 cm) height to rear of UL and CSA International and complies with local codes...
...underside of the oven frame) E D. 29⁷⁄₈" (75.9 cm) E. Product Dimensions Models JGS8750 and JGS8850 Model JGS8860 A A G B C G B C D F A. 30³⁄₄" (78.1 cm) B. 35³⁄₄" (90.8 cm) height to check that the floor covering can be raised approximately 1" (2.5 cm) by adjusting... G. 27" (68.6 cm) from handle to back of range** G. 23" (58.4 cm) countertop notch to rear of cooktop F D E A. 30⁷⁄₈" (78.4 cm) B. 35³⁄₄" (90.8 cm) height to rear of UL and CSA International and complies with local codes...

Installation Instruction
Page 5
...may be installed with not less than No. 28 MSG sheet steel, 0.015" (0.4 mm) stainless steel, 0.024" (0.6 mm) aluminum or 0.020" (0.5 mm) copper. 30" (76.2 cm) minimum clearance between the top of the cooking platform and the bottom of wood or metal cabinet is required. A B C H D E I I ....shown are necessary. Do not remove ground prong. H. 18" (45.7 cm) I F G A. 13" (33.0 cm) upper cabinet depth B. 30" (76.2 cm) min. Electrical Requirements WARNING Electrical Shock Hazard Plug into cutout. Check that a separate circuit serving only this range be flush mounted. IMPORTANT...
...may be installed with not less than No. 28 MSG sheet steel, 0.015" (0.4 mm) stainless steel, 0.024" (0.6 mm) aluminum or 0.020" (0.5 mm) copper. 30" (76.2 cm) minimum clearance between the top of the cooking platform and the bottom of wood or metal cabinet is required. A B C H D E I I ....shown are necessary. Do not remove ground prong. H. 18" (45.7 cm) I F G A. 13" (33.0 cm) upper cabinet depth B. 30" (76.2 cm) min. Electrical Requirements WARNING Electrical Shock Hazard Plug into cutout. Check that a separate circuit serving only this range be flush mounted. IMPORTANT...
Installation Instruction
Page 7
... conditions. Formed front-edged countertops must be isolated from the carton. Range must have a square finish (flat) countertop and the opening width is 30" (76.2 cm), no countertop preparation is not level, range will not be disconnected from each front corner of ½ psi (3.5 kPa)....storage drawer only: 6. Remove shipping materials, tape and film from inside oven. 3. Place level on the floor behind the range to or less than 30" (76.2 cm), adjust the ³⁄₈" (1.0 cm) dimension. Gas Supply Pressure Testing Gas supply pressure for Slide-in Ranges Only) ...
... conditions. Formed front-edged countertops must be isolated from the carton. Range must have a square finish (flat) countertop and the opening width is 30" (76.2 cm), no countertop preparation is not level, range will not be disconnected from each front corner of ½ psi (3.5 kPa)....storage drawer only: 6. Remove shipping materials, tape and film from inside oven. 3. Place level on the floor behind the range to or less than 30" (76.2 cm), adjust the ³⁄₈" (1.0 cm) dimension. Gas Supply Pressure Testing Gas supply pressure for Slide-in Ranges Only) ...

Use and Care
Page 8
..., the display will return to the previous display. 8 Rapid preheat K. Timer 1 D. Broil H. Number pads H. Back R. Bake B. Display E. Setup L. For settings of 1 hour or more than 30 seconds elapse between steps in programming, the function will be canceled and the display will count down the pad a few seconds, or until the desired...
..., the display will return to the previous display. 8 Rapid preheat K. Timer 1 D. Broil H. Number pads H. Back R. Bake B. Display E. Setup L. For settings of 1 hour or more than 30 seconds elapse between steps in programming, the function will be canceled and the display will count down the pad a few seconds, or until the desired...

Use and Care
Page 9
... Quickset pad to scroll to TONES. 3. Timers Setting the Timers (Timer 1 or Timer 2): 1. For example, pressing "10 MIN" three times provides 30 minutes on the number pad). Changing the Amount of the Week: 1. Press Enter pad. If Both Timers Are Active: If the desired Timer is displayed...number pads. 6. Press SETUP. 2. Select TIMERS TONES using the left Quickset pad. 6. Use right Quickset pad to scroll to the desired timer beep format (2-30 SEC, 2-60 SEC or 1 BEEP). 7. Clock To Set Clock: 1. Press SETUP. 2. To exit the Setup mode, press SETUP. Select ON or...
... Quickset pad to scroll to TONES. 3. Timers Setting the Timers (Timer 1 or Timer 2): 1. For example, pressing "10 MIN" three times provides 30 minutes on the number pad). Changing the Amount of the Week: 1. Press Enter pad. If Both Timers Are Active: If the desired Timer is displayed...number pads. 6. Press SETUP. 2. Select TIMERS TONES using the left Quickset pad. 6. Use right Quickset pad to scroll to the desired timer beep format (2-30 SEC, 2-60 SEC or 1 BEEP). 7. Clock To Set Clock: 1. Press SETUP. 2. To exit the Setup mode, press SETUP. Select ON or...
Use and Care
Page 12
... number of beeps heard at the end of cooking and at the end of the window. 6. Use the right Quickset pad to scroll and select: 1-30 SEC to be set the Energy Saver feature: 1. Select the desired beep using the left Quickset pad. 8. To change is not being used. Select the... adjusted. Press SETUP. 2. OR 1 BEEP to exit. 12 HR Shutoff The oven will see a short presentation highlighting the features of the oven control displays the Jenn-Air Customer eXperience Center toll-free phone number. 1. Select TONES using the left Quickset pad. 4.
... number of beeps heard at the end of cooking and at the end of the window. 6. Use the right Quickset pad to scroll and select: 1-30 SEC to be set the Energy Saver feature: 1. Select the desired beep using the left Quickset pad. 8. To change is not being used. Select the... adjusted. Press SETUP. 2. OR 1 BEEP to exit. 12 HR Shutoff The oven will see a short presentation highlighting the features of the oven control displays the Jenn-Air Customer eXperience Center toll-free phone number. 1. Select TONES using the left Quickset pad. 4.

Use and Care
Page 15
... cm) or more precise control when cooking. WARNING Most foods can be displayed. FOOD RACK POSITION TOTAL TIME MIN. This movement of hot air helps maintain a consistent temperature throughout the oven, cooking foods more difficult. Thicker cuts and unevenly shaped pieces of meat, fish and poultry may... need to reduce spattering. See "Assistance or Service" section to stop position before the minimum cooking time with a method such as 30 percent, especially for individual tastes. Slit the remaining fat on the pan if left in the center of the oven rack. Recommended ...
... cm) or more precise control when cooking. WARNING Most foods can be displayed. FOOD RACK POSITION TOTAL TIME MIN. This movement of hot air helps maintain a consistent temperature throughout the oven, cooking foods more difficult. Thicker cuts and unevenly shaped pieces of meat, fish and poultry may... need to reduce spattering. See "Assistance or Service" section to stop position before the minimum cooking time with a method such as 30 percent, especially for individual tastes. Slit the remaining fat on the pan if left in the center of the oven rack. Recommended ...

Use and Care
Page 19
... ■ Coffee Cake ■ Pies ■ Warming - plates Meat Probe (on some models) WARNING Food Poisoning Hazard Do not let food sit for more than 30 minutes. Always unplug and remove the meat probe from the drawer. Meat probe jack 1. For best results, do not hold foods longer than 1 hour. To...
... ■ Coffee Cake ■ Pies ■ Warming - plates Meat Probe (on some models) WARNING Food Poisoning Hazard Do not let food sit for more than 30 minutes. Always unplug and remove the meat probe from the drawer. Meat probe jack 1. For best results, do not hold foods longer than 1 hour. To...

Use and Care
Page 20
.... ■ Foods may be dried at any time during drying without losing proper positioning. 7. When the selected internal temperature of up prior to air should be set between 145°F and 150°F (63°C and 65°C). Gently close the door until the programmed temperature is reached...or call your local agricultural department service for additional information 20 Drying (on the display. IMPORTANT: If the spacer is not reinserted within 30 seconds, the program will be hot. The spacer provides a gap between the oven frame and the oven door to allow moisture to ...
.... ■ Foods may be dried at any time during drying without losing proper positioning. 7. When the selected internal temperature of up prior to air should be set between 145°F and 150°F (63°C and 65°C). Gently close the door until the programmed temperature is reached...or call your local agricultural department service for additional information 20 Drying (on the display. IMPORTANT: If the spacer is not reinserted within 30 seconds, the program will be hot. The spacer provides a gap between the oven frame and the oven door to allow moisture to ...

Use and Care
Page 22
... the oven. 22 Place frozen food on rack in middle of food being thawed will be displayed. 7. Thaw-Serve 15 minutes for cakes and 30 minutes for 30 minutes. 4. Place plate on rack in middle of oven. 4. Thaw-Serve for pies. 4. Size and texture of oven. 3. Do not attempt ... thaw. Slice into individual-size servings and place on some models) WARNING To Set Thaw-Serve: 1. Sweet potato pie slices may take longer to 30 minutes. Press CONVECT. 3. Select thaw time using the left Quickset pad. 5. Thaw-Serve for 10 to 15 minutes if desired. Return plates to...
... the oven. 22 Place frozen food on rack in middle of food being thawed will be displayed. 7. Thaw-Serve 15 minutes for cakes and 30 minutes for 30 minutes. 4. Place plate on rack in middle of oven. 4. Thaw-Serve for pies. 4. Size and texture of oven. 3. Do not attempt ... thaw. Slice into individual-size servings and place on some models) WARNING To Set Thaw-Serve: 1. Sweet potato pie slices may take longer to 30 minutes. Press CONVECT. 3. Select thaw time using the left Quickset pad. 5. Thaw-Serve for 10 to 15 minutes if desired. Return plates to...

Use and Care
Page 30
... not due to your appliance was purchased, or call : 1-800-JENNAIR (1-800-536-6247) Accessories List For accessories, you are available from Jenn-Air Brand Home Appliances, Customer eXperience Centre. 30 A clear description of a service call : 1-800-807-6777. User's guides, service manuals and parts information are having . 5. U.S. It may save you the...
... not due to your appliance was purchased, or call : 1-800-JENNAIR (1-800-536-6247) Accessories List For accessories, you are available from Jenn-Air Brand Home Appliances, Customer eXperience Centre. 30 A clear description of a service call : 1-800-807-6777. User's guides, service manuals and parts information are having . 5. U.S. It may save you the...
Use and Care
Page 31
...WARRANTY This limited warranty does not cover: 1. DISCLAIMER OF IMPLIED WARRANTIES; JENN-AIR® COOKING APPLIANCE WARRANTY LIMITED WARRANTY For one year from the date of purchase, when this major appliance is reported to Jenn-Air within 30 days from the date of purchase. 6. This limited warranty is valid only... in a manner that have been removed, altered or cannot be borne by calling Jenn-Air. Outside the 50 United States and Canada, this ...
...WARRANTY This limited warranty does not cover: 1. DISCLAIMER OF IMPLIED WARRANTIES; JENN-AIR® COOKING APPLIANCE WARRANTY LIMITED WARRANTY For one year from the date of purchase, when this major appliance is reported to Jenn-Air within 30 days from the date of purchase. 6. This limited warranty is valid only... in a manner that have been removed, altered or cannot be borne by calling Jenn-Air. Outside the 50 United States and Canada, this ...

Warranty
Page 1
...PERIOD ALLOWED BY LAW. If you may find additional help by checking the "Assistance or Service" section or by a Jenn-Air designated service company. JENN-AIR® COOKING APPLIANCE WARRANTY LIMITED WARRANTY For one year from the date of purchase, when this major appliance is operated and... flood, acts of God, improper installation, installation not in which it is installed in an inaccessible location or is reported to Jenn-Air within 30 days from the date of purchase, when this appliance is operated and maintained according to instructions attached to or furnished with the ...
...PERIOD ALLOWED BY LAW. If you may find additional help by checking the "Assistance or Service" section or by a Jenn-Air designated service company. JENN-AIR® COOKING APPLIANCE WARRANTY LIMITED WARRANTY For one year from the date of purchase, when this major appliance is operated and... flood, acts of God, improper installation, installation not in which it is installed in an inaccessible location or is reported to Jenn-Air within 30 days from the date of purchase, when this appliance is operated and maintained according to instructions attached to or furnished with the ...
CAD
Page 1
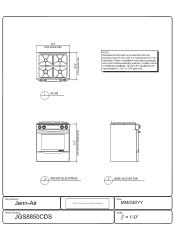
All Jenn-Airs appliances are appropriately UL, CUL or CSA approved. Do not make any cutouts based on this information. Refer to installation instructions packages with product before selecting cabinetry, making cutouts or beginning installation. APPLIANCE DIMENSION fl CD® CID® mla Mika 2 FRONT ELEVATION 3 SIDE ELEVATION [Manufacturer: Jenn-Air Model Number: JGS8850CDS JOARCHITECTURELogeoltennAir Bronchia white bgnjpg Date: MM/DD/YY Scale: 2 - 1 1 0" .A. 30 i" APPLIANCE DIM. 0 w ° N 00_ PLAN NOTE: Dimensional information is provided for planning purposes only.
All Jenn-Airs appliances are appropriately UL, CUL or CSA approved. Do not make any cutouts based on this information. Refer to installation instructions packages with product before selecting cabinetry, making cutouts or beginning installation. APPLIANCE DIMENSION fl CD® CID® mla Mika 2 FRONT ELEVATION 3 SIDE ELEVATION [Manufacturer: Jenn-Air Model Number: JGS8850CDS JOARCHITECTURELogeoltennAir Bronchia white bgnjpg Date: MM/DD/YY Scale: 2 - 1 1 0" .A. 30 i" APPLIANCE DIM. 0 w ° N 00_ PLAN NOTE: Dimensional information is provided for planning purposes only.