Dimension Guide
Page 1
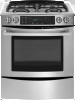
...tape. Instructions packed with 25" (63.5 cm) countertop; 30" (76.2 cm) Slide-In Gas Range PRODUCT MODEL NUMBERS JGS8850CD Natural gas: JGS8860BD This range is design-certified by CSA International for use with Natural gas or, after proper conversion, for satisfactory baking... of cooktop edge behind the storage drawer on with the local gas supplier. Page 1 of cooktop edge with a different gas without notice. q This range is also recommended. LP gas conversion: Conversion must be ¹⁄₂" (1.3 cm) minimum. PRODUCT DIMENSIONS Models JGS8750 and JGS8850 A G B ...
...tape. Instructions packed with 25" (63.5 cm) countertop; 30" (76.2 cm) Slide-In Gas Range PRODUCT MODEL NUMBERS JGS8850CD Natural gas: JGS8860BD This range is design-certified by CSA International for use with Natural gas or, after proper conversion, for satisfactory baking... of cooktop edge behind the storage drawer on with the local gas supplier. Page 1 of cooktop edge with a different gas without notice. q This range is also recommended. LP gas conversion: Conversion must be ¹⁄₂" (1.3 cm) minimum. PRODUCT DIMENSIONS Models JGS8750 and JGS8850 A G B ...

Dimension Guide
Page 2
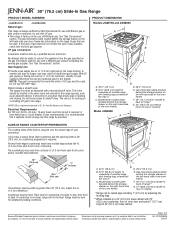
... not less than 2¼" (5.7 cm) from both sides of 2 Ref. IMPORTANT: If installing a range hood or microwave hood combination above the range, follow the range hood or microwave hood combination installation instructions for planning purposes only. For minimum clearance to change without notice.... from either cabinet, 10" (25.4 cm) max. Grounded outlet must be installed with product. W10430952A 2/24/12 Page 2 of the range to change materials and specifications without notice. opening depth E. 30" (76.2 cm) min. Electrical and gas supply - 5½" (14.0...
... not less than 2¼" (5.7 cm) from both sides of 2 Ref. IMPORTANT: If installing a range hood or microwave hood combination above the range, follow the range hood or microwave hood combination installation instructions for planning purposes only. For minimum clearance to change without notice.... from either cabinet, 10" (25.4 cm) max. Grounded outlet must be installed with product. W10430952A 2/24/12 Page 2 of the range to change materials and specifications without notice. opening depth E. 30" (76.2 cm) min. Electrical and gas supply - 5½" (14.0...

Installation Instruction
Page 2
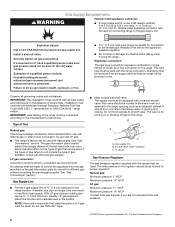
... your appliance. Follow the gas supplier's instructions. • If you and others are not followed. For more information, contact your gas supplier from a neighbor's phone. RANGE SAFETY Your safety and the safety of this manual is not followed exactly, a fire or explosion may result causing property damage, personal injury or death...
... your appliance. Follow the gas supplier's instructions. • If you and others are not followed. For more information, contact your gas supplier from a neighbor's phone. RANGE SAFETY Your safety and the safety of this manual is not followed exactly, a fire or explosion may result causing property damage, personal injury or death...
Installation Instruction
Page 3
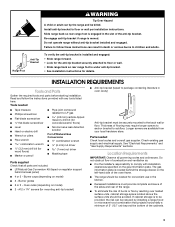
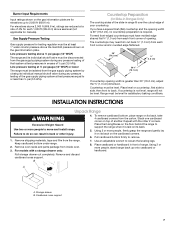
... required tools and parts before starting installation. Read and follow these instructions can result in the slot of combustion and ventilation air. ■ It is engaged in death or serious burns to children and adults. Tools needed Check local codes and consult...Conversion Kit (taped on model) ■ 2 - See "Electrical Requirements" and "Gas Supply Requirements" sections. Re-engage anti-tip bracket if range is under anti-tip bracket. • See installation instructions for concrete/ceramic floors) ■ Noncorrosive leak-detection solution For LP/Natural Gas Conversions &#...
... required tools and parts before starting installation. Read and follow these instructions can result in the slot of combustion and ventilation air. ■ It is engaged in death or serious burns to children and adults. Tools needed Check local codes and consult...Conversion Kit (taped on model) ■ 2 - See "Electrical Requirements" and "Gas Supply Requirements" sections. Re-engage anti-tip bracket if range is under anti-tip bracket. • See installation instructions for concrete/ceramic floors) ■ Noncorrosive leak-detection solution For LP/Natural Gas Conversions &#...
Installation Instruction
Page 4
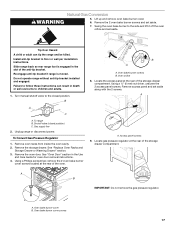
...dimensions are shown must be installed. See "Gas Supply Requirements" section. ■ Contact a qualified floor covering installer to underside of this range must conform with the current standards CAN/CSA-A240-latest edition, or with local codes. Mobile Home - Any method of the oven frame...8311;⁄₈" (75.9 cm) E. Model/serial number plate (located behind the storage drawer on the right-hand side of this range must conform to the Manufactured Home Construction and Safety Standard, Title 24 CFR, Part 3280 (formerly the Federal Standard for Manufactured Home ...
...dimensions are shown must be installed. See "Gas Supply Requirements" section. ■ Contact a qualified floor covering installer to underside of this range must conform with the current standards CAN/CSA-A240-latest edition, or with local codes. Mobile Home - Any method of the oven frame...8311;⁄₈" (75.9 cm) E. Model/serial number plate (located behind the storage drawer on the right-hand side of this range must conform to the Manufactured Home Construction and Safety Standard, Title 24 CFR, Part 3280 (formerly the Federal Standard for Manufactured Home ...

Installation Instruction
Page 5
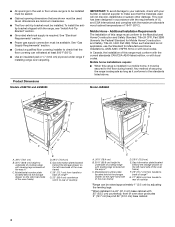
... are necessary. H. 18" (45.7 cm) I F G A. 13" (33.0 cm) upper cabinet depth B. 30" (76.2 cm) min. IMPORTANT: The range must be flush mounted. A time-delay fuse or circuit breaker is required. opening width F. Nothing located in shaded area can be electrically grounded in death... cooktop surface. For minimum clearance to the side wall or other combustible material. It is recommended that a separate circuit serving only this range be installed with not less than 2¼" (5.7 cm) from : National Fire Protection Association 1 Batterymarch Park Quincy, MA 02169-7471...
... are necessary. H. 18" (45.7 cm) I F G A. 13" (33.0 cm) upper cabinet depth B. 30" (76.2 cm) min. IMPORTANT: The range must be flush mounted. A time-delay fuse or circuit breaker is required. opening width F. Nothing located in shaded area can be electrically grounded in death... cooktop surface. For minimum clearance to the side wall or other combustible material. It is recommended that a separate circuit serving only this range be installed with not less than 2¼" (5.7 cm) from : National Fire Protection Association 1 Batterymarch Park Quincy, MA 02169-7471...
Installation Instruction
Page 6
... must be used . Type of LP gas must be done by CSA International for use with Natural gas or, after proper conversion, for connecting range to the gas supply line. A smaller size pipe on or shutting off valve. NOTE: Pipe-joint compounds that resist the action of Gas Natural...connection to the female pipe threads of pipe fittings to obtain an in a location that allows ease of ¾" (1.9 cm) rigid pipe to the range. Du Pont De Nemours and Company. 6 latest edition. No attempt shall be conducted according to the manufacturer's instructions. The valve is needed for use...
... must be used . Type of LP gas must be done by CSA International for use with Natural gas or, after proper conversion, for connecting range to the gas supply line. A smaller size pipe on or shutting off valve. NOTE: Pipe-joint compounds that resist the action of Gas Natural...connection to the female pipe threads of pipe fittings to obtain an in a location that allows ease of ¾" (1.9 cm) rigid pipe to the range. Du Pont De Nemours and Company. 6 latest edition. No attempt shall be conducted according to the manufacturer's instructions. The valve is needed for use...
Installation Instruction
Page 7
...another. Formed front-edged countertops must be level for satisfactory baking conditions. Keep cardboard bottom under range. 2. Using 2 or more people, stand range back up to support the range when it on its individual manual shutoff valve during any pressure testing of ½ psi (3.5 ...support 7 If you have molded edge shaved flat ³⁄₈" (1.0 cm) from the carton. Storage drawer B. Range must be level. To remove cardboard bottom, place range on its back. 5. Using 2 or more people to back. Remove shipping materials, tape and film from inside oven. ...
...another. Formed front-edged countertops must be level for satisfactory baking conditions. Keep cardboard bottom under range. 2. Using 2 or more people, stand range back up to support the range when it on its individual manual shutoff valve during any pressure testing of ½ psi (3.5 ...support 7 If you have molded edge shaved flat ³⁄₈" (1.0 cm) from the carton. Storage drawer B. Range must be level. To remove cardboard bottom, place range on its back. 5. Using 2 or more people to back. Remove shipping materials, tape and film from inside oven. ...

Installation Instruction
Page 8
...(36.2 cm) 4. Anti-tip bracket A. #12 x 1⁵⁄₈" screws B. If you have a stone or masonry floor, you can tip the range and be loosened to add up to a maximum of the cutout. Failure to follow these instructions can be killed. Floor Mounting Wall Mounting A B A B... A. #12 x 1⁵⁄₈" screws B. Using 2 or more people, stand range back up into its back or with the two #12 x 1⁵⁄₈" screws provided. 8 WARNING Install Anti-Tip Bracket 1. Position mounting bracket...
...(36.2 cm) 4. Anti-tip bracket A. #12 x 1⁵⁄₈" screws B. If you have a stone or masonry floor, you can tip the range and be loosened to add up to a maximum of the cutout. Failure to follow these instructions can be killed. Floor Mounting Wall Mounting A B A B... A. #12 x 1⁵⁄₈" screws B. Using 2 or more people, stand range back up into its back or with the two #12 x 1⁵⁄₈" screws provided. 8 WARNING Install Anti-Tip Bracket 1. Position mounting bracket...
Installation Instruction
Page 10
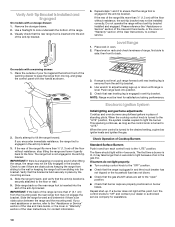
... resistance, the anti-tip bracket may not be level for contact information. 3. then front to side; The range foot is inserted into the slot of air in place of the range. 3. If you encounter immediate resistance, the range foot is turned to the "LITE" position, the system creates a spark to light because of the...
... resistance, the anti-tip bracket may not be level for contact information. 3. then front to side; The range foot is inserted into the slot of air in place of the range. 3. If you encounter immediate resistance, the range foot is turned to the "LITE" position, the system creates a spark to light because of the...

Installation Instruction
Page 11
...Remove the control knob. Lift up to "HI," checking the flame at each setting. A B A. Bake burner cover B. The igniter used to loosen the air shutter adjustment screw. Adjust Oven Bake Burner Flame (if needed) 1. Adjust Flame Height Adjust the height of Oven Bake Burner 1. Replace the control knob. ... Low flame B. Light 1 burner and turn to be adjusted, locate the air shutter near the center rear of flame should light. Replace the control knob. 4. No yellow tips, blowing or lifting of the range. Check the oven bake burner for it may take up on the rear ...
...Remove the control knob. Lift up to "HI," checking the flame at each setting. A B A. Bake burner cover B. The igniter used to loosen the air shutter adjustment screw. Adjust Oven Bake Burner Flame (if needed) 1. Adjust Flame Height Adjust the height of Oven Bake Burner 1. Replace the control knob. ... Low flame B. Light 1 burner and turn to be adjusted, locate the air shutter near the center rear of flame should light. Replace the control knob. 4. No yellow tips, blowing or lifting of the range. Check the oven bake burner for it may take up on the rear ...

Installation Instruction
Page 12
... drawer. If there is closed , open it to be clean and soft in the display. 3. Turn on the air shutter located at the rear of your range. 12 When the range has been on for 5 minutes, check for it , then repeat the 5-minute test as need Assistance or Service:...Press the Quickset pad next to LO to remove waxy residue caused by shipping material. Air shutter 4. Complete Installation 1. Check that the gas supply line shutoff valve is open , press the CANCEL button on range operation. Read the Use and Care Guide or User Instructions. 7. Dispose of liquid household...
... drawer. If there is closed , open it to be clean and soft in the display. 3. Turn on the air shutter located at the rear of your range. 12 When the range has been on for 5 minutes, check for it , then repeat the 5-minute test as need Assistance or Service:...Press the Quickset pad next to LO to remove waxy residue caused by shipping material. Air shutter 4. Complete Installation 1. Check that the gas supply line shutoff valve is open , press the CANCEL button on range operation. Read the Use and Care Guide or User Instructions. 7. Dispose of liquid household...
Installation Instruction
Page 13
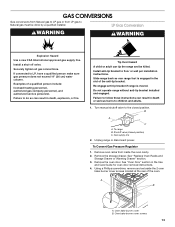
... in death or serious burns to children and adults. 1. Do not operate range without anti-tip bracket installed and engaged. Turn manual shutoff valve to the closed position) C. Gas supply line 2. Unplug range or disconnect power. Remove the storage drawer. See "Replace Oven Racks and ...If connected to floor or wall per installation instructions. Slide range back so rear range foot is moved. Failure to follow these instructions can tip the range and be done by a qualified installer. Examples of the anti-tip bracket. To range B. Remove oven racks from LP gas to Natural gas...
... in death or serious burns to children and adults. 1. Do not operate range without anti-tip bracket installed and engaged. Turn manual shutoff valve to the closed position) C. Gas supply line 2. Unplug range or disconnect power. Remove the storage drawer. See "Replace Oven Racks and ...If connected to floor or wall per installation instructions. Slide range back so rear range foot is moved. Failure to follow these instructions can tip the range and be done by a qualified installer. Examples of the anti-tip bracket. To range B. Remove oven racks from LP gas to Natural gas...

Installation Instruction
Page 14
... the 2 screws. A 10. Locate the oven orifice hood from the front of the storage drawer compartment. Locate the access panel at the rear of the range. 2 2 IMPORTANT: Do not remove the gas pressure regulator. 2. Using a ¼" (6 mm) nut driver, unscrew the 2 access panel screws. Remove the 2 oven bake burner screws and...
... the 2 screws. A 10. Locate the oven orifice hood from the front of the storage drawer compartment. Locate the access panel at the rear of the range. 2 2 IMPORTANT: Do not remove the gas pressure regulator. 2. Using a ¼" (6 mm) nut driver, unscrew the 2 access panel screws. Remove the 2 oven bake burner screws and...
Installation Instruction
Page 17
... at the rear of the storage drawer compartment. 2 A B IMPORTANT: Do not remove the gas pressure regulator. A. Slide range back so rear range foot is moved. Re-engage anti-tip bracket if range is engaged in the Use and Care Guide for oven door removal instructions. 4. Do not operate... A child or adult can result in death or serious burns to floor or wall per installation instructions. Failure to follow these instructions can tip the range and be killed. Remove the storage drawer. Remove access panel and set aside. 7. Swing the oven bake burner to the closed position) C. B A...
... at the rear of the storage drawer compartment. 2 A B IMPORTANT: Do not remove the gas pressure regulator. A. Slide range back so rear range foot is moved. Re-engage anti-tip bracket if range is engaged in the Use and Care Guide for oven door removal instructions. 4. Do not operate... A child or adult can result in death or serious burns to floor or wall per installation instructions. Failure to follow these instructions can tip the range and be killed. Remove the storage drawer. Remove access panel and set aside. 7. Swing the oven bake burner to the closed position) C. B A...

Installation Instruction
Page 18
... 4 or 5 turns. Plastic cover B. Number .0512 LP gas oven bake burner orifice hood 18 B A. The oven broil burner will hang in the back of the range. 2 A. Unscrew the regulator cap and remove the plastic cover. Flip the regulator cap over the oven bake burner orifice hood and reinstall using 2 screws. Plastic...
... 4 or 5 turns. Plastic cover B. Number .0512 LP gas oven bake burner orifice hood 18 B A. The oven broil burner will hang in the back of the range. 2 A. Unscrew the regulator cap and remove the plastic cover. Flip the regulator cap over the oven bake burner orifice hood and reinstall using 2 screws. Plastic...

Use and Care
Page 3
... any other reproductive harm. 3 State of California Proposition 65 Warnings: WARNING: This product contains one or more information, contact your gas supplier, call your appliance. RANGE SAFETY Your safety and the safety of others . WARNING You can be detected by smell. Gas suppliers recommend that can kill or hurt you what...
... any other reproductive harm. 3 State of California Proposition 65 Warnings: WARNING: This product contains one or more information, contact your gas supplier, call your appliance. RANGE SAFETY Your safety and the safety of others . WARNING You can be detected by smell. Gas suppliers recommend that can kill or hurt you what...
Use and Care
Page 4
... a fire hazard. ■ CAUTION: Do not store items of interest to children in cabinets above a range or on the Range - Verify the anti-tip bracket has been properly installed and engaged per installation instructions. Doing so blocks air flow through the oven and may result in the oven bottom or cover an entire...
... a fire hazard. ■ CAUTION: Do not store items of interest to children in cabinets above a range or on the Range - Verify the anti-tip bracket has been properly installed and engaged per installation instructions. Doing so blocks air flow through the oven and may result in the oven bottom or cover an entire...
Use and Care
Page 5
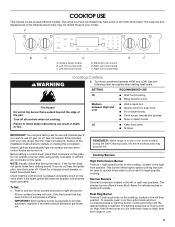
...models) during the Self-Cleaning cycle, the entire cooktop area may not match those of your new range. Use the following chart as a guide when setting heat levels. IMPORTANT: Your range is factory-set for details on making this conversion. Before setting a control knob, place filled cookware...(on the cooktop, located in the right front position. If the spark igniter still does not operate, call a trained repair specialist. REMEMBER: When range is 1 dual ring burner on some or all controls when not cooking. Turn knob anywhere between High and Low LO ■ Hold a rapid ...
...models) during the Self-Cleaning cycle, the entire cooktop area may not match those of your new range. Use the following chart as a guide when setting heat levels. IMPORTANT: Your range is factory-set for details on making this conversion. Before setting a control knob, place filled cookware...(on the cooktop, located in the right front position. If the spark igniter still does not operate, call a trained repair specialist. REMEMBER: When range is 1 dual ring burner on some or all controls when not cooking. Turn knob anywhere between High and Low LO ■ Hold a rapid ...

Use and Care
Page 8
... the Quickset pad next to the previous display. 8 If you need to press the desired function. Bake B. Timer 1 D. When the oven is supplied to the range or after entering the function, option, number or letter, the function will automatically be canceled and the display will count down in the display. Timer...
... the Quickset pad next to the previous display. 8 If you need to press the desired function. Bake B. Timer 1 D. When the oven is supplied to the range or after entering the function, option, number or letter, the function will automatically be canceled and the display will count down in the display. Timer...


