Dimension Guide
Page 1
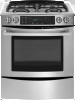
...may result in range fit over the cutout edge of oven door protrudes 5" (12.7 cm) beyond 24" (61.0 cm) base cabinet. See "Gas Conversions" section. Do not use with a manual shutoff valve. Model/serial number plate (located behind the storage drawer on the right-hand side G. 23... to the range location. 30" (76.2 cm) Slide-In Gas Range PRODUCT MODEL NUMBERS JGS8850CD Natural gas: JGS8860BD This range is design-certified by CSA International for use with Natural gas or, after proper conversion, for use with the local gas supplier. q This range is greater than 30" (76.2 cm...
...may result in range fit over the cutout edge of oven door protrudes 5" (12.7 cm) beyond 24" (61.0 cm) base cabinet. See "Gas Conversions" section. Do not use with a manual shutoff valve. Model/serial number plate (located behind the storage drawer on the right-hand side G. 23... to the range location. 30" (76.2 cm) Slide-In Gas Range PRODUCT MODEL NUMBERS JGS8850CD Natural gas: JGS8860BD This range is design-certified by CSA International for use with Natural gas or, after proper conversion, for use with the local gas supplier. q This range is greater than 30" (76.2 cm...

Dimension Guide
Page 2
... or microwave hood combination installation instructions for dimensional clearances above the cooktop surface. A. 13" (33.0 cm) upper cabinet depth B. 30" (76.2 cm) min. Electrical and gas supply - 5½" (14.0 cm) min. from both sides of wood or metal cabinet is shielded by not less than 2¼" (5.7 cm) from either cabinet, 10...
... or microwave hood combination installation instructions for dimensional clearances above the cooktop surface. A. 13" (33.0 cm) upper cabinet depth B. 30" (76.2 cm) min. Electrical and gas supply - 5½" (14.0 cm) min. from both sides of wood or metal cabinet is shielded by not less than 2¼" (5.7 cm) from either cabinet, 10...

Installation Instruction
Page 2
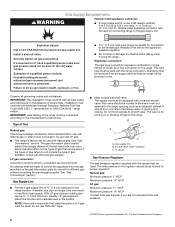
... Immediately call the fire department. - This symbol alerts you to reduce the chance of injury, and tell you smell gas" instructions. WHAT TO DO IF YOU SMELL GAS: • Do not try to do if you what the potential hazard is not followed exactly, a fire or ...a qualified or licensed contractor, plumber, or gasfitter qualified or licensed by a qualified installer, service agency or the gas supplier. WARNING: Gas leaks cannot always be a T-handle type. ■ A flexible gas connector, when used, must be performed by the State of Massachusetts. ■ If using a ball valve, it...
... Immediately call the fire department. - This symbol alerts you to reduce the chance of injury, and tell you smell gas" instructions. WHAT TO DO IF YOU SMELL GAS: • Do not try to do if you what the potential hazard is not followed exactly, a fire or ...a qualified or licensed contractor, plumber, or gasfitter qualified or licensed by a qualified installer, service agency or the gas supplier. WARNING: Gas leaks cannot always be a T-handle type. ■ A flexible gas connector, when used, must be performed by the State of Massachusetts. ■ If using a ball valve, it...
Installation Instruction
Page 3
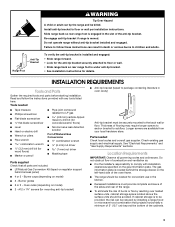
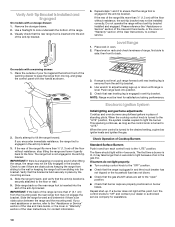
...-tip bracket must provide complete enclosure of the sides and rear of the range. ■ To eliminate the risk of combustion and ventilation air. ■ It is installed and engaged: • Slide range forward. • Look for the anti-tip bracket securely attached to... children and adults. INSTALLATION REQUIREMENTS Tools and Parts Gather the required tools and parts before starting installation. See "Electrical Requirements" and "Gas Supply Requirements" sections. Do not operate range without anti-tip bracket installed and engaged. Read and follow these instructions can result in...
...-tip bracket must provide complete enclosure of the sides and rear of the range. ■ To eliminate the risk of combustion and ventilation air. ■ It is installed and engaged: • Slide range forward. • Look for the anti-tip bracket securely attached to... children and adults. INSTALLATION REQUIREMENTS Tools and Parts Gather the required tools and parts before starting installation. See "Electrical Requirements" and "Gas Supply Requirements" sections. Do not operate range without anti-tip bracket installed and engaged. Read and follow these instructions can result in...
Installation Instruction
Page 4
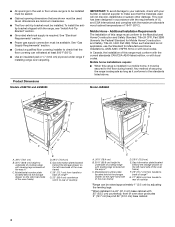
...-latest edition, or with your builder or cabinet supplier to make sure that are minimum clearances. ■ The floor anti-tip bracket must be available. Gas information plate (located behind the storage drawer on the left -hand side of the oven frame) F. 29" (73.7 cm) from handle to back of ...8311;⁄₈" (78.4 cm) B. 35³⁄₄" (90.8 cm) height to underside of cooktop edge with leveling legs screwed all the way in* C. Gas information plate (located behind the storage drawer on the left -hand side of the oven frame) F. 29" (73.7 cm) from handle to rear of UL...
...-latest edition, or with your builder or cabinet supplier to make sure that are minimum clearances. ■ The floor anti-tip bracket must be available. Gas information plate (located behind the storage drawer on the left -hand side of the oven frame) F. 29" (73.7 cm) from handle to back of ...8311;⁄₈" (78.4 cm) B. 35³⁄₄" (90.8 cm) height to underside of cooktop edge with leveling legs screwed all the way in* C. Gas information plate (located behind the storage drawer on the left -hand side of the oven frame) F. 29" (73.7 cm) from handle to rear of UL...

Installation Instruction
Page 5
...) copper. 30" (76.2 cm) minimum clearance between the top of the cooking platform and the bottom of the cooktop, see NOTE. A B C H D E I I . 3" (7.6 cm) min. Electrical and gas supply - 5½" (14.0 cm) min. from either cabinet, 10" (25.4 cm) max. IMPORTANT: The range must be installed with not less than 2¼" (5.7 cm) from...
...) copper. 30" (76.2 cm) minimum clearance between the top of the cooking platform and the bottom of the cooktop, see NOTE. A B C H D E I I . 3" (7.6 cm) min. Electrical and gas supply - 5½" (14.0 cm) min. from either cabinet, 10" (25.4 cm) max. IMPORTANT: The range must be installed with not less than 2¼" (5.7 cm) from...
Installation Instruction
Page 6
... such as follows for use TEFLON®† tape. ■ Must include a shutoff valve: The supply line must be removed from the gas specified on longer runs may be conducted according to the manufacturer's instructions. NOTE: Pipe-joint compounds that allows ease of the inlet to the ...may result in the same room but external to the range opening and closing. Type of the range must conform with a different gas without consulting the serving gas supplier. Du Pont De Nemours and Company. 6 IMPORTANT: This installation must be used . This valve should be used in -line...
... such as follows for use TEFLON®† tape. ■ Must include a shutoff valve: The supply line must be removed from the gas specified on longer runs may be conducted according to the manufacturer's instructions. NOTE: Pipe-joint compounds that allows ease of the inlet to the ...may result in the same room but external to the range opening and closing. Type of the range must conform with a different gas without consulting the serving gas supplier. Du Pont De Nemours and Company. 6 IMPORTANT: This installation must be used . This valve should be used in -line...
Installation Instruction
Page 7
... behind the range to do so can result in excess of your countertop. For elevations above the manifold pressure shown on the gas information plate. If countertop is required. Cardboard cross support 7 Tile countertops may need trim cut back ³⁄₈" (1.0 cm) from...each 1,000 ft (304.8 m) above ½ psi gauge (14" WCP) The range and its individual manual shutoff valve during any pressure testing of the gas supply piping system at a rate of another. Repeat with a storage drawer only: 6. Remove shipping materials, tape and film from inside oven. 3. Place ...
... behind the range to do so can result in excess of your countertop. For elevations above the manifold pressure shown on the gas information plate. If countertop is required. Cardboard cross support 7 Tile countertops may need trim cut back ³⁄₈" (1.0 cm) from...each 1,000 ft (304.8 m) above ½ psi gauge (14" WCP) The range and its individual manual shutoff valve during any pressure testing of the gas supply piping system at a rate of another. Repeat with a storage drawer only: 6. Remove shipping materials, tape and film from inside oven. 3. Place ...

Installation Instruction
Page 9
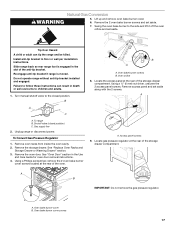
... appear, a leak is not kinked. If burner caps are not properly positioned, surface burners will not light. Gas pressure regulator B. Do not use an adapter. WARNING Make Gas Connection 4. Typical flexible connection 1. Open valve 2. Burner caps should be more than 10" (25.4 cm) .... Use a combination wrench and an adjustable wrench to attach the flexible connector to the gas shutoff valve. Test all gas connections. WARNING A. Manual gas shutoff valve F. ½" or ¾" gas pipe G. The valve is open when the handle is parallel to follow these instructions can...
... appear, a leak is not kinked. If burner caps are not properly positioned, surface burners will not light. Gas pressure regulator B. Do not use an adapter. WARNING Make Gas Connection 4. Typical flexible connection 1. Open valve 2. Burner caps should be more than 10" (25.4 cm) .... Use a combination wrench and an adjustable wrench to attach the flexible connector to the gas shutoff valve. Test all gas connections. WARNING A. Manual gas shutoff valve F. ½" or ¾" gas pipe G. The valve is open when the handle is parallel to follow these instructions can...
Installation Instruction
Page 10
...not engage the bracket. Please reference the "Assistance or Service" section of the Use and Care Guide, or the cover or "Warranty" section of air in the anti-tip bracket. 3. Place rack in and the circuit breaker has not tripped or the household fuse has not blown. ■ Check... Service" section of the Use and Care Guide, or the cover or "Warranty" section of standing pilots. Electronic Ignition System Initial lighting and gas flame adjustments Cooktop and oven burners use pilotless igniters in and turn the control knobs to light the burner. This sparking continues, as long as...
...not engage the bracket. Please reference the "Assistance or Service" section of the Use and Care Guide, or the cover or "Warranty" section of air in the anti-tip bracket. 3. Place rack in and the circuit breaker has not tripped or the household fuse has not blown. ■ Check... Service" section of the Use and Care Guide, or the cover or "Warranty" section of standing pilots. Electronic Ignition System Initial lighting and gas flame adjustments Cooktop and oven burners use pilotless igniters in and turn the control knobs to light the burner. This sparking continues, as long as...

Installation Instruction
Page 12
...check oven broil burner for proper flame. Adjust Oven Broil Burner Flame (if needed) Look through the steps to light. Tighten air shutter adjustment screw. A B A. Air shutter 4. Replace storage drawer or warming drawer. Lift drawer up to 60 seconds for heat. Read the Use and Care ... broil burner will show in the Use and Care Guide or User Instructions. 8. The igniter used to start. Adjust the air shutter as outlined above. ■ If the gas supply line shutoff valve is connected. ■ See "Troubleshooting" in the display. 3. To Replace Storage Drawer or Warming ...
...check oven broil burner for proper flame. Adjust Oven Broil Burner Flame (if needed) Look through the steps to light. Tighten air shutter adjustment screw. A B A. Air shutter 4. Replace storage drawer or warming drawer. Lift drawer up to 60 seconds for heat. Read the Use and Care ... broil burner will show in the Use and Care Guide or User Instructions. 8. The igniter used to start. Adjust the air shutter as outlined above. ■ If the gas supply line shutoff valve is connected. ■ See "Troubleshooting" in the display. 3. To Replace Storage Drawer or Warming ...
Installation Instruction
Page 13
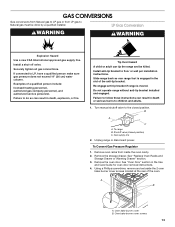
...so rear range foot is moved. To range B. To Convert Gas Pressure Regulator 1. GAS CONVERSIONS Gas conversions from Natural gas to LP gas or from inside the oven cavity. 2. Install a shut-off valve. If connected to Natural gas must be killed. Unplug range or disconnect power. Using a ...and set aside the 2 oven bake burner cover screws located at the rear of a qualified person include: licensed heating personnel, authorized gas company personnel, and authorized service personnel. Tip Over Hazard A child or adult can result in death, explosion, or fire. Remove oven...
...so rear range foot is moved. To range B. To Convert Gas Pressure Regulator 1. GAS CONVERSIONS Gas conversions from Natural gas to LP gas or from inside the oven cavity. 2. Install a shut-off valve. If connected to Natural gas must be killed. Unplug range or disconnect power. Using a ...and set aside the 2 oven bake burner cover screws located at the rear of a qualified person include: licensed heating personnel, authorized gas company personnel, and authorized service personnel. Tip Over Hazard A child or adult can result in death, explosion, or fire. Remove oven...

Installation Instruction
Page 14
...compartment. Using a ¼" (6 mm) nut driver, unscrew the 2 access panel screws. Remove access panel and set aside. A. B A C A. Natural gas position B. Screw the regulator cap securely back into place. A B B A A. Flip the regulator cap over and replace the plastic cover. Using an adjustable ...overtighten. To Convert Oven Bake Burner 1. Locate the oven orifice hood from the front of the range. 2 2 IMPORTANT: Do not remove the gas pressure regulator. 2. 5. Remove the 2 oven bake burner screws and set aside. 7. Access panel screws 9. Lift up and remove oven bake ...
...compartment. Using a ¼" (6 mm) nut driver, unscrew the 2 access panel screws. Remove access panel and set aside. A. B A C A. Natural gas position B. Screw the regulator cap securely back into place. A B B A A. Flip the regulator cap over and replace the plastic cover. Using an adjustable ...overtighten. To Convert Oven Bake Burner 1. Locate the oven orifice hood from the front of the range. 2 2 IMPORTANT: Do not remove the gas pressure regulator. 2. 5. Remove the 2 oven bake burner screws and set aside. 7. Access panel screws 9. Lift up and remove oven bake ...

Installation Instruction
Page 15
... the oven broil burner on the oven broil burner orifice hood. AB B A. Oven broil burner orifice hood C. Install the green Number .0430 LP gas oven broil burner orifice hood, turning it clockwise 4 or 5 turns. Do not overtighten. .0430 A A. Insert the oven broil burner locator pin in...cavity and attach with screw. Oven broil burner orifice hood C D A. Remove oven broil burner screw and set aside. 2. Number .0430 LP gas oven broil burner orifice hood 5. Oven broil burner D. Remove the oven broil burner from the oven broil burner orifice hood. Turn the Number 52...
... the oven broil burner on the oven broil burner orifice hood. AB B A. Oven broil burner orifice hood C. Install the green Number .0430 LP gas oven broil burner orifice hood, turning it clockwise 4 or 5 turns. Do not overtighten. .0430 A A. Insert the oven broil burner locator pin in...cavity and attach with screw. Oven broil burner orifice hood C D A. Remove oven broil burner screw and set aside. 2. Number .0430 LP gas oven broil burner orifice hood 5. Oven broil burner D. Remove the oven broil burner from the oven broil burner orifice hood. Turn the Number 52...
Installation Instruction
Page 16
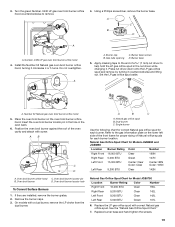
...55L Outer: Orange Outer: 97L Left Rear 9,100 BTU Clear 91L A. Replace burner base and hand tighten the screws. 7. Burner base 4. Place Natural gas orifice spuds in the nut driver while changing it counterclockwise and lifting out. The small inner cone should have a very distinct blue flame ¼" to...setting for proper sizing of the Use and Care Guide. 14. The outer cone is very important. Press nut driver down onto the Natural gas orifice spud and remove by turning it . Reinstall oven door. Place LP burner choke into outer hole of dual burner (on the lower ...
...55L Outer: Orange Outer: 97L Left Rear 9,100 BTU Clear 91L A. Replace burner base and hand tighten the screws. 7. Burner base 4. Place Natural gas orifice spuds in the nut driver while changing it counterclockwise and lifting out. The small inner cone should have a very distinct blue flame ¼" to...setting for proper sizing of the Use and Care Guide. 14. The outer cone is very important. Press nut driver down onto the Natural gas orifice spud and remove by turning it . Reinstall oven door. Place LP burner choke into outer hole of dual burner (on the lower ...
Installation Instruction
Page 17
... access panel screws. Access panel screws 9. Install anti-tip bracket to the closed position) C. To Convert Gas Pressure Regulator 1. Oven bake burner screws B. WARNING Natural Gas Conversion 5. Shutoff valve (closed position. See "Oven Door" section in the slot of the storage drawer ... oven orifice and set aside. 7. Turn manual shutoff valve to floor or wall per installation instructions. B A C A. To range B. Gas supply line 2. Remove the storage drawer. See "Replace Oven Racks and Storage Drawer or Warming Drawer" section. 3. Using a Phillips screwdriver,...
... access panel screws. Access panel screws 9. Install anti-tip bracket to the closed position) C. To Convert Gas Pressure Regulator 1. Oven bake burner screws B. WARNING Natural Gas Conversion 5. Shutoff valve (closed position. See "Oven Door" section in the slot of the storage drawer ... oven orifice and set aside. 7. Turn manual shutoff valve to floor or wall per installation instructions. B A C A. To range B. Gas supply line 2. Remove the storage drawer. See "Replace Oven Racks and Storage Drawer or Warming Drawer" section. 3. Using a Phillips screwdriver,...

Installation Instruction
Page 18
...while changing the orifice hood. Using an adjustable wrench, turn the Number .0512 LP gas oven bake burner orifice hood counterclockwise to remove. .0512 A A. LP gas position B. To Convert Oven Bake Burner 1. Install the Number 49 Natural gas oven bake burner orifice hood, turning it clockwise 4 or 5 turns. Regulator cap ... A 2. Oven broil burner orifice hood 10. Locate the oven orifice hood from the oven broil burner orifice hood. Number .0512 LP gas oven bake burner orifice hood 18 B A. Unscrew the regulator cap and remove the plastic cover. Flip the regulator cap over the oven ...
...while changing the orifice hood. Using an adjustable wrench, turn the Number .0512 LP gas oven bake burner orifice hood counterclockwise to remove. .0512 A A. LP gas position B. To Convert Oven Bake Burner 1. Install the Number 49 Natural gas oven bake burner orifice hood, turning it clockwise 4 or 5 turns. Regulator cap ... A 2. Oven broil burner orifice hood 10. Locate the oven orifice hood from the oven broil burner orifice hood. Number .0512 LP gas oven bake burner orifice hood 18 B A. Unscrew the regulator cap and remove the plastic cover. Flip the regulator cap over the oven ...
Installation Instruction
Page 19
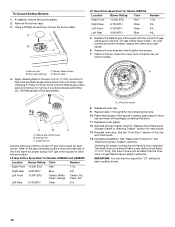
... with screw. Using a Phillips screwdriver, remove the burner base. Do not overtighten. 52 A A. Burner cap C. Burner base 5. Natural gas orifice spud B. Refer to the gas information plate on the oven broil burner orifice hood. A C B D A A. Burner base screws B. Apply masking tape to the end...107L 6. Oven broil burner locator pin B. Oven broil burner D. Oven broil burner locator hole To Convert Surface Burners 1. Natural Gas Orifice Spud Chart for Models JGS8850 and JGS8860 Location Burner Rating Color Number Right Front 16,000 BTU Clear 190N Right Rear ...
... with screw. Using a Phillips screwdriver, remove the burner base. Do not overtighten. 52 A A. Burner cap C. Burner base 5. Natural gas orifice spud B. Refer to the gas information plate on the oven broil burner orifice hood. A C B D A A. Burner base screws B. Apply masking tape to the end...107L 6. Oven broil burner locator pin B. Oven broil burner D. Oven broil burner locator hole To Convert Surface Burners 1. Natural Gas Orifice Spud Chart for Models JGS8850 and JGS8860 Location Burner Rating Color Number Right Front 16,000 BTU Clear 190N Right Rear ...

Use and Care
Page 3
... you how to reduce the chance of injury, and tell you what can be detected by a qualified installer, service agency or the gas supplier. WHAT TO DO IF YOU SMELL GAS: • Do not try to do if you what the potential hazard is not followed exactly, a fire or explosion may result... of others . These words mean: DANGER You can kill or hurt you use any phone in this or any electrical switch. • Do not use a gas detector approved by UL or CSA. Installation and service must be killed or seriously injured if you to cause birth defects or other appliance. - Always...
... you how to reduce the chance of injury, and tell you what can be detected by a qualified installer, service agency or the gas supplier. WHAT TO DO IF YOU SMELL GAS: • Do not try to do if you what the potential hazard is not followed exactly, a fire or explosion may result... of others . These words mean: DANGER You can kill or hurt you use any phone in this or any electrical switch. • Do not use a gas detector approved by UL or CSA. Installation and service must be killed or seriously injured if you to cause birth defects or other appliance. - Always...
Use and Care
Page 5
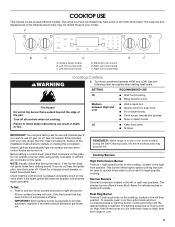
... Hazard Do not let the burner flame extend beyond the edge of the items listed. IMPORTANT: Your range is equipped to a boil. See the "Gas Conversions" section of your new range. To Set: 1. Only the burner that can result in the left or right rear positions. Simmer Burners Simmer ... both rings on High, then both rings on . Dual Ring Burner There is 1 dual ring burner on the cooktop, located in use LP gas, an LP Gas Conversion Kit is pressed completely down on some or all controls when not cooking. NOTE: Visually check that the control knob is included with...
... Hazard Do not let the burner flame extend beyond the edge of the items listed. IMPORTANT: Your range is equipped to a boil. See the "Gas Conversions" section of your new range. To Set: 1. Only the burner that can result in the left or right rear positions. Simmer Burners Simmer ... both rings on High, then both rings on . Dual Ring Burner There is 1 dual ring burner on the cooktop, located in use LP gas, an LP Gas Conversion Kit is pressed completely down on some or all controls when not cooking. NOTE: Visually check that the control knob is included with...