

User Manual
Page 1
... Control with Mouse Function & Laser Pointer 9 Installation 10 Connecting the Projector 10 Powering On/Off the Projector 11 Powering On the Projector 11 Powering Off the projector 12 Warning Indicator ...12 Adjusting the Projected Image 13 Adjusting the Projector Image Height 13 Adjusting the Projector Zoom / Focus 14 Adjusting Projected Image Size 14 User Controls 15...
... Control with Mouse Function & Laser Pointer 9 Installation 10 Connecting the Projector 10 Powering On/Off the Projector 11 Powering On the Projector 11 Powering Off the projector 12 Warning Indicator ...12 Adjusting the Projected Image 13 Adjusting the Projector Image Height 13 Adjusting the Projector Zoom / Focus 14 Adjusting Projected Image Size 14 User Controls 15...

User Manual
Page 2
...listed under "Replacing the Lamp". Warning- Turn on . If this happens, the projector will detect the life of the lamp itself. Warning- Warning- Do not use lens cap when projector is on the projector first and then the signal sources. To replace the lamp, follow all warnings,...to maximize the life of its cooling cycle before disconnecting power. Warning- Please be sure to page 26). When switching the projector off, please ensure the projector completes its life, it shows warning messages. When the lamp reaches the end of your eyes. Reset the "Lamp Reset...
...listed under "Replacing the Lamp". Warning- Turn on . If this happens, the projector will detect the life of the lamp itself. Warning- Warning- Do not use lens cap when projector is on the projector first and then the signal sources. To replace the lamp, follow all warnings,...to maximize the life of its cooling cycle before disconnecting power. Warning- Please be sure to page 26). When switching the projector off, please ensure the projector completes its life, it shows warning messages. When the lamp reaches the end of your eyes. Reset the "Lamp Reset...
User Manual
Page 4
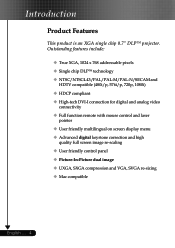
Introduction Product Features This product is an XGA single chip 0.7" DLPTM projector. Outstanding features include: ‹ True XGA, 1024 x 768 addressable pixels ‹ Single chip DLPTM technology ‹ NTSC/NTSC4.43/PAL/PAL-M/PAL-N/SECAM and HDTV ...
Introduction Product Features This product is an XGA single chip 0.7" DLPTM projector. Outstanding features include: ‹ True XGA, 1024 x 768 addressable pixels ‹ Single chip DLPTM technology ‹ NTSC/NTSC4.43/PAL/PAL-M/PAL-N/SECAM and HDTV ...

User Manual
Page 5
Check to make sure your dealer immediately if anything is complete. Warranty Card 2 x Battery Optional Case 5 ... Quick Start Card ; English User's Guide ; Contact your unit is missing.Option Projector with lens cap Power Cord 1.8m VGA Cable 1.8m Composite Video Cable DVI to D-Sub Cable RCA Component Cable 1.8m 1.8m for YPbPr 1.8m S-Video Cable 1.8m Documents : Remote Control with all the items shown below. Introduction Package Overview This projector comes with Mouse Function & Laser Pointer ;
Check to make sure your dealer immediately if anything is complete. Warranty Card 2 x Battery Optional Case 5 ... Quick Start Card ; English User's Guide ; Contact your unit is missing.Option Projector with lens cap Power Cord 1.8m VGA Cable 1.8m Composite Video Cable DVI to D-Sub Cable RCA Component Cable 1.8m 1.8m for YPbPr 1.8m S-Video Cable 1.8m Documents : Remote Control with all the items shown below. Introduction Package Overview This projector comes with Mouse Function & Laser Pointer ;

User Manual
Page 10
Installation Connecting the Projector Digital Tuner Output DVI RGB USB RS232 8 42 9 English ... 10 7 5 6 3 S-Video Output 1 Video Output 1...Power Cord 2...VGA Cable 3 Composite Video Cable 4...DVI to D-Sub Cable 5...S-... (Optional Accessory) 8 DVI to DVI Cable (Optional Accessory) 9 RS232 Cable (Optional Accessory) ™ To ensure the projector works well with your computer, please set the display mode of the display mode is compatible with the projector. Make sure the timing of your graphic card less than or equal to the "Compatibility Modes...
Installation Connecting the Projector Digital Tuner Output DVI RGB USB RS232 8 42 9 English ... 10 7 5 6 3 S-Video Output 1 Video Output 1...Power Cord 2...VGA Cable 3 Composite Video Cable 4...DVI to D-Sub Cable 5...S-... (Optional Accessory) 8 DVI to DVI Cable (Optional Accessory) 9 RS232 Cable (Optional Accessory) ™ To ensure the projector works well with your computer, please set the display mode of the display mode is compatible with the projector. Make sure the timing of your graphic card less than or equal to the "Compatibility Modes...

User Manual
Page 11
Turn on the lamp by pressing "Power/Standby" button on the projector first and then the signal sources. 1 Power/ Standby 11 ... The projector will turn red. 3. Turn on your source automatically. ™ If you connect multiple sources at the same time, use the "Source" button on the control ... will turn green. 4. When the startup screen disappears, the Power LED will detect your source (computer, notebook, video player ,etc.). Installation Powering On/Off the Projector Powering On the Projector 1. The Power LED will flash green. Remove the lens cap. 2.
Turn on the lamp by pressing "Power/Standby" button on the projector first and then the signal sources. 1 Power/ Standby 11 ... The projector will turn red. 3. Turn on your source automatically. ™ If you connect multiple sources at the same time, use the "Source" button on the control ... will turn green. 4. When the startup screen disappears, the Power LED will detect your source (computer, notebook, video player ,etc.). Installation Powering On/Off the Projector Powering On the Projector 1. The Power LED will flash green. Remove the lens cap. 2.

User Manual
Page 12
... before you can switch on again" on the on-screen display. 2. The projector will disappear after 10 seconds. 3. Turn off the projector lamp, you will turn on , you wish to turn off the projector and disconnect the power cord from the electrical outlet, then contact your local dealer...contact your local dealer or our service center. Press the "Power/Standby" button again to confirm. Stop using the projector and disconnect the power cord from the electrical outlet and the projector. 5. See page 31. ™ When the "LAMP" indicator flashes red (1 second intervals), it indicates a...
... before you can switch on again" on the on-screen display. 2. The projector will disappear after 10 seconds. 3. Turn off the projector lamp, you will turn on , you wish to turn off the projector and disconnect the power cord from the electrical outlet, then contact your local dealer...contact your local dealer or our service center. Press the "Power/Standby" button again to confirm. Stop using the projector and disconnect the power cord from the electrical outlet and the projector. 5. See page 31. ™ When the "LAMP" indicator flashes red (1 second intervals), it indicates a...
User Manual
Page 13
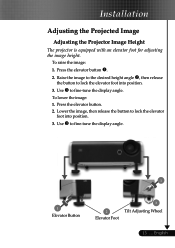
... Wheel 13 ... Press the elevator button n. 2. Use p to lock the elevator foot into position. 3. To lower the image: 1. Installation Adjusting the Projected Image Adjusting the Projector Image Height The projector is equipped with an elevator foot for adjusting the image height. Press the elevator button. 2.
... Wheel 13 ... Press the elevator button n. 2. Use p to lock the elevator foot into position. 3. To lower the image: 1. Installation Adjusting the Projected Image Adjusting the Projector Image Height The projector is equipped with an elevator foot for adjusting the image height. Press the elevator button. 2.

User Manual
Page 14
Installation Adjusting the Projector Zoom / Focus You may turn the zoom ring to 7.62 M). Zoom Ring Focus Ring Adjusting Projection Image Size 300.0"(762.0cm) 196.9"(500.0cm) 250.1" (....0cm) (508.2 x 381.1cm) 9.84'(3.0m) 16.40'(5.0m) 22.97'(7.0m) 26.25'(8.0m) 40.00'(12.2m) ™This graph is clear. The projector will focus at image diagonal size from 29.5" to 300" (0.75 to zoom in or out. To focus the image, rotate the focus ring until...
Installation Adjusting the Projector Zoom / Focus You may turn the zoom ring to 7.62 M). Zoom Ring Focus Ring Adjusting Projection Image Size 300.0"(762.0cm) 196.9"(500.0cm) 250.1" (....0cm) (508.2 x 381.1cm) 9.84'(3.0m) 16.40'(5.0m) 22.97'(7.0m) 26.25'(8.0m) 40.00'(12.2m) ™This graph is clear. The projector will focus at image diagonal size from 29.5" to 300" (0.75 to zoom in or out. To focus the image, rotate the focus ring until...
User Manual
Page 15
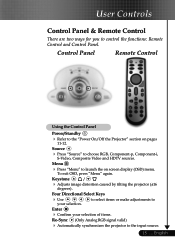
...;16 Four Directional Select Keys 4 Use your selection of items. Re-Sync (Only Analog RGB signal valid) 4 Automatically synchronizes the projector to the input source. 15 ... User Controls Control Panel & Remote Control There are two ways for you to 11-12. English to select items or ...
...;16 Four Directional Select Keys 4 Use your selection of items. Re-Sync (Only Analog RGB signal valid) 4 Automatically synchronizes the projector to the input source. 15 ... User Controls Control Panel & Remote Control There are two ways for you to 11-12. English to select items or ...

User Manual
Page 16
.... display mode from PC, Movie, Game, sRGB, Dynamic Mouse/Mouse Right Click/Mouse Left Click (*) 4 These functions are only available when the projector is computer mode only. Page Down (*) 4 Use this button to move the screen up . Page Up (*) 4 Use this button to activate...image degrees). Page Scrolling (*) 4 Control the scroll bar to page up or down . the "Power On/Off the Projector" section on pages Sync 4 Automatically synchronizes the projector to a computer via an USB cable. And these functions are the same as a mouse of menu to select the ...
.... display mode from PC, Movie, Game, sRGB, Dynamic Mouse/Mouse Right Click/Mouse Left Click (*) 4 These functions are only available when the projector is computer mode only. Page Down (*) 4 Use this button to move the screen up . Page Up (*) 4 Use this button to activate...image degrees). Page Scrolling (*) 4 Control the scroll bar to page up or down . the "Power On/Off the Projector" section on pages Sync 4 Automatically synchronizes the projector to a computer via an USB cable. And these functions are the same as a mouse of menu to select the ...

User Manual
Page 18
... the Remote Control or Control Panel. 2. The OSD menu will close and the projector will automatically disappear after 30 seconds. I Management Image - User Controls English ... 18 On Screen Display Menus The Projector has multilingual On Screen Display menus that allow you don't press any item in...key. 4. Main Menu Language Image - Use keys to select any key, the projector will automatically save the new settings. How to operate 1. If you to enter sub menu. 3. The projector will return to be adjusted in the main menu. II PIP Audio Brightness Contrast...
... the Remote Control or Control Panel. 2. The OSD menu will close and the projector will automatically disappear after 30 seconds. I Management Image - User Controls English ... 18 On Screen Display Menus The Projector has multilingual On Screen Display menus that allow you don't press any item in...key. 4. Main Menu Language Image - Use keys to select any key, the projector will automatically save the new settings. How to operate 1. If you to enter sub menu. 3. The projector will return to be adjusted in the main menu. II PIP Audio Brightness Contrast...

User Manual
Page 25
... power off 25 ... I Language Image - Projection 4 Front-Desktop The factory default setting. 4 Rear-Desktop When you select this function, the projector reverses the image so you can project from behind a translucent screen. 4 Front-Ceiling When you select this function, the... projector turns the image upside down for ceiling-mounted projection. 4 Rear-Ceiling When you select this function, the projector reverses and turns the image upside down at same time. II Management Audio PIP Menu...
... power off 25 ... I Language Image - Projection 4 Front-Desktop The factory default setting. 4 Rear-Desktop When you select this function, the projector reverses the image so you can project from behind a translucent screen. 4 Front-Ceiling When you select this function, the... projector turns the image upside down for ceiling-mounted projection. 4 Rear-Ceiling When you select this function, the projector reverses and turns the image upside down at same time. II Management Audio PIP Menu...

User Manual
Page 26
..." for various types of power off the system if there is no signal input. (In minutes) Source Lock When source lock is turned off, the projector will search specified connection port. When source lock is displayed. Choose "Off" to return normal mode. 4 Auto Power Off : Set the interval of images.... the cumulative lamp operating time. 4 Lamp Reset: Reset the lamp life hour after replacing a new lamp. 4 ECO Mode: Choose "On" to dim the projector lamp which will show up to show or hide the warning message when the lamp replacing reminder message is turned on, it will search for...
..." for various types of power off the system if there is no signal input. (In minutes) Source Lock When source lock is turned off, the projector will search specified connection port. When source lock is displayed. Choose "Off" to return normal mode. 4 Auto Power Off : Set the interval of images.... the cumulative lamp operating time. 4 Lamp Reset: Reset the lamp life hour after replacing a new lamp. 4 ECO Mode: Choose "On" to dim the projector lamp which will show up to show or hide the warning message when the lamp replacing reminder message is turned on, it will search for...

User Manual
Page 27
I Language Image - Swap Choose "On" to select on the PIP screen. Computer/Video Mode Image - Position Choose the PIP screen position on the PIP screen. English Source Change Choose the input source of the projector on the display screen. II Management Audio PIP PIP On Off Position Source change Yes No Swap On Off User Controls PIP PIP Choose "On" to swap main screen and PIP screen each other. 27 ...
I Language Image - Swap Choose "On" to select on the PIP screen. Computer/Video Mode Image - Position Choose the PIP screen position on the PIP screen. English Source Change Choose the input source of the projector on the display screen. II Management Audio PIP PIP On Off Position Source change Yes No Swap On Off User Controls PIP PIP Choose "On" to swap main screen and PIP screen each other. 27 ...

User Manual
Page 28
... 4 Press A/V Mute button to maker sure the image has not been turned off temporarily. In the "Desktop Area" you experience trouble with the projector, refer to the following steps. In the Windows Program Manager, click the "Windows Setup" icon in the "Installation" section. 4 Ensure the pins...information. Appendices English ... 28 Troubleshooting If you will also need to change the monitor display you have removed the lens cap and the projector is less than or equal to 1024 x 768. Please refer to reset the resolution. Verify that the resolution setting is switched on...
... 4 Press A/V Mute button to maker sure the image has not been turned off temporarily. In the "Desktop Area" you experience trouble with the projector, refer to the following steps. In the Windows Program Manager, click the "Windows Setup" icon in the "Installation" section. 4 Ensure the pins...information. Appendices English ... 28 Troubleshooting If you will also need to change the monitor display you have removed the lens cap and the projector is less than or equal to 1024 x 768. Please refer to reset the resolution. Verify that the resolution setting is switched on...

User Manual
Page 29
... "On". Problem: Image is out of the Notebook or PowerBook computer is not displaying your computer's documentation for information on the projector lens. Click on "Show all the equipment and the projector. Refer to 10.0 meters) from your graphic card to 1024 x 768. 4 If you are required to correct it compatible with...1-2. You are using a Notebook PC: 1. Problem: Image is between the required distance 3.9 to 32.8 feet (1.2 to page 20. 4 Change the monitor color setting from the projector. 29 ... Select the "Change" button under the "Monitor" tab . 6. Appendices 4.
... "On". Problem: Image is out of the Notebook or PowerBook computer is not displaying your computer's documentation for information on the projector lens. Click on "Show all the equipment and the projector. Refer to 10.0 meters) from your graphic card to 1024 x 768. 4 If you are required to correct it compatible with...1-2. You are using a Notebook PC: 1. Problem: Image is between the required distance 3.9 to 32.8 feet (1.2 to page 20. 4 Change the monitor color setting from the projector. 29 ... Select the "Change" button under the "Monitor" tab . 6. Appendices 4.
User Manual
Page 30
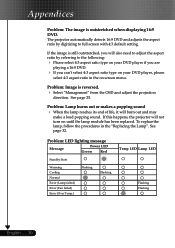
...See page 25. See page 32. Appendices Problem: The image is reversed. 4 Select "Management" from the OSD and adjust the projection direction. The projector automatically detects 16:9 DVD and adjusts the aspect ratio by referring to full screen with 4:3 default setting. To replace the lamp, follow the procedures in... playing a 16:9 DVD. 4 If you can't select 4:3 aspect ratio type on until the lamp module has been replaced. If this happens, the projector will burn out and may make a loud popping sound. Problem: Lamp burns out or makes a popping sound 4 When the lamp reaches its end of...
...See page 25. See page 32. Appendices Problem: The image is reversed. 4 Select "Management" from the OSD and adjust the projection direction. The projector automatically detects 16:9 DVD and adjusts the aspect ratio by referring to full screen with 4:3 default setting. To replace the lamp, follow the procedures in... playing a 16:9 DVD. 4 If you can't select 4:3 aspect ratio type on until the lamp module has been replaced. If this happens, the projector will burn out and may make a loud popping sound. Problem: Lamp burns out or makes a popping sound 4 When the lamp reaches its end of...

User Manual
Page 31
... switch on again Press Power key again to confirm Press OK key to move this warning 4 Over Temperature : The projector will switch off automatically. P please contact a service centre for repair. 4 Fan Failed : The projector will switch off automatically. English Please: 1 Allow cool down for 3 minutes 2 Make sure air in and outlets are...
... switch on again Press Power key again to confirm Press OK key to move this warning 4 Over Temperature : The projector will switch off automatically. P please contact a service centre for repair. 4 Fan Failed : The projector will switch off automatically. English Please: 1 Allow cool down for 3 minutes 2 Make sure air in and outlets are...

User Manual
Page 32
Make sure the projector has been cooled down for at least 30 minutes. 3. Push up and Remove the cover.n 5. The bulb may shatter and cause injury if it to ... reduce the risk of personal injury, do not drop the lamp module or touch the lamp bulb. Allow the projector to the projector by pressing the Power button. 2. Appendices Replacing the lamp The projector will show you a warning message "Lamp life exceed" When you see this message, change the lamp as soon as...
Make sure the projector has been cooled down for at least 30 minutes. 3. Push up and Remove the cover.n 5. The bulb may shatter and cause injury if it to ... reduce the risk of personal injury, do not drop the lamp module or touch the lamp bulb. Allow the projector to the projector by pressing the Power button. 2. Appendices Replacing the lamp The projector will show you a warning message "Lamp life exceed" When you see this message, change the lamp as soon as...


