
User Manual
Page 1
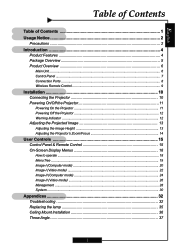
... 10 Connecting the Projector 10 Powering On/Off the Projector 11 Powering On the Projector 11 Powering Off the Projector 12 Warning Indicator ...12 Adjusting the Projected Image 13 Adjusting the Image Height 13 Adjusting the Projector's Zoom/Focus 14 User Controls 15 Control Panel & Remote Control 15 On-Screen Display Menus 18 How to operate ...18 Menu Tree ...19 Image-I (Computer mode 20 Image-I (Video mode 22 Image-II (Computer mode 24 Image-II (Video mode 26 Management ...28 System ...30 Appendices 32 Troubleshooting 32 Replacing the lamp 35 Ceiling Mount Installation 36...
... 10 Connecting the Projector 10 Powering On/Off the Projector 11 Powering On the Projector 11 Powering Off the Projector 12 Warning Indicator ...12 Adjusting the Projected Image 13 Adjusting the Image Height 13 Adjusting the Projector's Zoom/Focus 14 User Controls 15 Control Panel & Remote Control 15 On-Screen Display Menus 18 How to operate ...18 Menu Tree ...19 Image-I (Computer mode 20 Image-I (Video mode 22 Image-II (Computer mode 24 Image-II (Video mode 26 Management ...28 System ...30 Appendices 32 Troubleshooting 32 Replacing the lamp 35 Ceiling Mount Installation 36...
User Manual
Page 2
... projector first and then the signal sources. Warning- Please be sure to page 30). Warning- Reset the "Lamp Reset" function from the On Screen Display "System-->Lamp Setting" menu after replacing the lamp module (refer to change the lamp when it shows warning messages. Warning- The bright light may cause electric shock. This product will detect the life of fire or electric shock, do not open or disassemble the product as recommended in operation...
... projector first and then the signal sources. Warning- Please be sure to page 30). Warning- Reset the "Lamp Reset" function from the On Screen Display "System-->Lamp Setting" menu after replacing the lamp module (refer to change the lamp when it shows warning messages. Warning- The bright light may cause electric shock. This product will detect the life of fire or electric shock, do not open or disassemble the product as recommended in operation...

User Manual
Page 4
..., and HDTV (480i/p, 576i/p, 720p, 1080i) compatible ‹ High-Definition connection for digital signal with HDCP function and supports 480p, 576p, 720p and 1080i ‹ Built-in de-interlacing with 3:2 and 2:2 pulldown ‹ Full function remote control ‹ User-friendly multilingual on-screen display menu ‹ Advanced digital keystone correction and high quality full screen image re-scaling ‹ SXGA, XGA compression and SVGA, VGA re-sizing ‹ User-friendly control panel 4
..., and HDTV (480i/p, 576i/p, 720p, 1080i) compatible ‹ High-Definition connection for digital signal with HDCP function and supports 480p, 576p, 720p and 1080i ‹ Built-in de-interlacing with 3:2 and 2:2 pulldown ‹ Full function remote control ‹ User-friendly multilingual on-screen display menu ‹ Advanced digital keystone correction and high quality full screen image re-scaling ‹ SXGA, XGA compression and SVGA, VGA re-sizing ‹ User-friendly control panel 4
User Manual
Page 5
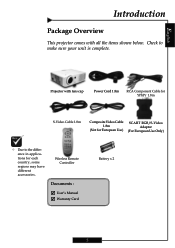
Wireless Remote Controller Documents : ; Check to the difference in applications for each country, some regions may have different accessories. Warranty Card Battery x 2 5 User's Manual ; Projector with all the items shown below. English Introduction Package Overview This projector comes with lens cap Power Cord 1.8m RCA Component Cable for YPbPr 1.8m S-Video Cable 1.8m Composite Video Cable 1.8m (Not for European Use) SCART RGB/S-Video Adaptor (For European Use Only) ™ Due to make sure your unit is complete.
Wireless Remote Controller Documents : ; Check to the difference in applications for each country, some regions may have different accessories. Warranty Card Battery x 2 5 User's Manual ; Projector with all the items shown below. English Introduction Package Overview This projector comes with lens cap Power Cord 1.8m RCA Component Cable for YPbPr 1.8m S-Video Cable 1.8m Composite Video Cable 1.8m (Not for European Use) SCART RGB/S-Video Adaptor (For European Use Only) ™ Due to make sure your unit is complete.
User Manual
Page 11
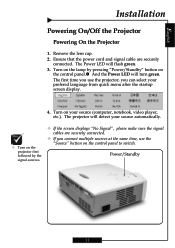
... the power cord and signal cable are securely connected. ™ If you connect multiple sources at the same time, use the projector, you use the "Source" button on the control panel.n And the Power LED will flash green. 3. Turn on the lamp by the signal sources. ™ If the screen displays "No Signal", please make sure the signal cables are securely connected. The projector will detect your source automatically. ™ Turn on the projector first followed by pressing "Power/Standby" button on the control panel to switch. The first time...
... the power cord and signal cable are securely connected. ™ If you connect multiple sources at the same time, use the projector, you use the "Source" button on the control panel.n And the Power LED will flash green. 3. Turn on the lamp by the signal sources. ™ If the screen displays "No Signal", please make sure the signal cables are securely connected. The projector will detect your source automatically. ™ Turn on the projector first followed by pressing "Power/Standby" button on the control panel to switch. The first time...
User Manual
Page 12
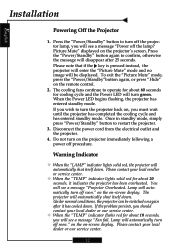
... fans continue to operate for about 20 seconds, it has cooled down. Warning Indicator ™ When the "LAMP" indicator lights solid red, the projector will automatically shut itself down . The projector will automatically shut itself down . Please contact your local dealer or our service center. ™ When the "TEMP" indicator flashs red for cooling cycle and the Power LED will disappear after it indicates the projector has been overheated. English Installation Powering Off the Projector...
... fans continue to operate for about 20 seconds, it has cooled down. Warning Indicator ™ When the "LAMP" indicator lights solid red, the projector will automatically shut itself down . The projector will automatically shut itself down . Please contact your local dealer or our service center. ™ When the "TEMP" indicator flashs red for cooling cycle and the Power LED will disappear after it indicates the projector has been overheated. English Installation Powering Off the Projector...

User Manual
Page 13
English Installation Adjusting the Projected Image Adjusting the Image Height The projector is equipped with an elevator foot to extend the foot so it rests on its foot; Press the elevator button n to adjust the image height. adjust as needed. 1 Elevator Button 3 2 Elevator Foot Tilt-adjustment Foot 13 To raise or lower the image : 1. Use p to lock the elevator foot into position. 3. Turn the projector over and locate the elevator...
English Installation Adjusting the Projected Image Adjusting the Image Height The projector is equipped with an elevator foot to extend the foot so it rests on its foot; Press the elevator button n to adjust the image height. adjust as needed. 1 Elevator Button 3 2 Elevator Foot Tilt-adjustment Foot 13 To raise or lower the image : 1. Use p to lock the elevator foot into position. 3. Turn the projector over and locate the elevator...

User Manual
Page 15
... 11~ 12 for more details. pause. Freeze 4 "Freeze" pauses the screen image, press "Freeze" again to restore the displayed image. Refer to the "Powering On/Off the Projector" section on the projector. Hide 4 "Hide" immediately turns the screen black. Brightness 4 Adjust the brightness of the image. 15 Press "Hide" again to un- Re-Sync 4 Automatically synchronizes the projector with the input source. Remote Control Control Panel Using the Remote Control Power 4 "Power" turns on the projector's lamp.
... 11~ 12 for more details. pause. Freeze 4 "Freeze" pauses the screen image, press "Freeze" again to restore the displayed image. Refer to the "Powering On/Off the Projector" section on the projector. Hide 4 "Hide" immediately turns the screen black. Brightness 4 Adjust the brightness of the image. 15 Press "Hide" again to un- Re-Sync 4 Automatically synchronizes the projector with the input source. Remote Control Control Panel Using the Remote Control Power 4 "Power" turns on the projector's lamp.

User Manual
Page 16
... viewing of the picture. Composite 4 Press "Composite" to change source to your selection. Enter 4 Confirm your selection. Component 4 Press "Component" to change source to VGA/YPbPr/SCART connector. Keystone +/- 4 Correct image distortion caused by tilting the projector. 4 : 3 4 Scale the image at a 4:3 aspect ratio. 16 : 9 4 Scale the image at full screen width. Four Directional Select Keys 4 Press "Menu", then use to select menu items or to make adjustments...
... viewing of the picture. Composite 4 Press "Composite" to change source to your selection. Enter 4 Confirm your selection. Component 4 Press "Component" to change source to VGA/YPbPr/SCART connector. Keystone +/- 4 Correct image distortion caused by tilting the projector. 4 : 3 4 Scale the image at a 4:3 aspect ratio. 16 : 9 4 Scale the image at full screen width. Four Directional Select Keys 4 Press "Menu", then use to select menu items or to make adjustments...

User Manual
Page 17
... make "Menu," then use adjustments to select items or Enter 4 Confirm your selection. to your selection of items. Auto Image 4 Automatically synchronizes the projector with the input source. 17 Keystone + /- 4 Adjusts image degrees). English User Controls Using the Control Panel Power/Standby 4 Refer to choose DVI, RGB, S-Video, Composite, Component and HDTV sources. SCART RGB, Menu 4 Display or exits the onscreen display menus. the "Power On/Off the Projector" section on pages Source 4 Press "Source" to 11...
... make "Menu," then use adjustments to select items or Enter 4 Confirm your selection. to your selection of items. Auto Image 4 Automatically synchronizes the projector with the input source. 17 Keystone + /- 4 Adjusts image degrees). English User Controls Using the Control Panel Power/Standby 4 Refer to choose DVI, RGB, S-Video, Composite, Component and HDTV sources. SCART RGB, Menu 4 Display or exits the onscreen display menus. the "Power On/Off the Projector" section on pages Source 4 Press "Source" to 11...
User Manual
Page 18
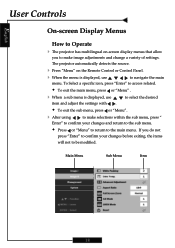
... menu is displayed, use item and adjust the settings with . to select the desired Š To exit the sub menu, press or "Menu". 4 After using to make image adjustments and change a variety of settings. Main Menu Sub Menu Item 18 English User Controls On-screen Display Menus How to Operate 4 The projector has multilingual on the Remote Control or Control Panel. 4 When the menu is displayed, use to navigate the main menu. The projector automatically detects the source. 4 Press "Menu" on -screen display...
... menu is displayed, use item and adjust the settings with . to select the desired Š To exit the sub menu, press or "Menu". 4 After using to make image adjustments and change a variety of settings. Main Menu Sub Menu Item 18 English User Controls On-screen Display Menus How to Operate 4 The projector has multilingual on the Remote Control or Control Panel. 4 When the menu is displayed, use to navigate the main menu. The projector automatically detects the source. 4 Press "Menu" on -screen display...

User Manual
Page 23
... the image. Color Adjusts a video image from black and white to fully saturated color. 4 Press the 4 Press the Tint to increase the amount of color in the image. Return the adjustments and settings to the factory default values. 4 Current: Returns the current menu's settings to factory default values. 4 All: Returns the settings for all menus to factory default values. 4 Exit: Cancel the revised settings 23 English User Controls Image-I (Video Mode) 4 Normal : For nomal status. 4 Movie : For home...
... the image. Color Adjusts a video image from black and white to fully saturated color. 4 Press the 4 Press the Tint to increase the amount of color in the image. Return the adjustments and settings to the factory default values. 4 Current: Returns the current menu's settings to factory default values. 4 All: Returns the settings for all menus to factory default values. 4 Exit: Cancel the revised settings 23 English User Controls Image-I (Video Mode) 4 Normal : For nomal status. 4 Movie : For home...

User Manual
Page 24
... function to match the frequency of the display with the graphics card. Signal 4 Frequency: Changes the display data frequency to make an adjustment. 4Tracking : Synchronizes the signal timing of your computer's graphic card. If you experience an unstable or flickering image, use this function to adjust the red, green and blue colors for advanced adjustment of brightness and contrast of DMD chip. 0 stands for minimal peaking, and 10 stands...
... function to match the frequency of the display with the graphics card. Signal 4 Frequency: Changes the display data frequency to make an adjustment. 4Tracking : Synchronizes the signal timing of your computer's graphic card. If you experience an unstable or flickering image, use this function to adjust the red, green and blue colors for advanced adjustment of brightness and contrast of DMD chip. 0 stands for minimal peaking, and 10 stands...

User Manual
Page 25
Reset Return the adjustments and settings to the factory default values. 4 Current: Returns the current menu's settings to factory default values. 4 All: Returns the settings for all menus to fit the width of the screen. 4 1:1 :The input source will be scaled to factory default values. 4 Exit: Cancel the revised settings 25 English User Controls Image-II (Computer Mode) Aspect Ratio Use this function to choose your desired aspect ratio. 4 4:3 : The input source will be scaled to fit the projection screen. 4 16:9 : The input source will be displayed without scaling.
Reset Return the adjustments and settings to the factory default values. 4 Current: Returns the current menu's settings to factory default values. 4 All: Returns the settings for all menus to fit the width of the screen. 4 1:1 :The input source will be scaled to factory default values. 4 Exit: Cancel the revised settings 25 English User Controls Image-II (Computer Mode) Aspect Ratio Use this function to choose your desired aspect ratio. 4 4:3 : The input source will be scaled to fit the projection screen. 4 16:9 : The input source will be displayed without scaling.

User Manual
Page 26
... the projection screen. 4 16:9 : The input source will be scaled to set the white peaking level of the individual colors. at lower temperature, the screen looks warmer. Advanced Adjustment Press "Enter" to fill up full 16:9 screen for maximum peaking. Full Screen Zoom Intend to adjust the red, green and blue colors for advanced adjustment of brightness and contrast of DMD chip. 0 stands for minimal peaking, and 10 stands for video with...
... the projection screen. 4 16:9 : The input source will be scaled to set the white peaking level of the individual colors. at lower temperature, the screen looks warmer. Advanced Adjustment Press "Enter" to fill up full 16:9 screen for maximum peaking. Full Screen Zoom Intend to adjust the red, green and blue colors for advanced adjustment of brightness and contrast of DMD chip. 0 stands for minimal peaking, and 10 stands for video with...
User Manual
Page 28
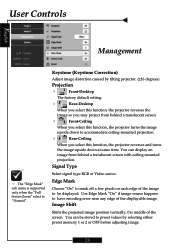
... projector reverses and turns the image upside down at same time. User Controls English Management ™ The "Edge Mask" sub menu is middle of the screen. You can be displayed. Signal Type Select signal type RGB or Video surces. You can display an image from behind a translucent screen with ceiling mounted projection. Use Edge Mask "On" if image source happens to "Normal". Image Shift Shifts the projected image position vertically. 0 is supported only when the "Full Screen Zoom...
... projector reverses and turns the image upside down at same time. User Controls English Management ™ The "Edge Mask" sub menu is middle of the screen. You can be displayed. Signal Type Select signal type RGB or Video surces. You can display an image from behind a translucent screen with ceiling mounted projection. Use Edge Mask "On" if image source happens to "Normal". Image Shift Shifts the projected image position vertically. 0 is supported only when the "Full Screen Zoom...
User Manual
Page 29
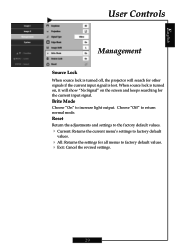
Reset Return the adjustments and settings to the factory default values. 4 Current: Returns the current menu's settings to factory default values. 4 All: Returns the settings for all menus to increase light output. When source lock is lost. Brite Mode Choose "On" to factory default values. 4 Exit: Cancel the revised settings. 29 Choose "Off" to return normal mode. English User Controls Management Source Lock When source lock is turned off, the projector will show "No Signal" on , it will...
Reset Return the adjustments and settings to the factory default values. 4 Current: Returns the current menu's settings to factory default values. 4 All: Returns the settings for all menus to increase light output. When source lock is lost. Brite Mode Choose "On" to factory default values. 4 Exit: Cancel the revised settings. 29 Choose "Off" to return normal mode. English User Controls Management Source Lock When source lock is turned off, the projector will show "No Signal" on , it will...
User Manual
Page 30
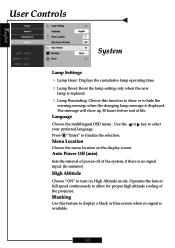
... allow for proper high altitude cooling of life. Menu Location Choose the menu location on High Altitude mode. Blanking Use this function to show up 30 hours before end of the projector. User Controls English System Lamp Settings 4 Lamp Hour: Displays the cumulative lamp operating time. 4 Lamp Reset: Reset the lamp setting only when the new lamp is replaced. 4 Lamp Reminding: Choose this feature to display a black or blue screen when no signal input. (In minutes) High Altitude Choose "ON" to turn on the display screen. Language Choose the...
... allow for proper high altitude cooling of life. Menu Location Choose the menu location on High Altitude mode. Blanking Use this function to show up 30 hours before end of the projector. User Controls English System Lamp Settings 4 Lamp Hour: Displays the cumulative lamp operating time. 4 Lamp Reset: Reset the lamp setting only when the new lamp is replaced. 4 Lamp Reminding: Choose this feature to display a black or blue screen when no signal input. (In minutes) High Altitude Choose "ON" to turn on the display screen. Language Choose the...
User Manual
Page 32
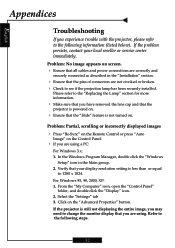
Problem: No image appears on the Control Panel. 4 If you have removed the lens cap and that the projector is powered on. 4 Ensure that the "Hide" feature is not turned on the "Advanced Properties" button. Problem: Partial, scrolling or incorrectly displayed images 4 Press "Re-Sync" on the Remote Control or press "Auto Image" on screen. 4 Ensure that all cables and power connections are correctly and securely connected as described in the Main group. 2. Verify...
Problem: No image appears on the Control Panel. 4 If you have removed the lens cap and that the projector is powered on. 4 Ensure that the "Hide" feature is not turned on the "Advanced Properties" button. Problem: Partial, scrolling or incorrectly displayed images 4 Press "Re-Sync" on the Remote Control or press "Auto Image" on screen. 4 Ensure that all cables and power connections are correctly and securely connected as described in the Main group. 2. Verify...
User Manual
Page 34
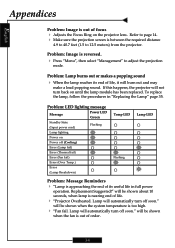
... a loud popping sound. Refer to adjust the projection mode. Problem: Image is out of order. 34 Problem: LED lighting message Message Power LED Green Standby State (Input power cord) Flashing Lamp lighting Power on the projector lens. will be shown about 10 seconds, when lamp is nearing end of life, it will be shown when the system temperature is between the required distance 4.9 to 40.7 feet (1.5 to 12.5 meters) from the projector. will not turn off soon." Replacement Suggested!" Problem: Lamp burns out...
... a loud popping sound. Refer to adjust the projection mode. Problem: Image is out of order. 34 Problem: LED lighting message Message Power LED Green Standby State (Input power cord) Flashing Lamp lighting Power on the projector lens. will be shown about 10 seconds, when lamp is nearing end of life, it will be shown when the system temperature is between the required distance 4.9 to 40.7 feet (1.5 to 12.5 meters) from the projector. will not turn off soon." Replacement Suggested!" Problem: Lamp burns out...


