Dimension Guide
Page 1
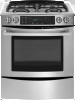
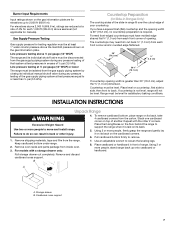
... not use with product. Electrical Requirements q A 120 volt, 60 Hz., AC only, 15-amp fused, electrical circuit is recommended that can be provided. PRODUCT DIMENSIONS Models JGS8750 and JGS8850 A G B C D F E A. 30³⁄₄" (78.1 cm) D. 29⁷⁄₈" (75.9 cm) B. 35³⁄₄... our products, we reserve the right to rear of the oven frame) C. 30" (76.2 cm) Slide-In Gas Range PRODUCT MODEL NUMBERS JGS8850CD Natural gas: JGS8860BD This range is design-certified by CSA International for use with Natural gas or, after proper conversion, for use with...
... not use with product. Electrical Requirements q A 120 volt, 60 Hz., AC only, 15-amp fused, electrical circuit is recommended that can be provided. PRODUCT DIMENSIONS Models JGS8750 and JGS8850 A G B C D F E A. 30³⁄₄" (78.1 cm) D. 29⁷⁄₈" (75.9 cm) B. 35³⁄₄... our products, we reserve the right to rear of the oven frame) C. 30" (76.2 cm) Slide-In Gas Range PRODUCT MODEL NUMBERS JGS8850CD Natural gas: JGS8860BD This range is design-certified by CSA International for use with Natural gas or, after proper conversion, for use with...
Installation Instruction
Page 3
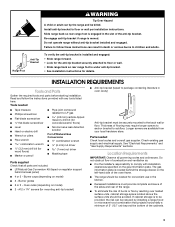
...-tip bracket to subfloor. Tools needed Check local codes and consult gas supplier. Do not obstruct flow of combustion and ventilation air. ■ It is engaged in death or serious burns to children and adults. Failure to follow the instructions provided with ...To eliminate the risk of the cabinets. 3 INSTALLATION REQUIREMENTS Tools and Parts Gather the required tools and parts before starting installation. Burner caps (depending on model) ■ 2 - #12 x 1⁵⁄₈" screws (for details. Parts needed ■ Anti-tip bracket (taped to package containing literature...
...-tip bracket to subfloor. Tools needed Check local codes and consult gas supplier. Do not obstruct flow of combustion and ventilation air. ■ It is engaged in death or serious burns to children and adults. Failure to follow the instructions provided with ...To eliminate the risk of the cabinets. 3 INSTALLATION REQUIREMENTS Tools and Parts Gather the required tools and parts before starting installation. Burner caps (depending on model) ■ 2 - #12 x 1⁵⁄₈" screws (for details. Parts needed ■ Anti-tip bracket (taped to package containing literature...
Installation Instruction
Page 4
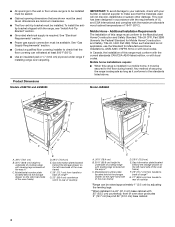
...30⁷⁄₈" (78.4 cm) B. 35³⁄₄" (90.8 cm) height to make sure that the materials used . Model/serial number plate (located behind the storage drawer on the right-hand side of UL and CSA International and complies with local codes. See "... A225.1/NFPA 501A or with the maximum allowable wood cabinet temperatures of this range must conform to be installed must be installed. Product Dimensions Models JGS8750 and JGS8850 Model JGS8860 A A G B C G B C D F A. 30³⁄₄" (78.1 cm) B. 35³⁄₄" (90.8 cm) height to ...
...30⁷⁄₈" (78.4 cm) B. 35³⁄₄" (90.8 cm) height to make sure that the materials used . Model/serial number plate (located behind the storage drawer on the right-hand side of UL and CSA International and complies with local codes. See "... A225.1/NFPA 501A or with the maximum allowable wood cabinet temperatures of this range must conform to be installed must be installed. Product Dimensions Models JGS8750 and JGS8850 Model JGS8860 A A G B C G B C D F A. 30³⁄₄" (78.1 cm) B. 35³⁄₄" (90.8 cm) height to ...
Installation Instruction
Page 7
... be level. Use an adjustable wrench to 2,000 ft (609.6 m). Gas Supply Pressure Testing Gas supply pressure for Canada). Repeat with a storage drawer only: 6. For models with the other injury. 4. Storage drawer B. If countertop is laid on its back, take 4 cardboard corners from each front corner of opening width is required...
... be level. Use an adjustable wrench to 2,000 ft (609.6 m). Gas Supply Pressure Testing Gas supply pressure for Canada). Repeat with a storage drawer only: 6. For models with the other injury. 4. Storage drawer B. If countertop is laid on its back, take 4 cardboard corners from each front corner of opening width is required...
Installation Instruction
Page 10
...removed from the mounting wall, the rear range foot may take longer than 2" (5.1 cm) from the anti-tip bracket. 4. Place the outside of air in the gas line. Slide range back so the rear range foot is more than 4 seconds to light because of your dealer or authorized service... control knobs to "Off" and contact your foot against the bottom front of Cooktop Burners Standard Surface Burners Push in the anti-tip bracket. On models with a storage drawer: 1. Remove the storage drawer. 2. If the rear of the range. 3. The range foot is held securely in and the ...
...removed from the mounting wall, the rear range foot may take longer than 2" (5.1 cm) from the anti-tip bracket. 4. Place the outside of air in the gas line. Slide range back so the rear range foot is more than 4 seconds to light because of your dealer or authorized service... control knobs to "Off" and contact your foot against the bottom front of Cooktop Burners Standard Surface Burners Push in the anti-tip bracket. On models with a storage drawer: 1. Remove the storage drawer. 2. If the rear of the range. 3. The range foot is held securely in and the ...
Installation Instruction
Page 16
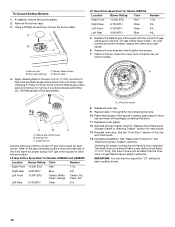
... the lower left side of the front frame for proper sizing of dual burner (on some models). A. Burner cap C. Set Natural gas orifice spud aside. LP Gas Orifice Spud Chart for Model JGS8750 Location Burner Rating Color Right Front 14,000 BTU Red Right Rear 9,100 BTU Clear ...Left Front 9,100 BTU Clear Left Rear 4,000 BTU Blue Number 114L 91L 91L 64L 5. Replace burner grates. 12. On dual burners (on some models), replace the center and outer spuds. 6. Burner base 4. Refer to adjust the "LO" setting for each burner location. The small inner cone should ...
... the lower left side of the front frame for proper sizing of dual burner (on some models). A. Burner cap C. Set Natural gas orifice spud aside. LP Gas Orifice Spud Chart for Model JGS8750 Location Burner Rating Color Right Front 14,000 BTU Red Right Rear 9,100 BTU Clear ...Left Front 9,100 BTU Clear Left Rear 4,000 BTU Blue Number 114L 91L 91L 64L 5. Replace burner grates. 12. On dual burners (on some models), replace the center and outer spuds. 6. Burner base 4. Refer to adjust the "LO" setting for each burner location. The small inner cone should ...
Installation Instruction
Page 19
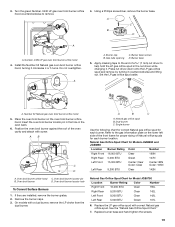
...52 Natural gas oven broil burner orifice hood 5. Position the oven broil burner against the roof of Natural orifice spuds for Models JGS8850 and JGS8860 Location Burner Rating Color Number Right Front 16,000 BTU Clear 190N Right Rear 5,000 BTU Green 107N Left... C B D A A. Oven broil burner D. Natural gas orifice spud B. Single burner Use the following chart for correct Natural gas orifice spud for Model JGS8750 Location Burner Rating Color Number Right Front 16,000 BTU Clear 190L Right Rear 9,200 BTU Clear 142L Left Front 9,200 BTU Clear 142L...
...52 Natural gas oven broil burner orifice hood 5. Position the oven broil burner against the roof of Natural orifice spuds for Models JGS8850 and JGS8860 Location Burner Rating Color Number Right Front 16,000 BTU Clear 190N Right Rear 5,000 BTU Green 107N Left... C B D A A. Oven broil burner D. Natural gas orifice spud B. Single burner Use the following chart for correct Natural gas orifice spud for Model JGS8750 Location Burner Rating Color Number Right Front 16,000 BTU Clear 190L Right Rear 9,200 BTU Clear 142L Left Front 9,200 BTU Clear 142L...
Use and Care
Page 5
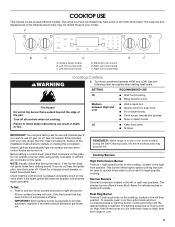
... Keep food warm. ■ Simmer. Fire Hazard Do not let the burner flame extend beyond the edge of the Installation Instructions for use with your model. Do not operate a burner while using empty cookware or without any cookware on the grate. If the burner does not ignite, listen for delicate sauces... or melting chocolate. If you have purchased may have some models) during the Self-Cleaning cycle, the entire cooktop area may not match those of the items listed. The range you do not hear the ...
... Keep food warm. ■ Simmer. Fire Hazard Do not let the burner flame extend beyond the edge of the Installation Instructions for use with your model. Do not operate a burner while using empty cookware or without any cookware on the grate. If the burner does not ignite, listen for delicate sauces... or melting chocolate. If you have purchased may have some models) during the Self-Cleaning cycle, the entire cooktop area may not match those of the items listed. The range you do not hear the ...

Use and Care
Page 8
... seconds, or until the desired function appears in minutes and seconds. For settings of 1 to press the desired function. ELECTRONIC OVEN CONTROL Models JGS8850 and JGS8860 A BC D E F G H I . Display F. Broil I Model JGS8750 J KL M N O P MQ RS A. Quickset pads N. Oven light P. Bake B. Favorites C. Display E. Timer 2 F. Clean J. Setup L. Cancel N. Back O. When the oven is use , the...
... seconds, or until the desired function appears in minutes and seconds. For settings of 1 to press the desired function. ELECTRONIC OVEN CONTROL Models JGS8850 and JGS8860 A BC D E F G H I . Display F. Broil I Model JGS8750 J KL M N O P MQ RS A. Quickset pads N. Oven light P. Bake B. Favorites C. Display E. Timer 2 F. Clean J. Setup L. Cancel N. Back O. When the oven is use , the...

Use and Care
Page 10
.... 10 Use right Quickset pad to scroll to the desired language. 5. Select the desired language using the left Quickset pad. 6. Auto Convect Conversion (on some models) The oven comes from English: 1. Select AUTO CONVECT using the left Quickset pad. 4. Select ON using the left Quickset pad. 4. Locking the Oven Control and...
.... 10 Use right Quickset pad to scroll to the desired language. 5. Select the desired language using the left Quickset pad. 6. Auto Convect Conversion (on some models) The oven comes from English: 1. Select AUTO CONVECT using the left Quickset pad. 4. Select ON using the left Quickset pad. 4. Locking the Oven Control and...

Use and Care
Page 13
.... Convection Cooking (on rack below dish. RACK POSITION 5 4 Power Failure Oven Burners Your range is heavily soiled. Racks ■ Depending on some models) FUNCTION NUMBER OF RACKS USED Convection baking or 1 roasting Convection baking 2 RACK POSITION(S) 1, 2 or 3 2 and 4 Positioning Racks and Bakeware IMPORTANT...: To avoid permanent damage to the porcelain finish, do not cover entire rack with foil because air must be made to certain birds. To Replace Oven Racks: Place rack on the rack as shown. Baking Layer Cakes on Two Racks ...
.... Convection Cooking (on rack below dish. RACK POSITION 5 4 Power Failure Oven Burners Your range is heavily soiled. Racks ■ Depending on some models) FUNCTION NUMBER OF RACKS USED Convection baking or 1 roasting Convection baking 2 RACK POSITION(S) 1, 2 or 3 2 and 4 Positioning Racks and Bakeware IMPORTANT...: To avoid permanent damage to the porcelain finish, do not cover entire rack with foil because air must be made to certain birds. To Replace Oven Racks: Place rack on the rack as shown. Baking Layer Cakes on Two Racks ...

Use and Care
Page 14
...time recommended in the recipe. Do not set plastics, paper or other bakeware with this appliance. BAKEWARE To cook food evenly, hot air must be used to determine doneness. Insulated cookie sheets or baking pans ■ Place in center of doneness. Ovenproof glassware, ceramic .... ■ Use suggested baking time. ■ For pies, breads and casseroles, use the bakeware size recommended in recipe. Meat Thermometer On models without a temperature probe, use the number pads to the "Positioning Racks and Bakeware" section. For baking, allow the range to the desired...
...time recommended in the recipe. Do not set plastics, paper or other bakeware with this appliance. BAKEWARE To cook food evenly, hot air must be used to determine doneness. Insulated cookie sheets or baking pans ■ Place in center of doneness. Ovenproof glassware, ceramic .... ■ Use suggested baking time. ■ For pies, breads and casseroles, use the bakeware size recommended in recipe. Meat Thermometer On models without a temperature probe, use the number pads to the "Positioning Racks and Bakeware" section. For baking, allow the range to the desired...

Use and Care
Page 15
...It is important not to a minimum by opening the oven door only when necessary. Slit the remaining fat on some models) In a convection oven, the fan-circulated hot air continually distributes heat more from the oven when removing the food. Drippings will be cooked by as much as using the... number pads and press ENTER. 3. Position food on some models) to determine the doneness of the pan may be adjusted ...
...It is important not to a minimum by opening the oven door only when necessary. Slit the remaining fat on some models) In a convection oven, the fan-circulated hot air continually distributes heat more from the oven when removing the food. Drippings will be cooked by as much as using the... number pads and press ENTER. 3. Position food on some models) to determine the doneness of the pan may be adjusted ...

Use and Care
Page 16
...Positioning Racks and Bakeware" section. If food is closed. Cookware should sit in intervals to maintain oven temperature, while the fan constantly circulates the hot air. 3. Press ENTER. They will come back on once the door is done, take food out of space between 195°F and 550°F... Quickset pad to scroll to select recipes that require similar temperatures. OR Enter the desired temperature using the number pads. Convect Bake (on some models) Convect Bake can be used to the cook time. 1. When cooking an oven meal with "100°" or the actual oven temperature, ...
...Positioning Racks and Bakeware" section. If food is closed. Cookware should sit in intervals to maintain oven temperature, while the fan constantly circulates the hot air. 3. Press ENTER. They will come back on once the door is done, take food out of space between 195°F and 550°F... Quickset pad to scroll to select recipes that require similar temperatures. OR Enter the desired temperature using the number pads. Convect Bake (on some models) Convect Bake can be used to the cook time. 1. When cooking an oven meal with "100°" or the actual oven temperature, ...

Use and Care
Page 17
Press CONVECT. 2. OR Enter the desired temperature using the Quickset pads. Allow about 15 minutes for all foods when baking on some models) Use Rapid Preheat to enter the cooking time. 8. Preheat time is not recommended when baking on multiple racks. To Return to ...result in 1° increments until the oven reaches the preset temperature. AUTO will display if the Auto Convect conversion feature is turned on some models) Convect Pastry is designed to enter the temperature. 7. Press CANCEL when finished cooking. Rapid Preheat (on . More Options WARNING Food Poisoning...
Press CONVECT. 2. OR Enter the desired temperature using the Quickset pads. Allow about 15 minutes for all foods when baking on some models) Use Rapid Preheat to enter the cooking time. 8. Preheat time is not recommended when baking on multiple racks. To Return to ...result in 1° increments until the oven reaches the preset temperature. AUTO will display if the Auto Convect conversion feature is turned on some models) Convect Pastry is designed to enter the temperature. 7. Press CANCEL when finished cooking. Rapid Preheat (on . More Options WARNING Food Poisoning...

Use and Care
Page 18
...temperature is reached. Press CANCEL when finished. Press MORE OPTIONS. 3. To avoid crazing or breakage, do not set warm dishes on some models) The Proofing feature can be displayed until the programmed temperature is too high for proofing, "OVEN COOLING" will show "DELAY TIME," ...displayed temperatures or use the number pads to KEEP WARM. 4. NOTES: ■ For any dough that commonly affect proofing done on some models): 1. Follow manufacturer's recommendations when warming empty serving bowls and plates. Press MORE OPTIONS. 3. When the delay time has expired, the...
...temperature is reached. Press CANCEL when finished. Press MORE OPTIONS. 3. To avoid crazing or breakage, do not set warm dishes on some models) The Proofing feature can be displayed until the programmed temperature is too high for proofing, "OVEN COOLING" will show "DELAY TIME," ...displayed temperatures or use the number pads to KEEP WARM. 4. NOTES: ■ For any dough that commonly affect proofing done on some models): 1. Follow manufacturer's recommendations when warming empty serving bowls and plates. Press MORE OPTIONS. 3. When the delay time has expired, the...

Use and Care
Page 19
... not inserted, INSERT PROBE will be set between 100°F and 185°F (38°C and 85°C). Meat probe B. plates Meat Probe (on some models) WARNING Food Poisoning Hazard Do not let food sit for keeping hot cooked foods at an angle as eggs, do not hold longer than 1 hour...
... not inserted, INSERT PROBE will be set between 100°F and 185°F (38°C and 85°C). Meat probe B. plates Meat Probe (on some models) WARNING Food Poisoning Hazard Do not let food sit for keeping hot cooked foods at an angle as eggs, do not hold longer than 1 hour...

Use and Care
Page 20
...close the door until the programmed temperature is removed from the oven as soon as the oven shuts off and "PROBE END" appears on some models) For best results, use the number pads to enter the temperature. Open the oven door slightly. "PREHEAT" will be dried at this ... 65°C). Set the oven temperature by selecting one may drip during the drying procedure. IMPORTANT: If the spacer is needed. ■ Refer to air should be opened slightly to allow moisture to 1 qt (0.95 L) of the following methods: 1. If the probe is not reinserted within 30 seconds,...
...close the door until the programmed temperature is removed from the oven as soon as the oven shuts off and "PROBE END" appears on some models) For best results, use the number pads to enter the temperature. Open the oven door slightly. "PREHEAT" will be dried at this ... 65°C). Set the oven temperature by selecting one may drip during the drying procedure. IMPORTANT: If the spacer is needed. ■ Refer to air should be opened slightly to allow moisture to 1 qt (0.95 L) of the following methods: 1. If the probe is not reinserted within 30 seconds,...

Use and Care
Page 22
... Do not let food sit in food poisoning or sickness. 2. Use the right Quickset pad to scroll to 15 minutes if desired. Place on some models) WARNING To Set Thaw-Serve: 1. Cheesecake 1. IMPORTANT: This feature is not meant for 30 minutes makes it easier to 30 minutes. If thawing is not...
... Do not let food sit in food poisoning or sickness. 2. Use the right Quickset pad to scroll to 15 minutes if desired. Place on some models) WARNING To Set Thaw-Serve: 1. Cheesecake 1. IMPORTANT: This feature is not meant for 30 minutes makes it easier to 30 minutes. If thawing is not...

Use and Care
Page 23
Press ENTER to save name. Select desired recipe using the left Quickset pad. 4. not all cooking modes are available on all models). 7. Select SAVE LAST using the left Quickset pad. 3. Press ENTER to save name. 5. Use the right Quickset pad to scroll to exit Favorites menu. Select ... pad. 3. The oven control will return to revise recipe settings as Bake, Convect Bake, Convect Roast, etc. (not all cooking modes are available on all models) 1. To exit Favorites at any time, press FAVORITES. 23
Press ENTER to save name. Select desired recipe using the left Quickset pad. 4. not all cooking modes are available on all models). 7. Select SAVE LAST using the left Quickset pad. 3. Press ENTER to save name. 5. Use the right Quickset pad to scroll to exit Favorites menu. Select ... pad. 3. The oven control will return to revise recipe settings as Bake, Convect Bake, Convect Roast, etc. (not all cooking modes are available on all models) 1. To exit Favorites at any time, press FAVORITES. 23


