
User Manual
Page 1
...14 Warning Indicator 14 Adjusting the Projected Image 15 Adjusting the Projector's Height 15 Adjusting the Projector's Zoom / Focus 16 Adjusting Projected Image Size 16 User Controls 17 Control Panel & Remote Control 17 On-screen Display Menus 20 How to operate ...20 Menu Tree...21 Image ...22 Display ...26 Setup...29 System ...32 Appendices 36 Troubleshooting 36 Image Problems 36 Intermission Problems 38 Projector Status Indication 39 Remote Control Problems 40 Replacing the Lamp 41 Compatibility Modes 42 RS232 Commands and Protocol Function List 43 Ceiling Mount Installation...
...14 Warning Indicator 14 Adjusting the Projected Image 15 Adjusting the Projector's Height 15 Adjusting the Projector's Zoom / Focus 16 Adjusting Projected Image Size 16 User Controls 17 Control Panel & Remote Control 17 On-screen Display Menus 20 How to operate ...20 Menu Tree...21 Image ...22 Display ...26 Setup...29 System ...32 Appendices 36 Troubleshooting 36 Image Problems 36 Intermission Problems 38 Projector Status Indication 39 Remote Control Problems 40 Replacing the Lamp 41 Compatibility Modes 42 RS232 Commands and Protocol Function List 43 Ceiling Mount Installation...
User Manual
Page 2
... related markings. 10. B. Opening or removing covers may keep air from overheating, put the projector in accordance with a dry cloth. 6. The exclamation point within the product's enclosure that may block the ventilation openings. Keep these instructions -before using this projector yourself. WARNING: TO REDUCE THE RISK OF FIRE OR ELECTRIC SHOCK, DO NOT EXPOSE THIS APPLIANCE TO RAIN OR MOISTURE. Install in a position and...
... related markings. 10. B. Opening or removing covers may keep air from overheating, put the projector in accordance with a dry cloth. 6. The exclamation point within the product's enclosure that may block the ventilation openings. Keep these instructions -before using this projector yourself. WARNING: TO REDUCE THE RISK OF FIRE OR ELECTRIC SHOCK, DO NOT EXPOSE THIS APPLIANCE TO RAIN OR MOISTURE. Install in a position and...
User Manual
Page 3
.... Reset the "Lamp Reset" function from the onscreen display "System|Lamp Setting" menu after replacing the lamp module (refer to cool down . Do not use lens cap when projector is in this may hurt your local reseller or service center to cool down , and follow all warnings, precautions and maintenance as this user's guide. ▀■ Warning▀■ Warning▀■ Warning▀■ Warning▀■ Warning▀■ Warning...
.... Reset the "Lamp Reset" function from the onscreen display "System|Lamp Setting" menu after replacing the lamp module (refer to cool down . Do not use lens cap when projector is in this may hurt your local reseller or service center to cool down , and follow all warnings, precautions and maintenance as this user's guide. ▀■ Warning▀■ Warning▀■ Warning▀■ Warning▀■ Warning▀■ Warning...
User Manual
Page 5
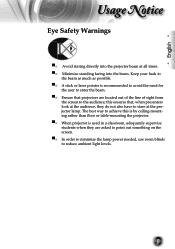
... to reduce ambient light levels. 5 The best way to achieve this ensures that projectors are asked to point out something on the screen. ▀■ In order to minimize the lamp power needed, use room blinds to stare at all times. ▀■ Minimize standing facing into the beam. English Usage Notice Eye Safety Warnings ▀■ Avoid...
... to reduce ambient light levels. 5 The best way to achieve this ensures that projectors are asked to point out something on the screen. ▀■ In order to minimize the lamp power needed, use room blinds to stare at all times. ▀■ Minimize standing facing into the beam. English Usage Notice Eye Safety Warnings ▀■ Avoid...
User Manual
Page 6
.../p) ▪ RGB signal: HD, XGA, SVGA, VGA res-sizing ▀■ Macintosh compatible ▀■ Full function IR remote control with back light ▀■ Advanced vertical digital keystone correction and high quality full screen image re-scaling ▀■ User friendly control panel ▀■ Optoma's patent-pending O2AirTM Photo Catalyst air purification technology ▀■ HDMI & DVI support HDCP function. ▀■ HDMI(support HDMI 1.3) x2, DVI-I (support HDMI 1.1, SCART...
.../p) ▪ RGB signal: HD, XGA, SVGA, VGA res-sizing ▀■ Macintosh compatible ▀■ Full function IR remote control with back light ▀■ Advanced vertical digital keystone correction and high quality full screen image re-scaling ▀■ User friendly control panel ▀■ Optoma's patent-pending O2AirTM Photo Catalyst air purification technology ▀■ HDMI & DVI support HDCP function. ▀■ HDMI(support HDMI 1.3) x2, DVI-I (support HDMI 1.1, SCART...
User Manual
Page 13
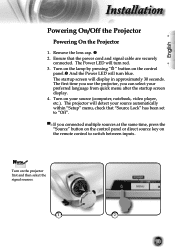
... Installation Powering On/Off the Projector Powering On the Projector 1. The Power LED will turn red. 3. Noottee Turn on the control panel. And the Power LED will turn blue. The first time you use the projector, you connected multiple sources at the same time, press the "Source" button on the control panel or direct source key on your preferred language from quick menu after the startup screen display. 4. Ensure that "Source Lock" has been set to switch between inputs. Remove the lens cap. 2. Turn on...
... Installation Powering On/Off the Projector Powering On the Projector 1. The Power LED will turn red. 3. Noottee Turn on the control panel. And the Power LED will turn blue. The first time you use the projector, you connected multiple sources at the same time, press the "Source" button on the control panel or direct source key on your preferred language from quick menu after the startup screen display. 4. Ensure that "Source Lock" has been set to switch between inputs. Remove the lens cap. 2. Turn on...

User Manual
Page 14
... "TEMP" indicator flashes red, it has cooled down . Warning Indicator ▀■ When the "LAMP" indicator lights solid red, the projector will flash blue. If the problem persists, you must wait until the projector has completed the cooling cycle and has entered standby mode. Installation Powering Off the Projector 1. Press the " " button to turn off procedure. The cooling fans continue to confirm, otherwise the message will see a message displayed on...
... "TEMP" indicator flashes red, it has cooled down . Warning Indicator ▀■ When the "LAMP" indicator lights solid red, the projector will flash blue. If the problem persists, you must wait until the projector has completed the cooling cycle and has entered standby mode. Installation Powering Off the Projector 1. Press the " " button to turn off procedure. The cooling fans continue to confirm, otherwise the message will see a message displayed on...
User Manual
Page 18
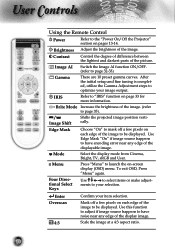
... of the display image. User Controls Using the Remote Control Power Refer to the "Power On/Off the Projector" section on page 33 for more information. ments to page 35). / Image Shift Shifts the projected image position vertically. Use this function to adjust if image source happens to have encoding error near any edge of the image. (refer to your selection. Brightness Adjust the brightness of the picture. Brite Mode Increase the...
... of the display image. User Controls Using the Remote Control Power Refer to the "Power On/Off the Projector" section on page 33 for more information. ments to page 35). / Image Shift Shifts the projected image position vertically. Use this function to adjust if image source happens to have encoding error near any edge of the image. (refer to your selection. Brightness Adjust the brightness of the picture. Brite Mode Increase the...

User Manual
Page 21
... SETUP Color Space LaRnegsueatge SYSTEM SYSTEM|Lamp Setting SYSTEM SYSTEM MIennputLSoocuatricoen Lamp Setting InPpruotjeScotiuornce SoImuracgeeLAoIck HighIARlItSitude AuTSteoosutPrcPoeawtLetoercrOknff HBiagchSkiAggnlrtoaitulundde Au1t2oVPTorwigegreOr ff Signal Lamp Hour LaCmoploRr eSmpaincdeer BriRteesMeot de CLaomlopr SRpeasceet MenuREeLxsoiecttation Lamp Setting MePnruojLeocctiaotnion LaImmpaSgeetAtiIng ProIjReIcStion User Controls Off(0)/(1~5) Film/Video/Graphics/PC Off(0)/(1~2) On(1)/Off(0) Warm Mid Cold CinUesmera:/RBedrigGhatin//TGVr/eseRnGGBa/inU/ser Blue Gain/Red Bias/ Green...
... SETUP Color Space LaRnegsueatge SYSTEM SYSTEM|Lamp Setting SYSTEM SYSTEM MIennputLSoocuatricoen Lamp Setting InPpruotjeScotiuornce SoImuracgeeLAoIck HighIARlItSitude AuTSteoosutPrcPoeawtLetoercrOknff HBiagchSkiAggnlrtoaitulundde Au1t2oVPTorwigegreOr ff Signal Lamp Hour LaCmoploRr eSmpaincdeer BriRteesMeot de CLaomlopr SRpeasceet MenuREeLxsoiecttation Lamp Setting MePnruojLeocctiaotnion LaImmpaSgeetAtiIng ProIjReIcStion User Controls Off(0)/(1~5) Film/Video/Graphics/PC Off(0)/(1~2) On(1)/Off(0) Warm Mid Cold CinUesmera:/RBedrigGhatin//TGVr/eseRnGGBa/inU/ser Blue Gain/Red Bias/ Green...

User Manual
Page 22
User Controls Image Noottee "Image mode-->TV" will support automatically "Overscan" with step "2" as default. 22 Mode There are many factory presets optimized for various types of the image. Press the to darken image. Press the to lighten the image. Brightness Adjust the brightness of images. Cinema: For home theater. Bright: For the brightest possible image, Use if ambient light is present. TV: For...
User Controls Image Noottee "Image mode-->TV" will support automatically "Overscan" with step "2" as default. 22 Mode There are many factory presets optimized for various types of the image. Press the to darken image. Press the to lighten the image. Brightness Adjust the brightness of images. Cinema: For home theater. Bright: For the brightest possible image, Use if ambient light is present. TV: For...
User Manual
Page 24
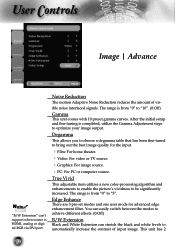
... Black and White Extension can 't support when source is from "0" to "10". (0:Off) Gamma This unit comes with 10 preset gamma curves. User Controls Image | Advance Noottee "B/W Extension" can stretch the black and white levels to automatically increase the contrast of vis- The range is HDMI, analog or digital RGB via DVI port. True Vivid This adjustable item utilizes a new color-processing algorithm...
... Black and White Extension can 't support when source is from "0" to "10". (0:Off) Gamma This unit comes with 10 preset gamma curves. User Controls Image | Advance Noottee "B/W Extension" can stretch the black and white levels to automatically increase the contrast of vis- The range is HDMI, analog or digital RGB via DVI port. True Vivid This adjustable item utilizes a new color-processing algorithm...

User Manual
Page 27
... for 16x9 Display in a 16:9 display. H Image Shift Shifts the projected image position horizontally. Some Letter-Box DVDs are no black bars, the full lamp power and vertical resolution is not 4:3, it will have black bars around the image in a wide 2.35:1 image. English User Controls Noottee (*) Each I/O has different setting of "Overscan". (*) "Image mode-->TV" will support automatically "Overscan" with 16:9 and 4:3 modes for most viewing experiences...
... for 16x9 Display in a 16:9 display. H Image Shift Shifts the projected image position horizontally. Some Letter-Box DVDs are no black bars, the full lamp power and vertical resolution is not 4:3, it will have black bars around the image in a wide 2.35:1 image. English User Controls Noottee (*) Each I/O has different setting of "Overscan". (*) "Image mode-->TV" will support automatically "Overscan" with 16:9 and 4:3 modes for most viewing experiences...

User Manual
Page 30
... when inputting S- Video or Video/CVBS signals. Saturation : Adjusts a video image from black and white to turn on High Altitude mode. Signal Phase: Changes the display data frequency to allow for proper high altitude cooling of color in the image. 30 quency of color in the image. When you experience an unstable or flickering image, use this function to increase the amount of your computer's graphic card. Auto Power Off Sets the...
... when inputting S- Video or Video/CVBS signals. Saturation : Adjusts a video image from black and white to turn on High Altitude mode. Signal Phase: Changes the display data frequency to allow for proper high altitude cooling of color in the image. 30 quency of color in the image. When you experience an unstable or flickering image, use this function to increase the amount of your computer's graphic card. Auto Power Off Sets the...
User Manual
Page 32
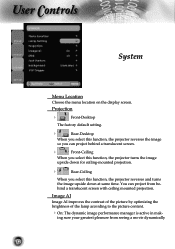
... this function, the projector reverses the image so you can project from seeing a movie dynamically 32 You can project behind a translucent screen with ceiling mounted projection. Image AI Image AI improves the contrast of the picture by optimizing the brightness of the lamp according to the picture content. On: The dynamic image performance manager is active in mak- User Controls System Menu Location Choose the menu location on the display screen.
... this function, the projector reverses the image so you can project from seeing a movie dynamically 32 You can project behind a translucent screen with ceiling mounted projection. Image AI Image AI improves the contrast of the picture by optimizing the brightness of the lamp according to the picture content. On: The dynamic image performance manager is active in mak- User Controls System Menu Location Choose the menu location on the display screen.
User Manual
Page 35
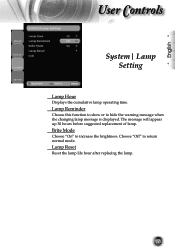
English User Controls System| Lamp Setting Lamp Hour Displays the cumulative lamp operating time. Lamp Reminder Choose this function to show or to increase the brightness. Lamp Reset Reset the lamp life hour after replacing the lamp. 35 Brite Mode Choose "On" to hide the warning message when the changing lamp message is displayed. The message will appear up 30 hours before suggested replacement of lamp. Choose "Off" to return normal mode.
English User Controls System| Lamp Setting Lamp Hour Displays the cumulative lamp operating time. Lamp Reminder Choose this function to show or to increase the brightness. Lamp Reset Reset the lamp life hour after replacing the lamp. 35 Brite Mode Choose "On" to hide the warning message when the changing lamp message is displayed. The message will appear up 30 hours before suggested replacement of lamp. Choose "Off" to return normal mode.
User Manual
Page 36
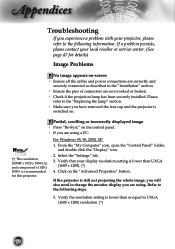
... need to change the monitor display you experience a problem with your projector, please refer to UXGA (1600 x 1200) resolution. (*) 36 Select the "Settings" tab. 3. Partial, scrolling or incorrectly displayed image Press "Re-Sync" on the control panel. If you have removed the lens cap and the projector is lower than UXGA (1600 x 1200). (*) 4. Click on -screen Ensure all the cables and power connections are correctly...
... need to change the monitor display you experience a problem with your projector, please refer to UXGA (1600 x 1200) resolution. (*) 36 Select the "Settings" tab. 3. Partial, scrolling or incorrectly displayed image Press "Re-Sync" on the control panel. If you have removed the lens cap and the projector is lower than UXGA (1600 x 1200). (*) 4. Click on -screen Ensure all the cables and power connections are correctly...
User Manual
Page 38
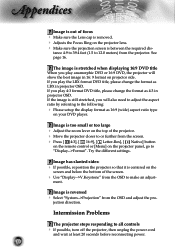
... bottom of the screen. Use "Display-->V.Keystone" from the screen. Press [ 4:3], [ 16:9], [ Letter-Box], [ Native] button on the remote control or [Menu] on the projector lens. Make sure the projection screen is between the required dis- Intermission Problems The projector stops responding to 12.0 meters) from the OSD and adjust the pro- See page 16. If you play 4:3 format DVD title, please change the format...
... bottom of the screen. Use "Display-->V.Keystone" from the screen. Press [ 4:3], [ 16:9], [ Letter-Box], [ Native] button on the remote control or [Menu] on the projector lens. Make sure the projection screen is between the required dis- Intermission Problems The projector stops responding to 12.0 meters) from the OSD and adjust the pro- See page 16. If you play 4:3 format DVD title, please change the format...

User Manual
Page 39
... procedures in the "Replacing the Lamp" section on and Lamp lighting Power off (Cooling) Error (Lamp fail) Error (Thermal fail) Error (Fan fail) Error (Over Temp.) Power LED (Red) Power LED (Blue) Temp-LED Lamp-LED Flashing Flashing Flashing Flashing Message Reminders Fan failed: 39 Projector Status Indication LED states Message Standby State (Input power cord) Power on (Warming) Power on page 41. English Appendices Noottee Steady light => No light => Lamp burns out or makes a popping sound When the lamp reaches its end of life, it will not turn on until the...
... procedures in the "Replacing the Lamp" section on and Lamp lighting Power off (Cooling) Error (Lamp fail) Error (Thermal fail) Error (Fan fail) Error (Over Temp.) Power LED (Red) Power LED (Blue) Temp-LED Lamp-LED Flashing Flashing Flashing Flashing Message Reminders Fan failed: 39 Projector Status Indication LED states Message Standby State (Input power cord) Power on (Warming) Power on page 41. English Appendices Noottee Steady light => No light => Lamp burns out or makes a popping sound When the lamp reaches its end of life, it will not turn on until the...

User Manual
Page 40
trol and the projector. Appendices Over temperature: Replacing the lamp: Remote Control Problems If the remote control does not work Check the operating angle for the remote control is approximately ±22.5°. Make sure there are exhausted. If so, replace weak batteries in the remote control. 40 Move to within 6 m (20 ft) of the projector. Make sure batteries are inserted correctly. Make sure batteries are not any obstructions between the remote con-
trol and the projector. Appendices Over temperature: Replacing the lamp: Remote Control Problems If the remote control does not work Check the operating angle for the remote control is approximately ±22.5°. Make sure there are exhausted. If so, replace weak batteries in the remote control. 40 Move to within 6 m (20 ft) of the projector. Make sure batteries are inserted correctly. Make sure batteries are not any obstructions between the remote con-
User Manual
Page 41
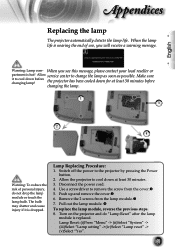
... a warning message. Allow the projector to cool down at least 30 minutes before changing lamp! Remove the 2 screws from the cover. 5. When the lamp life is nearing the end of personal injury, do "Lamp Reset" after the lamp module is replaced. Make sure it is hot! Switch off the power to change the lamp as soon as possible. Lamp Reset: (i)Press "Menu" -> (ii)Select "System" -> (iii)Select "Lamp setting" ->(iv)Select "Lamp reset" -> (v)Select...
... a warning message. Allow the projector to cool down at least 30 minutes before changing lamp! Remove the 2 screws from the cover. 5. When the lamp life is nearing the end of personal injury, do "Lamp Reset" after the lamp module is replaced. Make sure it is hot! Switch off the power to change the lamp as soon as possible. Lamp Reset: (i)Press "Menu" -> (ii)Select "System" -> (iii)Select "Lamp setting" ->(iv)Select "Lamp reset" -> (v)Select...


