User Manual
Page 1
...9 Control Panel 9 Connection Ports 10 Remote Control 12 Installing the Batteries 15 Remote Control Operation 16 Connection 17 Connecting a computer or monitor 18 Connecting Video source devices 20 Operation 23 Powering On/Off the Projector 23 Adjusting the Projector Height 24 Adjusting the Projector Zoom and Focus 24 Adjusting Projection Image Size 25 Menu Operation 27 Appendix 47 Installing the Dust Filter (Optional accessory 47 Replacing the Lamp 48 Ceiling mount installation 50 Compatibility Modes 51 RS232 Commands and Protocol Function List 56 Troubleshooting 61 Optoma...
...9 Control Panel 9 Connection Ports 10 Remote Control 12 Installing the Batteries 15 Remote Control Operation 16 Connection 17 Connecting a computer or monitor 18 Connecting Video source devices 20 Operation 23 Powering On/Off the Projector 23 Adjusting the Projector Height 24 Adjusting the Projector Zoom and Focus 24 Adjusting Projection Image Size 25 Menu Operation 27 Appendix 47 Installing the Dust Filter (Optional accessory 47 Replacing the Lamp 48 Ceiling mount installation 50 Compatibility Modes 51 RS232 Commands and Protocol Function List 56 Troubleshooting 61 Optoma...

User Manual
Page 3
... condense on the projector. For your safety, if the projector is equipped with a lens cap. Moisture Condensation Never operate this projector immediately after moving it before you turn on the lens and the crucial internal parts. Warning ─ Not all projectors come with a lens cap please ensure to remove it from possible damage, do not use the projector for at least 2 hours when there is...
... condense on the projector. For your safety, if the projector is equipped with a lens cap. Moisture Condensation Never operate this projector immediately after moving it before you turn on the lens and the crucial internal parts. Warning ─ Not all projectors come with a lens cap please ensure to remove it from possible damage, do not use the projector for at least 2 hours when there is...
User Manual
Page 5
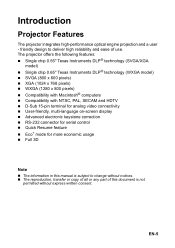
...; User-friendly, multi-language on-screen display „ Advanced electronic keystone correction „ RS-232 connector for serial control „ Quick Resume feature „ Eco+ mode for more economic usage „ Full 3D Note „ The information in this document is subject to deliver high reliability and ease of this manual is not permitted without express written consent. Introduction Projector...
...; User-friendly, multi-language on-screen display „ Advanced electronic keystone correction „ RS-232 connector for serial control „ Quick Resume feature „ Eco+ mode for more economic usage „ Full 3D Note „ The information in this document is subject to deliver high reliability and ease of this manual is not permitted without express written consent. Introduction Projector...
User Manual
Page 9
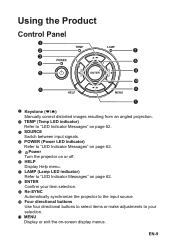
... correct distorted images resulting from an angled projection. 2 TEMP (Temp LED indicator) Refer to "LED Indicator Messages" on page 62. 3 SOURCE Switch between input signals. 4 POWER (Power LED indicator) Refer to "LED Indicator Messages" on page 62. 5 Power Turn the projector on or off. 6 HELP Display Help menu. 7 LAMP (Lamp LED indicator) Refer to "LED Indicator Messages" on page 62. 8 ENTER Confirm your item selection. 9 Re-SYNC Automatically synchronize the projector to the input source. 10 Four directional buttons Use four directional buttons to select items or make adjustments to your...
... correct distorted images resulting from an angled projection. 2 TEMP (Temp LED indicator) Refer to "LED Indicator Messages" on page 62. 3 SOURCE Switch between input signals. 4 POWER (Power LED indicator) Refer to "LED Indicator Messages" on page 62. 5 Power Turn the projector on or off. 6 HELP Display Help menu. 7 LAMP (Lamp LED indicator) Refer to "LED Indicator Messages" on page 62. 8 ENTER Confirm your item selection. 9 Re-SYNC Automatically synchronize the projector to the input source. 10 Four directional buttons Use four directional buttons to select items or make adjustments to your...

User Manual
Page 14
.... Set the input signal to turn on region). Mouse icon will appear on the mouse function. Note „ HDMI also supports mouse function. „ OSD must be closed before turning on the screen confirming the activation of operating your remote control. „ To move the cursor on page 18 for the Remote with a USB cable prior to the normal mode, press Switch again. Note „ Remote Control (IR...
.... Set the input signal to turn on region). Mouse icon will appear on the mouse function. Note „ HDMI also supports mouse function. „ OSD must be closed before turning on the screen confirming the activation of operating your remote control. „ To move the cursor on page 18 for the Remote with a USB cable prior to the normal mode, press Switch again. Note „ Remote Control (IR...
User Manual
Page 18
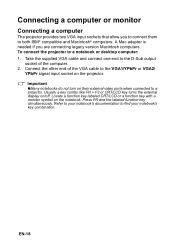
... on their external video ports when connected to a projector. EN-18 Take the supplied VGA cable and connect one end to the D-Sub output socket of the VGA cable to find your notebook's documentation to the VGA1/YPbPr or VGA2/ YPbPr signal input socket on /off. Usually a key combo like FN + F3 or CRT/LCD key turns the external display on the projector. A Mac adapter is needed if...
... on their external video ports when connected to a projector. EN-18 Take the supplied VGA cable and connect one end to the D-Sub output socket of the VGA cable to find your notebook's documentation to the VGA1/YPbPr or VGA2/ YPbPr signal input socket on /off. Usually a key combo like FN + F3 or CRT/LCD key turns the external display on the projector. A Mac adapter is needed if...
User Manual
Page 22
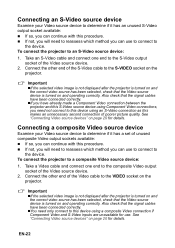
... video image is not displayed after the projector is turned on and the correct video source has been selected, check that the signal cables have already made a Component Video connection between the projector and this S-Video source device using Component Video connections, you need only connect to this device using an S-Video connection as this makes an unnecessary second connection of the Video source device. 2. See "Connecting Video source devices" on and operating correctly. Also check that the Video source device is turned...
... video image is not displayed after the projector is turned on and the correct video source has been selected, check that the signal cables have already made a Component Video connection between the projector and this S-Video source device using Component Video connections, you need only connect to this device using an S-Video connection as this makes an unnecessary second connection of the Video source device. 2. See "Connecting Video source devices" on and operating correctly. Also check that the Video source device is turned...
User Manual
Page 23
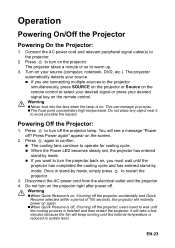
..., etc.). Connect the AC power cord and relevant peripheral signal cable(s) to select your desired signal or press your source. „ If you are connecting multiple sources to the projector simultaneously, press SOURCE on the projector or Source on . Press again to confirm. „ The cooling fans continue to operate for cooling cycle. „ When the Power LED becomes steady red, the projector has entered stand-by mode. Warning „When...
..., etc.). Connect the AC power cord and relevant peripheral signal cable(s) to select your desired signal or press your source. „ If you are connecting multiple sources to the projector simultaneously, press SOURCE on the projector or Source on . Press again to confirm. „ The cooling fans continue to operate for cooling cycle. „ When the Power LED becomes steady red, the projector has entered stand-by mode. Warning „When...

User Manual
Page 27
... confirm the selection. 5. Use "Enter" to enter sub menu. 3. Main Menu Sub-Menu Settings Single-ItemMenu EN-27 When OSD is displayed, use / key to select to enter the Single-Item-Menu. 4. Menu Operation The projector has multilingual on-screen display menus that allow you to operate 1. How to make image adjustments and change a variety of settings. To open the OSD menu, press "Menu" on the Remote Control or Projector Keypad. 2. Use / key to select...
... confirm the selection. 5. Use "Enter" to enter sub menu. 3. Main Menu Sub-Menu Settings Single-ItemMenu EN-27 When OSD is displayed, use / key to select to enter the Single-Item-Menu. 4. Menu Operation The projector has multilingual on-screen display menus that allow you to operate 1. How to make image adjustments and change a variety of settings. To open the OSD menu, press "Menu" on the Remote Control or Projector Keypad. 2. Use / key to select...

User Manual
Page 28
Advanced Color Settings Single-Item Menu SVGA / XGA: Presentation / Bright / Movie / sRGB / Blackboard / User / 3D WXGA: Presentation / Bright / Movie / sRGB / Blackboard / Game / ISF Day / ISF Night / User / 3D Film / Video / Graphics / Standard Red Green Blue Cyan Magenta Warm / Standard / Cool / Cold Hue / Saturation / Gain Hue / Saturation / Gain Hue / Saturation / Gain Hue / Saturation / Gain Hue / Saturation / Gain EN-28 Menu tree Main Menu Sub-Menu Display Mode IMAGE Brightness Contrast Sharpness Color Tint Gamma BrilliantColor™ Color Temp.
Advanced Color Settings Single-Item Menu SVGA / XGA: Presentation / Bright / Movie / sRGB / Blackboard / User / 3D WXGA: Presentation / Bright / Movie / sRGB / Blackboard / Game / ISF Day / ISF Night / User / 3D Film / Video / Graphics / Standard Red Green Blue Cyan Magenta Warm / Standard / Cool / Cold Hue / Saturation / Gain Hue / Saturation / Gain Hue / Saturation / Gain Hue / Saturation / Gain Hue / Saturation / Gain EN-28 Menu tree Main Menu Sub-Menu Display Mode IMAGE Brightness Contrast Sharpness Color Tint Gamma BrilliantColor™ Color Temp.
User Manual
Page 29
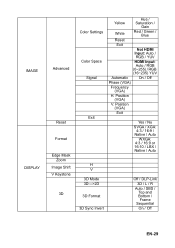
... Yes / No SVGA / XGA: 4:3 / 16:9 / Native / Auto WXGA: 4:3 / 16:9 or 16:10 / LBX / Native / Auto H V 3D Mode 3D--->2D 3D Format 3D Sync Invert Off / DLP-Link 3D / L / R Auto / SBS / Top and Bottom / Frame Sequential On / Off EN-29 Position (VGA) V. IMAGE DISPLAY Advanced Reset Format Edge Mask Zoom Image Shift V Keystone 3D Color Settings Color Space Signal Exit Yellow Hue / Saturation / Gain White Red / Green / Blue Reset Exit Not HDMI Input: Auto / RGB / YUV HDMI Input: Auto / RGB (0~255) / RGB...
... Yes / No SVGA / XGA: 4:3 / 16:9 / Native / Auto WXGA: 4:3 / 16:9 or 16:10 / LBX / Native / Auto H V 3D Mode 3D--->2D 3D Format 3D Sync Invert Off / DLP-Link 3D / L / R Auto / SBS / Top and Bottom / Frame Sequential On / Off EN-29 Position (VGA) V. IMAGE DISPLAY Advanced Reset Format Edge Mask Zoom Image Shift V Keystone 3D Color Settings Color Space Signal Exit Yellow Hue / Saturation / Gain White Red / Green / Blue Reset Exit Not HDMI Input: Auto / RGB / YUV HDMI Input: Auto / RGB (0~255) / RGB...
User Manual
Page 31
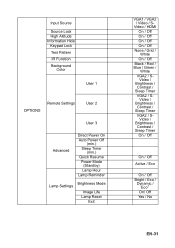
... / Contrast / Sleep Timer VGA2 / S- Input Source Source Lock High Altitude Information Hide Keypad Lock Test Pattern IR Function Background Color User 1 OPTIONS Remote Settings User 2 User 3 Advanced Direct Power On Auto Power Off (min.) Sleep Timer (min.) Quick Resume Power Mode (Standby) Lamp Hour Lamp Reminder Lamp Settings Brightness Mode Image Life Lamp Reset Exit VGA1 / VGA2 / Video / SVideo / HDMI On / Off On / Off On / Off On / Off None / Grid / White On / Off Black / Red / Blue / Green / White VGA2 / SVideo / Brightness / Contrast / Sleep Timer VGA2 / S- Video / Brightness...
... / Contrast / Sleep Timer VGA2 / S- Input Source Source Lock High Altitude Information Hide Keypad Lock Test Pattern IR Function Background Color User 1 OPTIONS Remote Settings User 2 User 3 Advanced Direct Power On Auto Power Off (min.) Sleep Timer (min.) Quick Resume Power Mode (Standby) Lamp Hour Lamp Reminder Lamp Settings Brightness Mode Image Life Lamp Reset Exit VGA1 / VGA2 / Video / SVideo / HDMI On / Off On / Off On / Off On / Off None / Grid / White On / Off Black / Red / Blue / Green / White VGA2 / SVideo / Brightness / Contrast / Sleep Timer VGA2 / S- Video / Brightness...
User Manual
Page 35
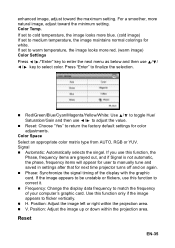
... signal timing of your computer's graphic card. Position: Adjust the image up or down within the projection area. „ V. For a smoother, more red. (warm image) Color Settings Press / /"Enter" key to enter the next menu as below and then use this function to correct it. „ Frequency: Change the display data frequency to flicker vertically. „ H. Press "Enter" to finalize the selection. „ Red/Green/Blue/Cyan/Magenta/Yellow/White: Use...
... signal timing of your computer's graphic card. Position: Adjust the image up or down within the projection area. „ V. For a smoother, more red. (warm image) Color Settings Press / /"Enter" key to enter the next menu as below and then use this function to correct it. „ Frequency: Change the display data frequency to flicker vertically. „ H. Press "Enter" to finalize the selection. „ Red/Green/Blue/Cyan/Magenta/Yellow/White: Use...

User Manual
Page 41
...), and allow user control an individual projector by RS232. Note „ Password default value is entered 3 times, the projector will be 4 digits. 3. Audio Settings Mute Cut off the sound temporarily. Volume Adjust the volume level. Press "Enter" to enter your password. „ Change Password: 1. Use number button to enter current password and then press "Enter" to input old password. 2. Enter new password (4 digits in length) using the number buttons on the remote to enter your new password and then press...
...), and allow user control an individual projector by RS232. Note „ Password default value is entered 3 times, the projector will be 4 digits. 3. Audio Settings Mute Cut off the sound temporarily. Volume Adjust the volume level. Press "Enter" to enter your password. „ Change Password: 1. Use number button to enter current password and then press "Enter" to input old password. 2. Enter new password (4 digits in length) using the number buttons on the remote to enter your new password and then press...
User Manual
Page 44
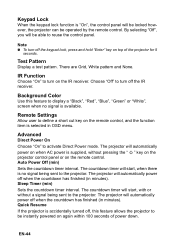
..." to turn off , this feature to display a "Black", "Red", "Blue", "Green" or "White", screen when no signal being sent to the projector. Choose "Off" to define a short cut key on the remote control. The countdown timer will automatically power off when the countdown has finished (in minutes). Sleep Timer (min) Sets the countdown timer interval. The projector will start , with or without pressing the " projector control panel or on the remote control, and...
..." to turn off , this feature to display a "Black", "Red", "Blue", "Green" or "White", screen when no signal being sent to the projector. Choose "Off" to define a short cut key on the remote control. The countdown timer will automatically power off when the countdown has finished (in minutes). Sleep Timer (min) Sets the countdown timer interval. The projector will start , with or without pressing the " projector control panel or on the remote control, and...
User Manual
Page 45
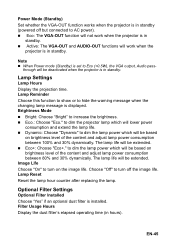
Power Mode (Standby) Set whether the VGA-OUT function works when the projector is in standby (powered off but connected to Eco ( Note „ When Power mode (Standby) is set to AC power). „ Eco: The VGA-OUT function will not work when the projector is in standby. „ Active: The VGA-OUT and AUDIO-OUT functions will work when the projector is in standby.
Power Mode (Standby) Set whether the VGA-OUT function works when the projector is in standby (powered off but connected to Eco ( Note „ When Power mode (Standby) is set to AC power). „ Eco: The VGA-OUT function will not work when the projector is in standby. „ Active: The VGA-OUT and AUDIO-OUT functions will work when the projector is in standby.
User Manual
Page 48
... nor cover it could be exposed. Replacing the Lamp Over time, the brightness on the projected image. If somehow the lamp has shattered, it could cause headaches, nausea, dizziness, and other similar lamps. „ A lamp may differ according to user's health. Note „ The lamp is recommended to an end. Wait at least 30 minutes in order to turn off the projector after turning...
... nor cover it could be exposed. Replacing the Lamp Over time, the brightness on the projected image. If somehow the lamp has shattered, it could cause headaches, nausea, dizziness, and other similar lamps. „ A lamp may differ according to user's health. Note „ The lamp is recommended to an end. Wait at least 30 minutes in order to turn off the projector after turning...
User Manual
Page 59
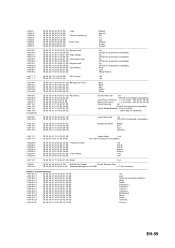
...cc2 ~XX89 0 7E 30 30 38 39 20 30 0D Audio Input Default ~XX89 1 7E 30 30 38 39 20 31 0D Audio1 ...~XX100 1 7E 30 30 31 30 30 20 31 0D Source Lock On ~XX100 0 7E 30 30 31 30 30 20 30... ~XX101 1 7E 30 30 31 30 31 20 31 0D High Altitude On ~XX101 0 7E 30 30 31 30 31 20 ...Color Blue ~XX104 2 7E 30 30 31 30 34 20 32 0D Black ~XX104 3 7E 30 30 31 30 34 20 33 0D Red ~XX104 4 7E 30 30 31 30 34 20 34 0D Green ~XX104 5 7E 30 30 31 30 34 20 35 0D White... 30 36 20 a 0D Auto Power Off (min) n = 0 (a=30) ~ 180 (a=31 38 30) ~XX107 n 7E 30 30 31 30 37 20 a 0D Sleep Timer (min) n = 0 ...
...cc2 ~XX89 0 7E 30 30 38 39 20 30 0D Audio Input Default ~XX89 1 7E 30 30 38 39 20 31 0D Audio1 ...~XX100 1 7E 30 30 31 30 30 20 31 0D Source Lock On ~XX100 0 7E 30 30 31 30 30 20 30... ~XX101 1 7E 30 30 31 30 31 20 31 0D High Altitude On ~XX101 0 7E 30 30 31 30 31 20 ...Color Blue ~XX104 2 7E 30 30 31 30 34 20 32 0D Black ~XX104 3 7E 30 30 31 30 34 20 33 0D Red ~XX104 4 7E 30 30 31 30 34 20 34 0D Green ~XX104 5 7E 30 30 31 30 34 20 35 0D White... 30 36 20 a 0D Auto Power Off (min) n = 0 (a=30) ~ 180 (a=31 38 30) ~XX107 n 7E 30 30 31 30 37 20 a 0D Sleep Timer (min) n = 0 ...
User Manual
Page 60
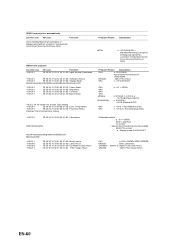
... Range/Lamp fail/Fan Lock/Over Temperature/ Lamp Hours Running Out/Cover Open INFOn n : 0/1/2/3/4/6/7/8/ = Standby/Warming/Cooling/Out of Range/Lamp fail/Fan Lock/Over Temperature/Lamp Hours Running Out/Cover Open READ from projector 232 ASCII Code HEX Code Function Projector Return Description ~XX121 1 7E 30 30 31 32 31 20 31 0D Input Source Commands OKn n: 0/1/2/3/4/5= ~XX122 1 7E 30 30 31 32 32 20 31 0D Software Version OKdddd None/VGA1/VGA2/Video/SVideo/HDMI...
... Range/Lamp fail/Fan Lock/Over Temperature/ Lamp Hours Running Out/Cover Open INFOn n : 0/1/2/3/4/6/7/8/ = Standby/Warming/Cooling/Out of Range/Lamp fail/Fan Lock/Over Temperature/Lamp Hours Running Out/Cover Open READ from projector 232 ASCII Code HEX Code Function Projector Return Description ~XX121 1 7E 30 30 31 32 31 20 31 0D Input Source Commands OKn n: 0/1/2/3/4/5= ~XX122 1 7E 30 30 31 32 32 20 31 0D Software Version OKdddd None/VGA1/VGA2/Video/SVideo/HDMI...
User Manual
Page 61
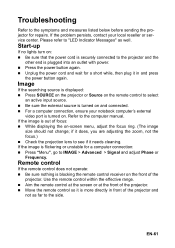
... the remote control receiver on -screen menu, adjust the focus ring. (The image size should not change; If the problem persists, contact your notebook computer's external video port is turned on : „ Be sure that the power cord is out of focus: „ While displaying the on the front of the projector and not as well. If the image is securely connected to IMAGE > Advanced > Signal and adjust Phase or Frequency. EN-61 Start...
... the remote control receiver on -screen menu, adjust the focus ring. (The image size should not change; If the problem persists, contact your notebook computer's external video port is turned on : „ Be sure that the power cord is out of focus: „ While displaying the on the front of the projector and not as well. If the image is securely connected to IMAGE > Advanced > Signal and adjust Phase or Frequency. EN-61 Start...


