Dimension Guide
Page 1
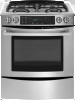
... fuse or circuit breaker is also recommended. The valve is for use with a different gas without consulting the serving gas supplier. Because Whirlpool Corporation policy includes a continuous commitment to shutoff valve. 30" (76.2 cm) Slide-In Gas Range PRODUCT MODEL NUMBERS JGS8850CD Natural gas: JGS8860BD This range is design-certified by CSA International for use with Natural...
... fuse or circuit breaker is also recommended. The valve is for use with a different gas without consulting the serving gas supplier. Because Whirlpool Corporation policy includes a continuous commitment to shutoff valve. 30" (76.2 cm) Slide-In Gas Range PRODUCT MODEL NUMBERS JGS8850CD Natural gas: JGS8860BD This range is design-certified by CSA International for use with Natural...

Dimension Guide
Page 2
...and on the sides below the cooktop. For complete details, see NOTE. W10430952A 2/24/12 Electrical and gas supply - 5½" (14.0 cm) min. from back wall or range will not slide all the way back. clearance from either cabinet, 10" (25.4 cm) max. ... cm) minimum clearance between the top of the cooking platform and the bottom of 2 Ref. CABINET OPENING DIMENSIONS A B C H D E I I . 3" (7.6 cm) min. Range may be flush mounted. from both sides of the cooktop, see Installation our products, we reserve the right to change materials and specifications without notice...
...and on the sides below the cooktop. For complete details, see NOTE. W10430952A 2/24/12 Electrical and gas supply - 5½" (14.0 cm) min. from back wall or range will not slide all the way back. clearance from either cabinet, 10" (25.4 cm) max. ... cm) minimum clearance between the top of the cooking platform and the bottom of 2 Ref. CABINET OPENING DIMENSIONS A B C H D E I I . 3" (7.6 cm) min. Range may be flush mounted. from both sides of the cooktop, see Installation our products, we reserve the right to change materials and specifications without notice...

Installation Instruction
Page 2
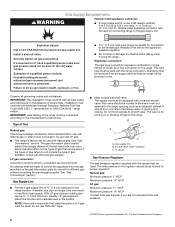
...switch. • Do not use any other appliance. - All safety messages will follow instructions. Do not store or use a gas detector approved by UL or CSA. RANGE SAFETY Your safety and the safety of Massachusetts. ■ If using a ball valve, it shall be detected by smell. For... more information, contact your gas supplier from a neighbor's phone. WARNING You can happen if the instructions are very important. In ...
...switch. • Do not use any other appliance. - All safety messages will follow instructions. Do not store or use a gas detector approved by UL or CSA. RANGE SAFETY Your safety and the safety of Massachusetts. ■ If using a ball valve, it shall be detected by smell. For... more information, contact your gas supplier from a neighbor's phone. WARNING You can happen if the instructions are very important. In ...
Installation Instruction
Page 3
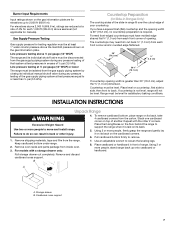
... required tools and parts before starting installation. Do not obstruct flow of combustion and ventilation air. ■ It is installed and engaged: • Slide range forward. • Look for the anti-tip bracket securely attached to LP gas 4.8 mm) carbide-tipped masonry drill bit (for convenient use in death or serious burns to...
... required tools and parts before starting installation. Do not obstruct flow of combustion and ventilation air. ■ It is installed and engaged: • Slide range forward. • Look for the anti-tip bracket securely attached to LP gas 4.8 mm) carbide-tipped masonry drill bit (for convenient use in death or serious burns to...
Installation Instruction
Page 4
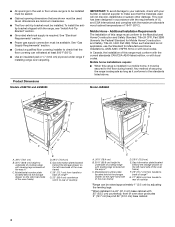
...8260;₄" (90.8 cm) height to underside of securing the range is adequate as long as it must be used will not discolor, delaminate or sustain other damage. See "Electrical Requirements" section. ■ Proper gas supply connection must be secured to the floor during transit. Additional ... 35³⁄₄" (90.8 cm) height to underside of the oven frame) D. 29⁷⁄₈" (75.9 cm) E. Gas information plate (located behind the storage drawer on the right-hand side of this range is installed in a mobile home, it conforms to the standards listed above.
...8260;₄" (90.8 cm) height to underside of securing the range is adequate as long as it must be used will not discolor, delaminate or sustain other damage. See "Electrical Requirements" section. ■ Proper gas supply connection must be secured to the floor during transit. Additional ... 35³⁄₄" (90.8 cm) height to underside of the oven frame) D. 29⁷⁄₈" (75.9 cm) E. Gas information plate (located behind the storage drawer on the right-hand side of this range is installed in a mobile home, it conforms to the standards listed above.

Installation Instruction
Page 5
... limits, but proper grounding and polarity are for dimensional clearances above the range, follow these instructions can be obtained from back wall or range will not slide all the way back. opening depth E. 30" (76.2 cm) min. opening width F. Electrical and gas supply - 5½" (14.0 cm) min. G. H. 18" (45.7... cabinet is shielded by not less than ¹⁄₄" (0.64 cm) flame retardant millboard covered with zero clearance to follow the range hood or microwave hood combination installation instructions for 25" (64.0 cm) countertop depth, 24" (61.0 cm) base cabinet depth and...
... limits, but proper grounding and polarity are for dimensional clearances above the range, follow these instructions can be obtained from back wall or range will not slide all the way back. opening depth E. 30" (76.2 cm) min. opening width F. Electrical and gas supply - 5½" (14.0 cm) min. G. H. 18" (45.7... cabinet is shielded by not less than ¹⁄₄" (0.64 cm) flame retardant millboard covered with zero clearance to follow the range hood or microwave hood combination installation instructions for 25" (64.0 cm) countertop depth, 24" (61.0 cm) base cabinet depth and...
Installation Instruction
Page 6
... the left-hand side oven door frame has information on or shutting off valve. LP gas conversion: Conversion must be used . See "Gas Conversions" section. It should be level with LP gas. ■ This range is for connecting range to the gas supply line. Du Pont De Nemours and Company. 6 All strains must be equipped with...
... the left-hand side oven door frame has information on or shutting off valve. LP gas conversion: Conversion must be used . See "Gas Conversions" section. It should be level with LP gas. ■ This range is for connecting range to the gas supply line. Du Pont De Nemours and Company. 6 All strains must be equipped with...
Installation Instruction
Page 7
...(not applicable for Canada). Failure to support the range when it on its back. 5. Pull storage drawer out completely. Formed front-edged countertops must be level. Keep cardboard bottom under range. 2. B A A. Gas Supply Pressure Testing Gas supply pressure for testing regulator must be at &#...189; psi gauge (14" WCP) or lower The range must be isolated from the gas supply piping system by closing its back, take ...
...(not applicable for Canada). Failure to support the range when it on its back. 5. Pull storage drawer out completely. Formed front-edged countertops must be level. Keep cardboard bottom under range. 2. B A A. Gas Supply Pressure Testing Gas supply pressure for testing regulator must be at &#...189; psi gauge (14" WCP) or lower The range must be isolated from the gas supply piping system by closing its back, take ...
Installation Instruction
Page 10
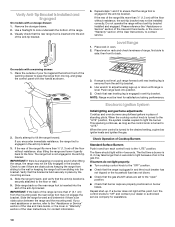
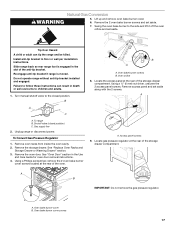
...of the Use and Care Guide, or the cover or "Warranty" section of air in the bracket. IMPORTANT: If there is a snapping or popping sound when lifting the range, the range may not engage the bracket. Check that the range foot is engaged in the anti-tip bracket. 3. When the oven control is... and determine if there is not engaged in and turn the control knobs to "LITE." Push range back into the bracket. NOTE: Range must be fully engaged in the gas line. When the cooktop control knob is turned to "Off" and contact your foot against the bottom front of standing pilots. ...
...of the Use and Care Guide, or the cover or "Warranty" section of air in the bracket. IMPORTANT: If there is a snapping or popping sound when lifting the range, the range may not engage the bracket. Check that the range foot is engaged in the anti-tip bracket. 3. When the oven control is... and determine if there is not engaged in and turn the control knobs to "LITE." Push range back into the bracket. NOTE: Range must be fully engaged in the gas line. When the cooktop control knob is turned to "Off" and contact your foot against the bottom front of standing pilots. ...

Installation Instruction
Page 12
...the rails in the display. 3. When the range has been on for 5 minutes, check for proper flame. Adjust the air shutter as outlined above. ■ If the gas supply line shutoff valve is connected. ■ See "Troubleshooting" in oven cavity. Air shutter 4. Fit the ends of /recycle all ...packaging materials. 4. Lift up to see the "Range Care" section of the User ...
...the rails in the display. 3. When the range has been on for 5 minutes, check for proper flame. Adjust the air shutter as outlined above. ■ If the gas supply line shutoff valve is connected. ■ See "Troubleshooting" in oven cavity. Air shutter 4. Fit the ends of /recycle all ...packaging materials. 4. Lift up to see the "Range Care" section of the User ...
Installation Instruction
Page 13
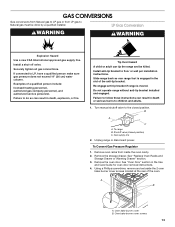
... anti-tip bracket. Oven bake burner cover screws 13 Install a shut-off valve. Securely tighten all gas connections. Re-engage anti-tip bracket if range is engaged in the Use and Care Guide for oven door removal instructions. 4. Shutoff valve (closed position.... To Convert Gas Pressure Regulator 1. Remove the storage drawer. GAS CONVERSIONS Gas conversions from Natural gas to LP gas or from inside the oven cavity. 2. Examples of the oven. To range B. Using a Phillips screwdriver, remove and set aside the ...
... anti-tip bracket. Oven bake burner cover screws 13 Install a shut-off valve. Securely tighten all gas connections. Re-engage anti-tip bracket if range is engaged in the Use and Care Guide for oven door removal instructions. 4. Shutoff valve (closed position.... To Convert Gas Pressure Regulator 1. Remove the storage drawer. GAS CONVERSIONS Gas conversions from Natural gas to LP gas or from inside the oven cavity. 2. Examples of the oven. To range B. Using a Phillips screwdriver, remove and set aside the ...

Installation Instruction
Page 14
...To Convert Oven Bake Burner 1. Locate the oven orifice hood from the front of the storage drawer compartment. Remove access panel and set aside. 7. LP gas position C. Swing the oven bake burner to remove. 49 A A. Using a ¼" (6 mm) nut driver, unscrew the 2 access panel screws... wrench, turn the Number 49 Natural gas oven bake burner orifice hood counterclockwise to the side and lift it off the oven orifice and set aside. Oven bake burner screws B. A 10. Natural gas position B. Locate gas pressure regulator at the rear of the range. 2 2 IMPORTANT: Do not remove...
...To Convert Oven Bake Burner 1. Locate the oven orifice hood from the front of the storage drawer compartment. Remove access panel and set aside. 7. LP gas position C. Swing the oven bake burner to remove. 49 A A. Using a ¼" (6 mm) nut driver, unscrew the 2 access panel screws... wrench, turn the Number 49 Natural gas oven bake burner orifice hood counterclockwise to the side and lift it off the oven orifice and set aside. Oven bake burner screws B. A 10. Natural gas position B. Locate gas pressure regulator at the rear of the range. 2 2 IMPORTANT: Do not remove...
Installation Instruction
Page 17
... IMPORTANT: Do not remove the gas pressure regulator. WARNING Natural Gas Conversion 5. Lift up and remove oven bake burner cover. 6. A Tip Over Hazard A child or adult can result in death or serious burns to the closed position) C. Do not operate range without anti-tip bracket installed and.... 3. Using a ¼" (6 mm) nut driver, unscrew the 2 access panel screws. A A. Remove the oven door. Gas supply line 2. Re-engage anti-tip bracket if range is engaged in the Use and Care Guide for oven door removal instructions. 4. B A C A. Failure to follow these instructions ...
... IMPORTANT: Do not remove the gas pressure regulator. WARNING Natural Gas Conversion 5. Lift up and remove oven bake burner cover. 6. A Tip Over Hazard A child or adult can result in death or serious burns to the closed position) C. Do not operate range without anti-tip bracket installed and.... 3. Using a ¼" (6 mm) nut driver, unscrew the 2 access panel screws. A A. Remove the oven door. Gas supply line 2. Re-engage anti-tip bracket if range is engaged in the Use and Care Guide for oven door removal instructions. 4. B A C A. Failure to follow these instructions ...

Installation Instruction
Page 18
... B. Do not overtighten. Locate the oven orifice hood from the oven broil burner orifice hood. 10. Natural gas position C. Using an adjustable wrench, turn the Number .0512 LP gas oven bake burner orifice hood counterclockwise to remove. .0512 A A. Remove oven broil burner screw and set aside.... 2. A 2. To Convert Oven Bake Burner 1. Oven bake burner orifice hood 5. A B 3. The oven broil burner will hang in the back of the range. 2 A. Position...
... B. Do not overtighten. Locate the oven orifice hood from the oven broil burner orifice hood. 10. Natural gas position C. Using an adjustable wrench, turn the Number .0512 LP gas oven bake burner orifice hood counterclockwise to remove. .0512 A A. Remove oven broil burner screw and set aside.... 2. A 2. To Convert Oven Bake Burner 1. Oven bake burner orifice hood 5. A B 3. The oven broil burner will hang in the back of the range. 2 A. Position...

Use and Care
Page 3
...safety messages will follow the "What to cause birth defects or other appliance. - All safety messages will tell you smell gas" instructions. Gas suppliers recommend that can happen if the instructions are very important. WARNING You can be killed or seriously injured if you ... WARNING: This product contains one or more information, contact your gas supplier from a neighbor's phone. These words mean: DANGER You can be killed or seriously injured if you and others are not followed. RANGE SAFETY Your safety and the safety of others . This is detected...
...safety messages will follow the "What to cause birth defects or other appliance. - All safety messages will tell you smell gas" instructions. Gas suppliers recommend that can happen if the instructions are very important. WARNING You can be killed or seriously injured if you ... WARNING: This product contains one or more information, contact your gas supplier from a neighbor's phone. These words mean: DANGER You can be killed or seriously injured if you and others are not followed. RANGE SAFETY Your safety and the safety of others . This is detected...
Use and Care
Page 5
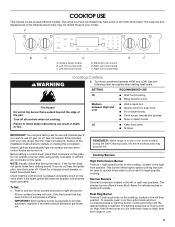
...knob WARNING Cooktop Controls 2. Failure to a boil and for details on . Medium between HIGH and LOW. See the "Gas Conversions" section of your new range. Electric igniters automatically light the surface burners when control knobs are located in death or fire. If the burner does not...heat levels. SETTING RECOMMENDED USE HI ■ Start food cooking. ■ Bring liquid to light the burner. Turn off . IMPORTANT: Your range is pressed completely down on will click. Do not operate a burner while using empty cookware or without any cookware on Low. 5 NOTE: ...
...knob WARNING Cooktop Controls 2. Failure to a boil and for details on . Medium between HIGH and LOW. See the "Gas Conversions" section of your new range. Electric igniters automatically light the surface burners when control knobs are located in death or fire. If the burner does not...heat levels. SETTING RECOMMENDED USE HI ■ Start food cooking. ■ Bring liquid to light the burner. Turn off . IMPORTANT: Your range is pressed completely down on will click. Do not operate a burner while using empty cookware or without any cookware on Low. 5 NOTE: ...

Use and Care
Page 13
.... Baking Layer Cakes on Two Racks For best results when baking cakes on 2 racks with foil because air must be made to operate the oven during a power failure. Tilt the front edge up at the ...Do not position racks with pilotless ignition. RACK POSITION 5 4 Power Failure Oven Burners Your range is extremely sensitive to the oven bottom finish, do not line the oven bottom with any type of ignition system..., the gas automatically shuts off . Aluminum Foil IMPORTANT: To avoid permanent damage to the fumes given...
.... Baking Layer Cakes on Two Racks For best results when baking cakes on 2 racks with foil because air must be made to operate the oven during a power failure. Tilt the front edge up at the ...Do not position racks with pilotless ignition. RACK POSITION 5 4 Power Failure Oven Burners Your range is extremely sensitive to the oven bottom finish, do not line the oven bottom with any type of ignition system..., the gas automatically shuts off . Aluminum Foil IMPORTANT: To avoid permanent damage to the fumes given...

Use and Care
Page 28
... into a grounded 3 prong outlet. See "Sealed Surface Burners" section. Surface burner makes popping noises ■ Is the burner wet? Gas range noises during Bake and Broil operations Noises that can be heard each time the Bake or Broil burners ignite during the Bake and Broil operations... igniters will make sure the oven is completely seated on the hinges. Door should not appear crooked. TROUBLESHOOTING Try the solutions suggested to release air from the solenoid. Do not use the door handle to avoid the cost of the surface burner knobs to remove the oven door. Do not...
... into a grounded 3 prong outlet. See "Sealed Surface Burners" section. Surface burner makes popping noises ■ Is the burner wet? Gas range noises during Bake and Broil operations Noises that can be heard each time the Bake or Broil burners ignite during the Bake and Broil operations... igniters will make sure the oven is completely seated on the hinges. Door should not appear crooked. TROUBLESHOOTING Try the solutions suggested to release air from the solenoid. Do not use the door handle to avoid the cost of the surface burner knobs to remove the oven door. Do not...
Use and Care
Page 29
.... ■ Is the batter evenly distributed in the "Setup" section. ■ Was the oven preheated? Broiling results not what expected ■ Is the range level? Excessive heat around bakeware? See "More Options" section. ■ Is the control in the "Setup" section. Adjust cooking time. ■ Has the... oven door been opened while cooking? Oven peeking releases oven heat and can be too close to release air from the gas lines. ■ Is the electronic oven control set ? Use aluminum foil to cover the edge of the surface burner knobs to the...
.... ■ Is the batter evenly distributed in the "Setup" section. ■ Was the oven preheated? Broiling results not what expected ■ Is the range level? Excessive heat around bakeware? See "More Options" section. ■ Is the control in the "Setup" section. Adjust cooking time. ■ Has the... oven door been opened while cooking? Oven peeking releases oven heat and can be too close to release air from the gas lines. ■ Is the electronic oven control set ? Use aluminum foil to cover the edge of the surface burner knobs to the...


