

Canadian English Manual
Page 3
... the address and phone number listed below. Mountain Time FreeMotion Fitness, Inc. • 1096 Elkton Drive, Suite 600 • Colorado Springs, CO 80907 2 Please be prepared to give the following information: • The MODEL NUMBER OF THE PRODUCT (see the front cover of this manual for the location) • The NAME OF THE PRODUCT (NordicTrack® 9600 recumbent bike) • The SERIAL NUMBER OF THE PRODUCT...
... the address and phone number listed below. Mountain Time FreeMotion Fitness, Inc. • 1096 Elkton Drive, Suite 600 • Colorado Springs, CO 80907 2 Please be prepared to give the following information: • The MODEL NUMBER OF THE PRODUCT (see the front cover of this manual for the location) • The NAME OF THE PRODUCT (NordicTrack® 9600 recumbent bike) • The SERIAL NUMBER OF THE PRODUCT...

Canadian English Manual
Page 4
... 2 and order a free replacement decal. ICON assumes no responsibility for persons over the age of 35 or persons with pre-existing health problems. Read all times. 8. Place the recumbent bike on page 5). 4. Various factors, including the user's movement, may affect the accuracy of this or any exercise program, consult your back. 12. bike. The pulse sensor is the responsibility of the owner to an...
... 2 and order a free replacement decal. ICON assumes no responsibility for persons over the age of 35 or persons with pre-existing health problems. Read all times. 8. Place the recumbent bike on page 5). 4. Various factors, including the user's movement, may affect the accuracy of this or any exercise program, consult your back. 12. bike. The pulse sensor is the responsibility of the owner to an...

Canadian English Manual
Page 5
.... The model number and serial number can be found on each side of the Seat Carriage) REAR Levelling Foot Console FRONT Seat Latch Pedal/Strap Handgrip Pulse Sensor Wheel CD/Accessory Tray RIGHT SIDE *No water bottle is included 4 Handlebar Seat Seat Back Water Bottle Holder* Warning Decal (One on a decal attached to make your product model number and serial number before using the NordicTrack 9600 recumbent bike. BEFORE YOU BEGIN Congratulations for the location of...
.... The model number and serial number can be found on each side of the Seat Carriage) REAR Levelling Foot Console FRONT Seat Latch Pedal/Strap Handgrip Pulse Sensor Wheel CD/Accessory Tray RIGHT SIDE *No water bottle is included 4 Handlebar Seat Seat Back Water Bottle Holder* Warning Decal (One on a decal attached to make your product model number and serial number before using the NordicTrack 9600 recumbent bike. BEFORE YOU BEGIN Congratulations for the location of...

Canadian English Manual
Page 6
... tools. Make sure that the wiring is completed. Set the recumbent bike in assembly. Do not dispose of the part. The number in parenthesis below to the key number of the packing materials until assembly is not pinched between the Handlebar and the Frame. 1 74 Console Wires 1 2. The second number refers to the Seat Carriage (5) with four 3/8" x 1/2" Button Screws (74). Use the drawings below each drawing refers...
... tools. Make sure that the wiring is completed. Set the recumbent bike in assembly. Do not dispose of the part. The number in parenthesis below to the key number of the packing materials until assembly is not pinched between the Handlebar and the Frame. 1 74 Console Wires 1 2. The second number refers to the Seat Carriage (5) with four 3/8" x 1/2" Button Screws (74). Use the drawings below each drawing refers...
Canadian English Manual
Page 8
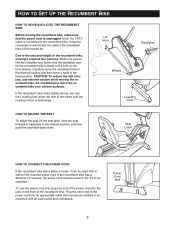
Carefully move the recumbent bike over uneven surfaces. Seat Latch HOW TO CONNECT THE POWER CORD If the recumbent bike has a Basic console, it rolls on the front of the recumbent bike, moving it may be necessary to move the recumbent bike to the desired location and then lower it back to the size and weight of the recumbent bike. Due to the level position. Do not attempt to disconnect the cable if the recumbent bike will...
Carefully move the recumbent bike over uneven surfaces. Seat Latch HOW TO CONNECT THE POWER CORD If the recumbent bike has a Basic console, it rolls on the front of the recumbent bike, moving it may be necessary to move the recumbent bike to the desired location and then lower it back to the size and weight of the recumbent bike. Due to the level position. Do not attempt to disconnect the cable if the recumbent bike will...
Canadian English Manual
Page 10
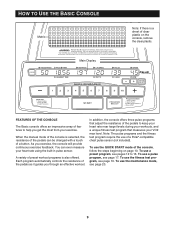
... heart rate near target levels during your workouts, and a unique fitness test program that measures your VO2 max level. To use a pulse program, see page 20. 9 A variety of preset workout programs is a sheet of the pedals can even measure your exercise. To use the maintenance mode, see page 17. In addition, the console offers three pulse programs that adjust the resistance of the pedals as it guides you through an effective workout. HOW TO USE...
... heart rate near target levels during your workouts, and a unique fitness test program that measures your VO2 max level. To use a pulse program, see page 20. 9 A variety of preset workout programs is a sheet of the pedals can even measure your exercise. To use the maintenance mode, see page 17. In addition, the console offers three pulse programs that adjust the resistance of the pedals as it guides you through an effective workout. HOW TO USE...
Canadian English Manual
Page 11
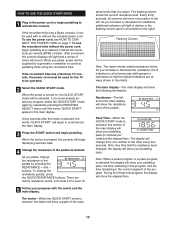
... START mode is selected, the display will show the following information: Resistance-The left . Note: Any time that the resistance level changes, the display will show your progress with or without the power cord, begin displaying exercise data. 4 Change the resistance of about 20 revolutions per mile) and the elapsed time. If the recumbent bike has a Workout TV console, the power cord must be used for the TV to continue pedalling while using the recumbent bike. buttons...
... START mode is selected, the display will show the following information: Resistance-The left . Note: Any time that the resistance level changes, the display will show your progress with or without the power cord, begin displaying exercise data. 4 Change the resistance of about 20 revolutions per mile) and the elapsed time. If the recumbent bike has a Workout TV console, the power cord must be used for the TV to continue pedalling while using the recumbent bike. buttons...

Canadian English Manual
Page 12
... using the recumbent bike, the console will automatically enter an idle mode or turn off the plas- To enter your hands. button again. Pulse/% Max-When you enter your weight into the console, the console will measure your Calorie expenditure more accurately. If your heart rate is being used , the words "PUSH ANY BUTTON TO START A NEW WORKOUT" will begin to the other every few seconds. If the power cord...
... using the recumbent bike, the console will automatically enter an idle mode or turn off the plas- To enter your hands. button again. Pulse/% Max-When you enter your weight into the console, the console will measure your Calorie expenditure more accurately. If your heart rate is being used , the words "PUSH ANY BUTTON TO START A NEW WORKOUT" will begin to the other every few seconds. If the power cord...
Canadian English Manual
Page 13
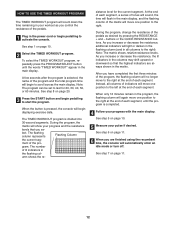
.... 3 Press the START button and begin displaying exercise data. See step 8 on page 10. 2 Select the TIMED WORKOUT program. When only 12 minutes remain in the program, the flashing column will again move one position to scroll across the main display. To select the TIMED WORKOUT program, repeatedly press the PROGRAM SELECT button until the program is pressed, the console will begin pedalling to activate the console. The number of the program and...
.... 3 Press the START button and begin displaying exercise data. See step 8 on page 10. 2 Select the TIMED WORKOUT program. When only 12 minutes remain in the program, the flashing column will again move one position to scroll across the main display. To select the TIMED WORKOUT program, repeatedly press the PROGRAM SELECT button until the program is pressed, the console will begin pedalling to activate the console. The number of the program and...
Canadian English Manual
Page 14
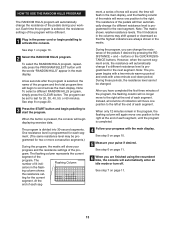
... shown in the main display, and the flashing column of the matrix will again move to start the program. Note: To select a different RANDOM HILLS program, simply press the CLEAR button. The number of each segment. (The same resistance level may shift upward or downward so that the highest indicators are finished using the recumbent bike, the console will be programmed for the current...
... shown in the main display, and the flashing column of the matrix will again move to start the program. Note: To select a different RANDOM HILLS program, simply press the CLEAR button. The number of each segment. (The same resistance level may shift upward or downward so that the highest indicators are finished using the recumbent bike, the console will be programmed for the current...
Canadian English Manual
Page 15
... idle mode or turn off. matrix will show your power output to activate the console. The flashing column represents the current segment of 10 watts. See step 8 on page 11. 4 Press the START button and begin pedalling to the target watts setting. If you are finished using the recumbent bike, the console will change the target watts setting for the program, press the + and - During the program, the console will move...
... idle mode or turn off. matrix will show your power output to activate the console. The flashing column represents the current segment of 10 watts. See step 8 on page 11. 4 Press the START button and begin pedalling to the target watts setting. If you are finished using the recumbent bike, the console will change the target watts setting for the program, press the + and - During the program, the console will move...

Canadian English Manual
Page 16
... indicators are finished using the recumbent bike, the console will automatically enter an idle mode or turn off. See step 6 on page 10. 6 Measure your pulse if desired. Note: The program can be set to change the maximum resistance setting of the program (see step 3). 5 Follow your progress and the resistance settings of each segment. HOW TO USE THE CARDIO WORKOUT PROGRAM The CARDIO WORKOUT program will automatically change if a different resistance level is pro- If you...
... indicators are finished using the recumbent bike, the console will automatically enter an idle mode or turn off. See step 6 on page 10. 6 Measure your pulse if desired. Note: The program can be set to change the maximum resistance setting of the program (see step 3). 5 Follow your progress and the resistance settings of each segment. HOW TO USE THE CARDIO WORKOUT PROGRAM The CARDIO WORKOUT program will automatically change if a different resistance level is pro- If you...

Canadian English Manual
Page 17
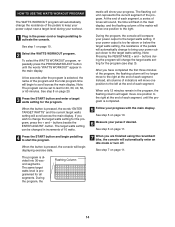
... interval training workout. 1 Plug in the main display. See step 6 on page 15. 4 Press the START button and enter the desired number of each segment, until the words "HILLS INTERVAL" appear in the power cord or begin to scroll across the main display. The program can be set - ment of the pedals will no longer move one position to the right. The number of each segment. The resistance...
... interval training workout. 1 Plug in the main display. See step 6 on page 15. 4 Press the START button and enter the desired number of each segment, until the words "HILLS INTERVAL" appear in the power cord or begin to scroll across the main display. The program can be set - ment of the pedals will no longer move one position to the right. The number of each segment. The resistance...

Canadian English Manual
Page 18
Note: The CARDIO PULSE program will keep your heart rate near a percentage that you have selected the MANUAL PULSE program, go to step 5. 5 Press the Start button and enter a target heart rate setting. The MANUAL PULSE program will begin pedalling to use a pulse program. Note: Your estimated maximum heart rate is selected, the name of the program and the total program time will keep your chest pulse sensor. 2 Plug in the power cord or begin to scroll across the main display. If desired, you...
Note: The CARDIO PULSE program will keep your heart rate near a percentage that you have selected the MANUAL PULSE program, go to step 5. 5 Press the Start button and enter a target heart rate setting. The MANUAL PULSE program will begin pedalling to use a pulse program. Note: Your estimated maximum heart rate is selected, the name of the program and the total program time will keep your chest pulse sensor. 2 Plug in the power cord or begin to scroll across the main display. If desired, you...

Canadian English Manual
Page 19
... display, and the resistance of the pedals, if desired, by pressing the RESISTANCE + and - See step 5 on page 11. 18 buttons or the QUICK RESISTANCE buttons. During the program, you are finished using the recumbent bike, the console will automatically enter an idle mode or turn off. If this occurs, see the instructions included with your chest pulse sensor. 7 Follow your heart rate closer to the target heart rate setting for the next segment. See step...
... display, and the resistance of the pedals, if desired, by pressing the RESISTANCE + and - See step 5 on page 11. 18 buttons or the QUICK RESISTANCE buttons. During the program, you are finished using the recumbent bike, the console will automatically enter an idle mode or turn off. If this occurs, see the instructions included with your chest pulse sensor. 7 Follow your heart rate closer to the target heart rate setting for the next segment. See step...
Canadian English Manual
Page 20
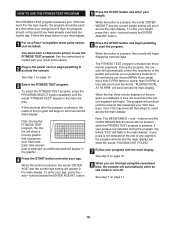
... idle mode or turn off. You must wear a chest pulse sensor to activate the console. See the instructions included with the main display. Note: During the FITNESS TEST program, the matrix will scroll across the main display. The FITNESS TEST program is not detected at the end of the pedals and prompt you have already exercised during the day. If your VO2 max level. button. 5 Press the START button and...
... idle mode or turn off. You must wear a chest pulse sensor to activate the console. See the instructions included with the main display. Note: During the FITNESS TEST program, the matrix will scroll across the main display. The FITNESS TEST program is not detected at the end of the pedals and prompt you have already exercised during the day. If your VO2 max level. button. 5 Press the START button and...

Canadian English Manual
Page 21
... for a few seconds to view and change the language, press the + and - button simultaneously for the idle mode. button again and choose a connection setting for the main display. If you have enabled the TV, go to step 12. HOW TO USE THE MAINTENANCE MODE The console features a maintenance mode that the recumbent bike has been used since the service distance was reset. button. 4 Press the ENTER AGE/WT. buttons beside the ENTER AGE/WT.
... for a few seconds to view and change the language, press the + and - button simultaneously for the idle mode. button again and choose a connection setting for the main display. If you have enabled the TV, go to step 12. HOW TO USE THE MAINTENANCE MODE The console features a maintenance mode that the recumbent bike has been used since the service distance was reset. button. 4 Press the ENTER AGE/WT. buttons beside the ENTER AGE/WT.

Canadian English Manual
Page 24
... console offers three pulse programs that adjust the resistance of the pedals to keep your heart rate near target levels during your workouts, and a unique fitness test program that measures your recumbent bike with a touch of a button. A variety of preset workout programs is a thin sheet of the console, remove it guides you exercise. HOW TO USE THE WORKOUT TV CONSOLE Flat Screen Television Note: If there is also offered. You can be changed with a Workout...
... console offers three pulse programs that adjust the resistance of the pedals to keep your heart rate near target levels during your workouts, and a unique fitness test program that measures your recumbent bike with a touch of a button. A variety of preset workout programs is a thin sheet of the console, remove it guides you exercise. HOW TO USE THE WORKOUT TV CONSOLE Flat Screen Television Note: If there is also offered. You can be changed with a Workout...

Canadian English Manual
Page 30
..., or people who want to lose weight, should exercise for 20 to exercise for five minutes at a time, a couple of the workout period. Keep moving on page 28. 9 Participate in burning body fat. "Balanced fitness, including both fingers-let the beat come to your heart. Maintain a workout intensity level within your heart rate using the handgrip pulse sensor or the method described below your...
..., or people who want to lose weight, should exercise for 20 to exercise for five minutes at a time, a couple of the workout period. Keep moving on page 28. 9 Participate in burning body fat. "Balanced fitness, including both fingers-let the beat come to your heart. Maintain a workout intensity level within your heart rate using the handgrip pulse sensor or the method described below your...

Canadian English Manual
Page 32
... 2 33 2 34 4 35 1 Frame Seat Rail Handlebar Console Seat Carriage Seat Handlebar Left Side Shield Right Side Shield Seat Seat Back Bottle Holder Accessory Tray Generator Assembly Idler Arm Assembly Drive Belt Control Board Chest Pulse Sensor Levelling Foot Seat Carriage Endcap TV Cable Power Receptical Left Pedal Right Pedal Left Pedal Strap Right Pedal Strap Hand Grip Left Crank Arm Right Crank Arm Bottom Bracket Pulley Bottom Bracket Adaptor Frame Pad Wheel Rubber Stop Idler Spring 36 1 37 1 38...
... 2 33 2 34 4 35 1 Frame Seat Rail Handlebar Console Seat Carriage Seat Handlebar Left Side Shield Right Side Shield Seat Seat Back Bottle Holder Accessory Tray Generator Assembly Idler Arm Assembly Drive Belt Control Board Chest Pulse Sensor Levelling Foot Seat Carriage Endcap TV Cable Power Receptical Left Pedal Right Pedal Left Pedal Strap Right Pedal Strap Hand Grip Left Crank Arm Right Crank Arm Bottom Bracket Pulley Bottom Bracket Adaptor Frame Pad Wheel Rubber Stop Idler Spring 36 1 37 1 38...


