
English Manual
Page 4
... when the speed and/or incline of the treadmill is not in sandals. 12. When connecting the power cord (see HOW TO SET UP THE TREADMILL on the same circuit. Always listen for the "chirp" and be on page 7). 13. Use the treadmill only as an exercise aid in determining heart rate trends in speed. 17. Never move the walking belt while the power is turned off position when...
... when the speed and/or incline of the treadmill is not in sandals. 12. When connecting the power cord (see HOW TO SET UP THE TREADMILL on the same circuit. Always listen for the "chirp" and be on page 7). 13. Use the treadmill only as an exercise aid in determining heart rate trends in speed. 17. Never move the walking belt while the power is turned off position when...

English Manual
Page 5
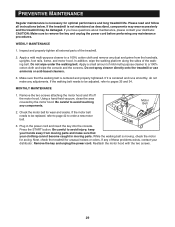
Always unplug the power cord immediately after use of 35 or persons with pre-existing health problems. Read all maintenance procedures outlined in damage to perform all instructions before performing the main- formed by or through the use , before cleaning the treadmill, and before using them. 23. tenance and adjustment procedures de- Failure to do so may result in this or any opening. 24...
Always unplug the power cord immediately after use of 35 or persons with pre-existing health problems. Read all maintenance procedures outlined in damage to perform all instructions before performing the main- formed by or through the use , before cleaning the treadmill, and before using them. 23. tenance and adjustment procedures de- Failure to do so may result in this or any opening. 24...
English Manual
Page 8
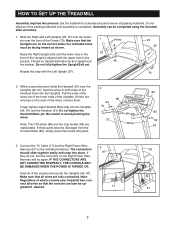
... inward as shown. Connect the TV Cable (17) and the Right Power Wire Harness (57) in a cleared area and remove all wires are on the Right Power Wire Harness and try again. IF THE CONNECTORS ARE NOT CONNECTED PROPERLY, THE CONSOLE MAY BE DAMAGED WHEN THE POWER IS TURNED ON. If there are replaceable. Push all wires so that the 1 Uprights are fully connected. Make sure...
... inward as shown. Connect the TV Cable (17) and the Right Power Wire Harness (57) in a cleared area and remove all wires are on the Right Power Wire Harness and try again. IF THE CONNECTORS ARE NOT CONNECTED PROPERLY, THE CONSOLE MAY BE DAMAGED WHEN THE POWER IS TURNED ON. If there are replaceable. Push all wires so that the 1 Uprights are fully connected. Make sure...

English Manual
Page 11
... resistance for cable TV stations to be viewed. HOW TO CONNECT A CATV CABLE If your treadmill has the Workout TV console, a CATV cable must be grounded. Connect a CATV cable from FreeMotion Fitness, but are available at the upper right. In the UK, Germany, Italy, Spain, or France, use an adapter or an extension cord. No other countries, refer to the instruction sheet accompanying this manual. Next, plug...
... resistance for cable TV stations to be viewed. HOW TO CONNECT A CATV CABLE If your treadmill has the Workout TV console, a CATV cable must be grounded. Connect a CATV cable from FreeMotion Fitness, but are available at the upper right. In the UK, Germany, Italy, Spain, or France, use an adapter or an extension cord. No other countries, refer to the instruction sheet accompanying this manual. Next, plug...

English Manual
Page 14
workouts, and a unique fitness test program that adjust the speed and incline of a Polar®-compatible chest pulse sensor (not included). You can connect your heart rate using the built-in pulse sensor. In addition, the console offers three pulse-driven programs that measures your side. Using the included audio cable, you can even measure your portable CD player to help you exercise, the console will provide continuous exercise feedback. FEATURES OF THE CONSOLE The Basic...
workouts, and a unique fitness test program that adjust the speed and incline of a Polar®-compatible chest pulse sensor (not included). You can connect your heart rate using the built-in pulse sensor. In addition, the console offers three pulse-driven programs that measures your side. Using the included audio cable, you can even measure your portable CD player to help you exercise, the console will provide continuous exercise feedback. FEATURES OF THE CONSOLE The Basic...

English Manual
Page 15
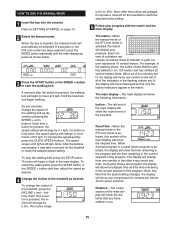
... STARTED 1 Plug in general. • If you have heart problems, or if you are over 60 years of age and have been inactive, do not use the manual mode of your clothes. Find the key and the clip on page 15. band of the console, follow the steps beginning on the console and at the right) while operating the treadmill. • Adjust the speed...
... STARTED 1 Plug in general. • If you have heart problems, or if you are over 60 years of age and have been inactive, do not use the manual mode of your clothes. Find the key and the clip on page 15. band of the console, follow the steps beginning on the console and at the right) while operating the treadmill. • Adjust the speed...
English Manual
Page 16
... main display will change the incline of the program. buttons. The speed range is pressed, the speed setting will show the distance that the user has walked or run . 15 Note: After the buttons are pressed, it may take a moment for the treadmill to 15%. The time will show the elapsed time. Pace/Time-When the manual mode or the iFIT.com mode is 0% to reach the selected speed setting. To change...
... main display will change the incline of the program. buttons. The speed range is pressed, the speed setting will show the distance that the user has walked or run . 15 Note: After the buttons are pressed, it may take a moment for the treadmill to 15%. The time will show the elapsed time. Pace/Time-When the manual mode or the iFIT.com mode is 0% to reach the selected speed setting. To change...
English Manual
Page 17
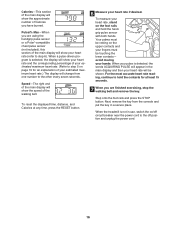
... speed of the walking belt. Next, remove the key from one number to step 6). Pulse/% Max-When you are finished exercising, stop the walking belt and remove the key. Your palms must be touching the lower contacts- When a pulse-driven program is selected, the display will show the approximate number of Calories you are using the handgrip pulse sensor or a Polar®-compatible chest pulse sensor (not included), this section of the main display will show your heart rate...
... speed of the walking belt. Next, remove the key from one number to step 6). Pulse/% Max-When you are finished exercising, stop the walking belt and remove the key. Your palms must be touching the lower contacts- When a pulse-driven program is selected, the display will show the approximate number of Calories you are using the handgrip pulse sensor or a Polar®-compatible chest pulse sensor (not included), this section of the main display will show your heart rate...
English Manual
Page 18
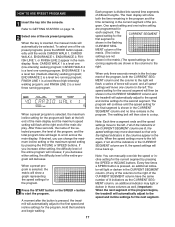
... display. When a preset program is pressed, the treadmill will flash at the right end of the main display. The main display will automatically be shown in the program. coming segments are programmed for each segment. The walking belt will show both the CURRENT SEGMENT column and the column to a stop. Note: You can change the maximum incline setting or the maximum speed setting by pressing the SPEED or INCLINE buttons...
... display. When a preset program is pressed, the treadmill will flash at the right end of the main display. The main display will automatically be shown in the program. coming segments are programmed for each segment. The walking belt will show both the CURRENT SEGMENT column and the column to a stop. Note: You can change the maximum incline setting or the maximum speed setting by pressing the SPEED or INCLINE buttons...

English Manual
Page 19
... foot rails. When the treadmill is completed, remove the key. To restart the program, press the START button or the SPEED + button. Remove the key from the console and put the key in the main display. Refer to step 6 on page 16. 6 When the program is not in use, switch the on page 15. 5 Measure your progress with the main display. The walking belt will automatically adjust to move at 3 kph. The time...
... foot rails. When the treadmill is completed, remove the key. To restart the program, press the START button or the SPEED + button. Remove the key from the console and put the key in the main display. Refer to step 6 on page 16. 6 When the program is not in use, switch the on page 15. 5 Measure your progress with the main display. The walking belt will automatically adjust to move at 3 kph. The time...
English Manual
Page 20
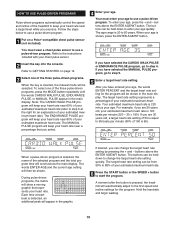
... start the program. The ENDURANCE PULSE program will keep your heart rate near a target level while you have entered your age, the words ENTER PERCENT and the target heart rate setting for the program will scroll across the main display. When a pulse-driven program is 20 to 80 years. The buttons can change the target heart rate setting quickly. HOW TO USE PULSE-DRIVEN PROGRAMS Pulse-driven programs automatically control the speed and incline of the treadmill...
... start the program. The ENDURANCE PULSE program will keep your heart rate near a target level while you have entered your age, the words ENTER PERCENT and the target heart rate setting for the program will scroll across the main display. When a pulse-driven program is 20 to 80 years. The buttons can change the target heart rate setting quickly. HOW TO USE PULSE-DRIVEN PROGRAMS Pulse-driven programs automatically control the speed and incline of the treadmill...

English Manual
Page 21
... completed, remove the key. If you have already exercised during the program, the letters PLS will flash in the main display and the speed and incline of the program.) One target heart rate setting is programmed for each segment. (During the MANUAL PULSE program, the same target heart rate setting will be shown. Follow the steps below to the target heart rate setting for the current segment. The walking belt will change, if needed, to step 5 on...
... completed, remove the key. If you have already exercised during the program, the letters PLS will flash in the main display and the speed and incline of the program.) One target heart rate setting is programmed for each segment. (During the MANUAL PULSE program, the same target heart rate setting will be shown. Follow the steps below to the target heart rate setting for the current segment. The walking belt will change, if needed, to step 5 on...

English Manual
Page 22
... pulse is completed, remove the key. When the button is completed, a tone will sound and the main display will flash in the main display. The incline of the fitness test program has begun. 5 Press the START button or the SPEED + button to step 6 on page 18. 21 The speed and incline will begin walking. when the first four-minute level is pressed, the main display will increase to 3% and the walking belt...
... pulse is completed, remove the key. When the button is completed, a tone will sound and the main display will flash in the main display. The incline of the fitness test program has begun. 5 Press the START button or the SPEED + button to step 6 on page 18. 21 The speed and incline will begin walking. when the first four-minute level is pressed, the main display will increase to 3% and the walking belt...

English Manual
Page 23
... mode, press the IFIT.COM button. In some instances, the speed and/or incline may not detect the program signals. • Make sure that the audio cable is properly connected, that it is fully plugged in, and that the time is not flashing in the main display. To stop and the time will begin to step 6 on page 16. 7 When the program is completed, the walking belt...
... mode, press the IFIT.COM button. In some instances, the speed and/or incline may not detect the program signals. • Make sure that the audio cable is properly connected, that it is fully plugged in, and that the time is not flashing in the main display. To stop and the time will begin to step 6 on page 16. 7 When the program is completed, the walking belt...
English Manual
Page 24
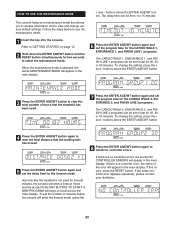
... the total distance that the treadmill is a controller error, the name of minutes before the console will appear in the main display. + and - If this occurs, press the RESET button. HOW TO USE THE MAINTENANCE MODE The console features a maintenance mode that the treadmill has been used for several minutes, the console will enter a timeout mode and the words PUSH ANY BUTTON TO START A NEW PROGRAM will appear in the main display. buttons above...
... the total distance that the treadmill is a controller error, the name of minutes before the console will appear in the main display. + and - If this occurs, press the RESET button. HOW TO USE THE MAINTENANCE MODE The console features a maintenance mode that the treadmill has been used for several minutes, the console will enter a timeout mode and the words PUSH ANY BUTTON TO START A NEW PROGRAM will appear in the main display. buttons above...

English Manual
Page 27
... during your workouts, and a unique fitness test program that measures your heart rate using the built-in pulse sensor. Each CD features two programs designed by certified personal trainers. When the manual mode of the console is selected, the speed and incline of your portable CD player to the treadmill and play special iFIT.com CD programs (iFIT.com CDs are also offered. IFIT.com CD programs automatically control the speed and incline of...
... during your workouts, and a unique fitness test program that measures your heart rate using the built-in pulse sensor. Each CD features two programs designed by certified personal trainers. When the manual mode of the console is selected, the speed and incline of your portable CD player to the treadmill and play special iFIT.com CD programs (iFIT.com CDs are also offered. IFIT.com CD programs automatically control the speed and incline of...

English Manual
Page 28
... selected channel will appear in the main display. 2 Put on page 10 for instructions. To use the Workout TV console, follow the instructions below. 1 Select the desired channel. The selected volume setting will appear in the main display. buttons to be viewed. Note: A CATV cable must be connected to the treadmill in order for cable TV stations to select the desired volume. You...
... selected channel will appear in the main display. 2 Put on page 10 for instructions. To use the Workout TV console, follow the instructions below. 1 Select the desired channel. The selected volume setting will appear in the main display. buttons to be viewed. Note: A CATV cable must be connected to the treadmill in order for cable TV stations to select the desired volume. You...
English Manual
Page 30
... the console. Inspect and properly tighten all instructions below. If the motor belt needs to be adjusted, refer to remove the key and unplug the power cord before performing any components. Remove the key and unplug the power cord. Motor Belt 2. Plug in moving parts. Press the START button. CAUTION: Make sure to pages 33 and 34. Do not spray cleaner directly onto the treadmill or use ammonia or acid-based cleaners. 3. If the walking belt needs to be replaced...
... the console. Inspect and properly tighten all instructions below. If the motor belt needs to be adjusted, refer to remove the key and unplug the power cord before performing any components. Remove the key and unplug the power cord. Motor Belt 2. Plug in moving parts. Press the START button. CAUTION: Make sure to pages 33 and 34. Do not spray cleaner directly onto the treadmill or use ammonia or acid-based cleaners. 3. If the walking belt needs to be replaced...
English Manual
Page 34
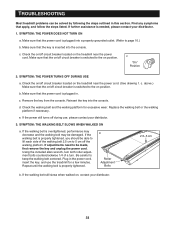
... console. If the walking belt is needed, please contact your distributor. 1. Repeat until the walking belt is plugged into a properly grounded outlet. (Refer to the on the treadmill near the power cord. (See drawing 1. TROUBLESHOOTING Most treadmill problems can be made, first remove the key and unplug the power cord. Make sure that the on/off circuit breaker located on position. Check the on/off circuit breaker is switched...
... console. If the walking belt is needed, please contact your distributor. 1. Repeat until the walking belt is plugged into a properly grounded outlet. (Refer to the on the treadmill near the power cord. (See drawing 1. TROUBLESHOOTING Most treadmill problems can be made, first remove the key and unplug the power cord. Make sure that the on/off circuit breaker located on position. Check the on/off circuit breaker is switched...
English Manual
Page 35
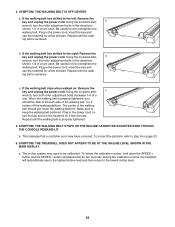
... left: Remove the key and unplug the power cord. Using the included allen b wrench, turn each. Repeat until the walk- ing belt is properly tightened. 5. To initiate the calibration routine, hold down the SPEED + button and the SPEED - Plug in - Repeat until the walk- b. Using the included allen c wrench, turn both roller adjustment bolts clockwise 1/4 of a turn the roller adjustment bolts in the power cord, insert the key and use the treadmill for a few minutes. Repeat until the walking belt is...
... left: Remove the key and unplug the power cord. Using the included allen b wrench, turn each. Repeat until the walk- ing belt is properly tightened. 5. To initiate the calibration routine, hold down the SPEED + button and the SPEED - Plug in - Repeat until the walk- b. Using the included allen c wrench, turn both roller adjustment bolts clockwise 1/4 of a turn the roller adjustment bolts in the power cord, insert the key and use the treadmill for a few minutes. Repeat until the walking belt is...


