
Uk Manual
Page 1
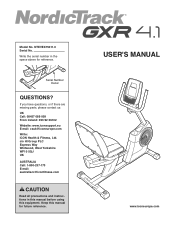
If you have questions, or if there are missing parts, please contact us: UK Call: 08457 089 009 From Ireland: 053 92 36102 Website: www.iconsupport.eu E-mail: [email protected] Write: ICON Health & Fitness, ...
If you have questions, or if there are missing parts, please contact us: UK Call: 08457 089 009 From Ireland: 053 92 36102 Website: www.iconsupport.eu E-mail: [email protected] Write: ICON Health & Fitness, ...
Uk Manual
Page 2
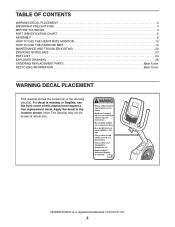
...NORDICTRACK is missing or illegible, see the front cover of this manual and request a free replacement decal. If a decal is a registered trademark of the warning decal(s). Apply the decal in the location shown. TABLE OF CONTENTS WARNING DECAL PLACEMENT 2 IMPORTANT PRECAUTIONS 3 BEFORE YOU BEGIN 4 PART... HOW TO USE THE HEART RATE MONITOR 12 HOW TO USE THE EXERCISE BIKE 13 MAINTENANCE AND TROUBLESHOOTING 22 EXERCISE GUIDELINES 23 PART LIST 24 EXPLODED DRAWING 26 ORDERING REPLACEMENT PARTS Back Cover RECYCLING INFORMATION Back Cover WARNING DECAL PLACEMENT This drawing shows the ...
...NORDICTRACK is missing or illegible, see the front cover of this manual and request a free replacement decal. If a decal is a registered trademark of the warning decal(s). Apply the decal in the location shown. TABLE OF CONTENTS WARNING DECAL PLACEMENT 2 IMPORTANT PRECAUTIONS 3 BEFORE YOU BEGIN 4 PART... HOW TO USE THE HEART RATE MONITOR 12 HOW TO USE THE EXERCISE BIKE 13 MAINTENANCE AND TROUBLESHOOTING 22 EXERCISE GUIDELINES 23 PART LIST 24 EXPLODED DRAWING 26 ORDERING REPLACEMENT PARTS Back Cover RECYCLING INFORMATION Back Cover WARNING DECAL PLACEMENT This drawing shows the ...
Uk Manual
Page 3
... weighing more than 300 lbs. (136 kg). 4. do not wear loose clothes that all users of the exercise bike are adequately informed of all times. 9. Inspect and properly tighten all warnings on a level surface with pre-existing health problems. ...all important precautions and instructions in this manual and all parts regularly. Wear appropriate clothes while exercising; Always wear athletic shoes for home use the exercise bike in a commercial, rental, or institutional setting. 5. Before beginning any worn parts immediately. 3 This is not a medical device. Various...
... weighing more than 300 lbs. (136 kg). 4. do not wear loose clothes that all users of the exercise bike are adequately informed of all times. 9. Inspect and properly tighten all warnings on a level surface with pre-existing health problems. ...all important precautions and instructions in this manual and all parts regularly. Wear appropriate clothes while exercising; Always wear athletic shoes for home use the exercise bike in a commercial, rental, or institutional setting. 5. Before beginning any worn parts immediately. 3 This is not a medical device. Various...
Uk Manual
Page 4
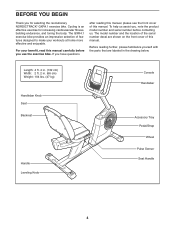
Before reading further, please familiarize yourself with the parts that are shown on the front cover of the serial... cm) Width: 2 ft. 2 in the drawing below. Cycling is an effective exercise for selecting the revolutionary NORDICTRACK® GXR4.1 exercise bike. The model number and the location of this manual. If you , note the product model number and serial...endurance, and toning the body. For your workouts at home more effective and enjoyable. The GXR4.1 exercise bike provides an impressive selection of this manual carefully before contacting us. To help us assist you...
Before reading further, please familiarize yourself with the parts that are shown on the front cover of the serial... cm) Width: 2 ft. 2 in the drawing below. Cycling is an effective exercise for selecting the revolutionary NORDICTRACK® GXR4.1 exercise bike. The model number and the location of this manual. If you , note the product model number and serial...endurance, and toning the body. For your workouts at home more effective and enjoyable. The GXR4.1 exercise bike provides an impressive selection of this manual carefully before contacting us. To help us assist you...
Uk Manual
Page 5
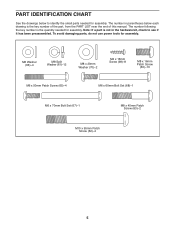
... near the end of this manual. The number following the key number is the quantity needed for assembly. To avoid damaging parts, do not use power tools for assembly. M6 Washer (66)-4 M8 Split Washer (61)-12 M8 x 20mm Washer (70)-2 M4 x 16mm Screw (98)-8 M8 x 16mm ... Bolt Set (67)-1 M8 x 45mm Patch Screw (63)-2 M10 x 95mm Patch Screw (62)-4 5 The number in parentheses below to see if it has been preassembled. PART IDENTIFICATION CHART See the drawings below each drawing is not in the hardware kit, check to identify the small...
... near the end of this manual. The number following the key number is the quantity needed for assembly. To avoid damaging parts, do not use power tools for assembly. M6 Washer (66)-4 M8 Split Washer (61)-12 M8 x 20mm Washer (70)-2 M4 x 16mm Screw (98)-8 M8 x 16mm ... Bolt Set (67)-1 M8 x 45mm Patch Screw (63)-2 M10 x 95mm Patch Screw (62)-4 5 The number in parentheses below to see if it has been preassembled. PART IDENTIFICATION CHART See the drawings below each drawing is not in the hardware kit, check to identify the small...

Uk Manual
Page 6
ASSEMBLY • Assembly requires two persons. • Place all assembly steps. • To identify small parts, see page 5. • In addition to the included tool(s), assembly requires the following tools: one adjustable wrench one Phillips screwdriver Assembly may be ...easier if you have a socket set or a set of ratchet wrenches. To avoid damaging parts, do not use power tools. 1. While another person lifts the rear of the Frame (1), attach the Front Stabilizer (2) to the Frame 2 with two M10 ...
ASSEMBLY • Assembly requires two persons. • Place all assembly steps. • To identify small parts, see page 5. • In addition to the included tool(s), assembly requires the following tools: one adjustable wrench one Phillips screwdriver Assembly may be ...easier if you have a socket set or a set of ratchet wrenches. To avoid damaging parts, do not use power tools. 1. While another person lifts the rear of the Frame (1), attach the Front Stabilizer (2) to the Frame 2 with two M10 ...

Uk Manual
Page 11
... (not shown) in the Left 12 Seat Shield (24). 91 92 24 13. Place a mat beneath the exercise bike to the desired position, and press the ends of the exercise bike. 14 If necessary, plug the Power Adapter (104) into an outlet, see HOW TO PLUG IN THE POWER ADAPTER ...the Right Pedal (16) clockwise into the Left Crank Arm (not shown). Make sure that all parts are properly tightened before you use the exercise bike. Identify the Right Pedal (16), which is completed, some extra parts may be left over. 12. Firmly tighten the Left Pedal (not shown) counterclockwise into the ...
... (not shown) in the Left 12 Seat Shield (24). 91 92 24 13. Place a mat beneath the exercise bike to the desired position, and press the ends of the exercise bike. 14 If necessary, plug the Power Adapter (104) into an outlet, see HOW TO PLUG IN THE POWER ADAPTER ...the Right Pedal (16) clockwise into the Left Crank Arm (not shown). Make sure that all parts are properly tightened before you use the exercise bike. Identify the Right Pedal (16), which is completed, some extra parts may be left over. 12. Firmly tighten the Left Pedal (not shown) counterclockwise into the ...
Uk Manual
Page 22
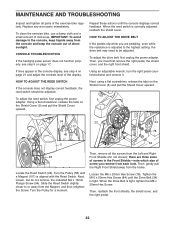
Replace any worn parts immediately. When the reed switch is tight, tighten the M6 x 20mm Hex Screw. Using an adjustable wrench, turn the right pedal...the Shield Cover (5) and pull the Shield Cover upward. Turn the Pulley for a moment. To clean the exercise bike, use a damp cloth and a small amount of the exercise bike regularly. IMPORTANT: To avoid damage to the console, keep the console out of the display. To adjust the drive... THE REED SWITCH If the console does not display correct feedback, the reed switch should be adjusted. Then, remove all parts of mild soap.
Replace any worn parts immediately. When the reed switch is tight, tighten the M6 x 20mm Hex Screw. Using an adjustable wrench, turn the right pedal...the Shield Cover (5) and pull the Shield Cover upward. Turn the Pulley for a moment. To clean the exercise bike, use a damp cloth and a small amount of the exercise bike regularly. IMPORTANT: To avoid damage to the console, keep the console out of the display. To adjust the drive... THE REED SWITCH If the console does not display correct feedback, the reed switch should be adjusted. Then, remove all parts of mild soap.

Uk Manual
Page 23
... exercise, which is to use your body uses carbohydrate calories for prolonged periods of exercise does your body begin to make exercise a regular and enjoyable part of exercise, your heart rate as an exercise aid in determining heart rate trends in your breath. During the first few minutes of time. Remember...
... exercise, which is to use your body uses carbohydrate calories for prolonged periods of exercise does your body begin to make exercise a regular and enjoyable part of exercise, your heart rate as an exercise aid in determining heart rate trends in your breath. During the first few minutes of time. Remember...
Uk Manual
Page 24
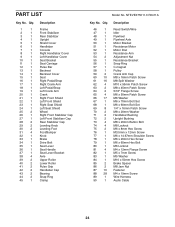
... Brake Drive Belt Seat Lever Seat Handle Seat Lever Bracket Axle Upper Roller Lower Roller Pulse Grip Handlebar Cap Bearing Snap Ring Clamp Model No. PART LIST Key No. Qty. 46 1 47 1 48 1 49 1 50 1 51 1 52 1 53 1 54 2 55 1 56 1 57 1 58 1 59 2 60 10 61 16 62 4 63 2 64...
... Brake Drive Belt Seat Lever Seat Handle Seat Lever Bracket Axle Upper Roller Lower Roller Pulse Grip Handlebar Cap Bearing Snap Ring Clamp Model No. PART LIST Key No. Qty. 46 1 47 1 48 1 49 1 50 1 51 1 52 1 53 1 54 2 55 1 56 1 57 1 58 1 59 2 60 10 61 16 62 4 63 2 64...
Uk Manual
Page 25
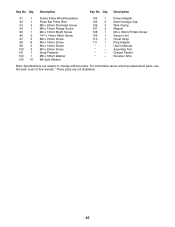
Description Key No. For information about ordering replacement parts, see the back cover of this manual. *These parts are subject to change without notice. Qty. Power Adapter Seat Carriage Cap Wire Clamp Magnet M4 x 16mm Phillips Screw Sensor Unit Chest Strap Plug Adapter ...
Description Key No. For information about ordering replacement parts, see the back cover of this manual. *These parts are subject to change without notice. Qty. Power Adapter Seat Carriage Cap Wire Clamp Magnet M4 x 16mm Phillips Screw Sensor Unit Chest Strap Plug Adapter ...
Uk Manual
Page 28
In doing so, you purchased this product. Part No. 311056 R0411A Printed in your local city office or the establishment where you will help us assist you, be prepared to conserve natural resources ... of this manual) • the name of the product (see the front cover of this manual) • the key number and description of the replacement part(s) (see the front cover of this manual) RECYCLING INFORMATION This electronic product must be disposed of in municipal waste. ORDERING REPLACEMENT...
In doing so, you purchased this product. Part No. 311056 R0411A Printed in your local city office or the establishment where you will help us assist you, be prepared to conserve natural resources ... of this manual) • the name of the product (see the front cover of this manual) • the key number and description of the replacement part(s) (see the front cover of this manual) RECYCLING INFORMATION This electronic product must be disposed of in municipal waste. ORDERING REPLACEMENT...


