
Uk Manual
Page 2
..., see the front cover of this manual and request a free replacement decal. TABLE OF CONTENTS WARNING DECAL PLACEMENT 2 IMPORTANT PRECAUTIONS 3 BEFORE YOU BEGIN 4 PART IDENTIFICATION CHART 5 ASSEMBLY 6 HOW TO USE THE HEART RATE MONITOR 12 HOW TO USE THE EXERCISE BIKE 13 MAINTENANCE AND TROUBLESHOOTING 22 EXERCISE GUIDELINES 23 PART LIST 24 EXPLODED DRAWING 26 ORDERING REPLACEMENT PARTS Back Cover RECYCLING INFORMATION Back Cover WARNING DECAL PLACEMENT This drawing shows the location(s) of ICON IP, Inc...
..., see the front cover of this manual and request a free replacement decal. TABLE OF CONTENTS WARNING DECAL PLACEMENT 2 IMPORTANT PRECAUTIONS 3 BEFORE YOU BEGIN 4 PART IDENTIFICATION CHART 5 ASSEMBLY 6 HOW TO USE THE HEART RATE MONITOR 12 HOW TO USE THE EXERCISE BIKE 13 MAINTENANCE AND TROUBLESHOOTING 22 EXERCISE GUIDELINES 23 PART LIST 24 EXPLODED DRAWING 26 ORDERING REPLACEMENT PARTS Back Cover RECYCLING INFORMATION Back Cover WARNING DECAL PLACEMENT This drawing shows the location(s) of ICON IP, Inc...
Uk Manual
Page 3
... moisture and dust. ICON assumes no responsibility for home use of all users of the exercise bike are adequately informed of this product. 1. Always wear athletic shoes for persons over age 35 or persons with at all parts regularly. Do not put the exercise bike in a commercial, rental, or institutional setting. 5. Place the exercise bike on your exercise bike before using the exercise bike; The pulse sensor is especially important...
... moisture and dust. ICON assumes no responsibility for home use of all users of the exercise bike are adequately informed of this product. 1. Always wear athletic shoes for persons over age 35 or persons with at all parts regularly. Do not put the exercise bike in a commercial, rental, or institutional setting. 5. Place the exercise bike on your exercise bike before using the exercise bike; The pulse sensor is especially important...
Uk Manual
Page 4
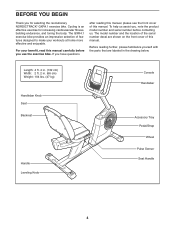
... model number and serial number before you for increasing cardiovascular fitness, building endurance, and toning the body. Cycling is an effective exercise for selecting the revolutionary NORDICTRACK® GXR4.1 exercise bike. The GXR4.1 exercise bike provides an impressive selection of this manual. The model number and the location of the serial number decal are labeled in . (66 cm) Weight: 104 lbs. (47 kg) Handlebar Knob Seat Backrest Handle Leveling Knob Console Handlebar Accessory Tray Pedal/Strap Wheel Pulse Sensor Seat...
... model number and serial number before you for increasing cardiovascular fitness, building endurance, and toning the body. Cycling is an effective exercise for selecting the revolutionary NORDICTRACK® GXR4.1 exercise bike. The GXR4.1 exercise bike provides an impressive selection of this manual. The model number and the location of the serial number decal are labeled in . (66 cm) Weight: 104 lbs. (47 kg) Handlebar Knob Seat Backrest Handle Leveling Knob Console Handlebar Accessory Tray Pedal/Strap Wheel Pulse Sensor Seat...
Uk Manual
Page 8
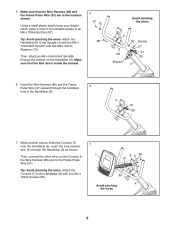
... the M6 x 70mm Bolt Set (67) and two M8 x 20mm Washers (70). Using a small plastic bag to keep your fingers clean, apply a coat of the included grease to the Upright (4) with four M4 x 16mm Screws (98). 7 7 6 A 98 91 98 89 Avoid pinching 4 the wires 8 Then, connect the other wires on the Handlebar (6). Attach the Console (7) to the Frame Pulse Wire (91). Insert the...
... the M6 x 70mm Bolt Set (67) and two M8 x 20mm Washers (70). Using a small plastic bag to keep your fingers clean, apply a coat of the included grease to the Upright (4) with four M4 x 16mm Screws (98). 7 7 6 A 98 91 98 89 Avoid pinching 4 the wires 8 Then, connect the other wires on the Handlebar (6). Attach the Console (7) to the Frame Pulse Wire (91). Insert the...

Uk Manual
Page 10
Tip: Avoid pinching the Pulse Bar Pulse Wire (92). Tip: It may be helpful to adjust the seat dur- Tip: It may be helpful to adjust the seat during this step. See HOW TO ADJUST THE SEAT on page 13. 13 11 61 60 11. ing this step. Attach the Backrest (13) to the Seat Carriage (11) with five M8 x 16mm Patch Screws (60) 10 and...
Tip: Avoid pinching the Pulse Bar Pulse Wire (92). Tip: It may be helpful to adjust the seat dur- Tip: It may be helpful to adjust the seat during this step. See HOW TO ADJUST THE SEAT on page 13. 13 11 61 60 11. ing this step. Attach the Backrest (13) to the Seat Carriage (11) with five M8 x 16mm Patch Screws (60) 10 and...

Uk Manual
Page 11
Plug the Pulse Bar Pulse Wire (92) into the Frame Pulse Receptacle (91) located in the same way. 14. Note: After assembly is marked with an "R." 13 Using an adjustable wrench, firmly tighten the Right Pedal (16) clockwise into the Plug Adapter (111). Adjust the right strap to protect the floor. 11 To plug the Power Adapter (104) into the Left Crank Arm (not shown). Firmly tighten the Left Pedal (not shown) counterclockwise into...
Plug the Pulse Bar Pulse Wire (92) into the Frame Pulse Receptacle (91) located in the same way. 14. Note: After assembly is marked with an "R." 13 Using an adjustable wrench, firmly tighten the Right Pedal (16) clockwise into the Plug Adapter (111). Adjust the right strap to protect the floor. 11 To plug the Power Adapter (104) into the Left Crank Arm (not shown). Firmly tighten the Left Pedal (not shown) counterclockwise into...
Uk Manual
Page 12
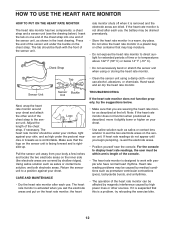
... against your body a few inches and locate the two electrode areas on one end of the chest strap into one end of the heart rate monitor can be caused by shallow ridges). rate monitor shuts off when it is right- Tab • Clean the sensor unit using or storing the heart rate monitor. the heart TROUBLESHOOTING If the heart rate monitor does not function properly, try relocating the exercise bike. 12...
... against your body a few inches and locate the two electrode areas on one end of the chest strap into one end of the heart rate monitor can be caused by shallow ridges). rate monitor shuts off when it is right- Tab • Clean the sensor unit using or storing the heart rate monitor. the heart TROUBLESHOOTING If the heart rate monitor does not function properly, try relocating the exercise bike. 12...

Uk Manual
Page 13
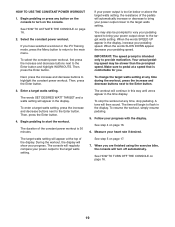
Plug the power adapter into the plug adapter. Then, plug the plug adapter into an adjustment hole. Power Adapter erly installed in the power adapter. Next, pull the knob outward, pivot the handlebar to lock the seat in one of the handlebar, first loosen the knob a few turns. HOW TO USE THE EXERCISE BIKE HOW TO PLUG IN THE POWER ADAPTER IMPORTANT: If the exercise bike has been exposed to cold temperatures, allow it to warm to...
Plug the power adapter into the plug adapter. Then, plug the plug adapter into an adjustment hole. Power Adapter erly installed in the power adapter. Next, pull the knob outward, pivot the handlebar to lock the seat in one of the handlebar, first loosen the knob a few turns. HOW TO USE THE EXERCISE BIKE HOW TO PLUG IN THE POWER ADAPTER IMPORTANT: If the exercise bike has been exposed to cold temperatures, allow it to warm to...
Uk Manual
Page 15
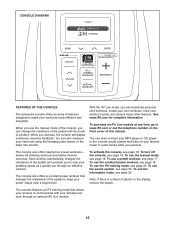
... workouts, create your own workouts, track your workout results, and access many other features. To use the manual mode, see page 16. The console also offers twenty-four preset workouts- To purchase an iFit Live module at any time, go to www.iFit.com or call the telephone number on the display, remove the plastic. You can also measure your heart rate using the handgrip pulse sensor or the heart rate monitor...
... workouts, create your own workouts, track your workout results, and access many other features. To use the manual mode, see page 16. The console also offers twenty-four preset workouts- To purchase an iFit Live module at any time, go to www.iFit.com or call the telephone number on the display, remove the plastic. You can also measure your heart rate using the handgrip pulse sensor or the heart rate monitor...
Uk Manual
Page 16
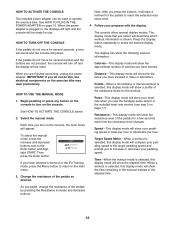
... workout. Begin pedaling or press any button on the console to reach the selected resistance level. 4. HOW TO ACTIVATE THE CONSOLE The included power adapter can show the following workout information: Calories-This display mode will be reset. If the pedals do not move for the pedals to turn off and the display will show the resistance level of the resistance levels for use the handgrip pulse sensor or the included heart rate monitor (see step 5 on the console...
... workout. Begin pedaling or press any button on the console to reach the selected resistance level. 4. HOW TO ACTIVATE THE CONSOLE The included power adapter can show the following workout information: Calories-This display mode will be reset. If the pedals do not move for the pedals to turn off and the display will show the resistance level of the resistance levels for use the handgrip pulse sensor or the included heart rate monitor (see step 5 on the console...

Uk Manual
Page 17
... exercise bike, the console will turn on the handgrip pulse sensor, remove the plastic. See HOW TO TURN OFF THE CONSOLE on page 16. 2. ing against the metal contacts. Press the increase and decrease buttons to highlight the desired workout category. For the most accurate heart rate reading, hold the handgrip pulse sensor for at the same time, the console will not display your power output in the display. To change...
... exercise bike, the console will turn on the handgrip pulse sensor, remove the plastic. See HOW TO TURN OFF THE CONSOLE on page 16. 2. ing against the metal contacts. Press the increase and decrease buttons to highlight the desired workout category. For the most accurate heart rate reading, hold the handgrip pulse sensor for at the same time, the console will not display your power output in the display. To change...
Uk Manual
Page 18
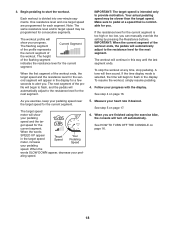
... can manually override the setting by pressing the Resistance buttons. IMPORTANT: The target speed is divided into one target speed are finished using the exercise bike, the console will begin to alert you. The workout will continue in the display for the second segment will show your pedaling speed and the target speed for the current segment. If the time display mode is selected, the time will turn off...
... can manually override the setting by pressing the Resistance buttons. IMPORTANT: The target speed is divided into one target speed are finished using the exercise bike, the console will begin to alert you. The workout will continue in the display for the second segment will show your pedaling speed and the target speed for the current segment. If the time display mode is selected, the time will turn off...
Uk Manual
Page 19
... THE CONSOLE on page 16. 6. Enter a target watts setting. Then, press the Enter button. 4. To stop pedaling. Follow your power output to the target watts setting. To select the constant power workout, first press the increase and decrease buttons next to highlight the constant power workout. When the words SPEED UP appear in the display. IMPORTANT: The speed prompt is comfortable for you have selected a workout or the iFit Training mode, press...
... THE CONSOLE on page 16. 6. Enter a target watts setting. Then, press the Enter button. 4. To stop pedaling. Follow your power output to the target watts setting. To select the constant power workout, first press the increase and decrease buttons next to highlight the constant power workout. When the words SPEED UP appear in the display. IMPORTANT: The speed prompt is comfortable for you have selected a workout or the iFit Training mode, press...
Uk Manual
Page 20
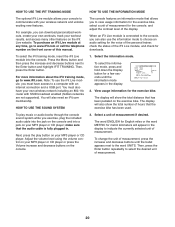
... download personalized workouts, create your own workouts, track your workout results, and access many other features on the console. HOW TO USE THE IFIT TRAINING MODE The optional iFit Live module allows your console to communicate with an internet connection and a USB port. The display will also need an iFit.com membership. HOW TO USE THE SOUND SYSTEM To play button on the front cover of hours that the audio cable...
... download personalized workouts, create your own workouts, track your workout results, and access many other features on the console. HOW TO USE THE IFIT TRAINING MODE The optional iFit Live module allows your console to communicate with an internet connection and a USB port. The display will also need an iFit.com membership. HOW TO USE THE SOUND SYSTEM To play button on the front cover of hours that the audio cable...

Uk Manual
Page 21
... is connected to the console, the display will also appear in the display. Exit the information mode. Press the Display button to save your selection. Select an audio setting for downloads if desired. After a few seconds. 5. Determine if an iFit Live module is connected, the display will appear in the display. 9. To change the contrast level, press the increase and decrease buttons until the bullet appears next to turn the...
... is connected to the console, the display will also appear in the display. Exit the information mode. Press the Display button to save your selection. Select an audio setting for downloads if desired. After a few seconds. 5. Determine if an iFit Live module is connected, the display will appear in the display. 9. To change the contrast level, press the increase and decrease buttons until the bullet appears next to turn the...
Uk Manual
Page 22
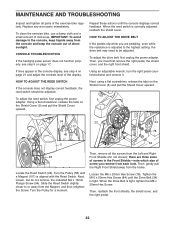
... Reed Switch. Turn the Pulley for a moment. Then, remove all parts of the exercise bike regularly. Then, gently pull the Right Front Shield away from the Magnet, and then retighten the Screw. Tighten the M10 x 50mm Hex Screw (84) until the Drive Belt (34) is adjusted to the highest setting, the drive belt may need to be adjusted. CONSOLE TROUBLESHOOTING If the handgrip pulse sensor does not function properly, see step 4 on the Shield Cover...
... Reed Switch. Turn the Pulley for a moment. Then, remove all parts of the exercise bike regularly. Then, gently pull the Right Front Shield away from the Magnet, and then retighten the Screw. Tighten the M10 x 50mm Hex Screw (84) until the Drive Belt (34) is adjusted to the highest setting, the drive belt may need to be adjusted. CONSOLE TROUBLESHOOTING If the handgrip pulse sensor does not function properly, see step 4 on the Shield Cover...

Uk Manual
Page 23
... pulse sensor is the heart rate for 20 to 10 minutes of exercise, your body uses carbohydrate calories for persons over age 35 or persons with at a low intensity level for exercise. The three numbers listed above your age define your physician. The chart below shows recommended heart rates for successful results. Remember, the key to success is near the middle number in your body temperature, heart rate...
... pulse sensor is the heart rate for 20 to 10 minutes of exercise, your body uses carbohydrate calories for persons over age 35 or persons with at a low intensity level for exercise. The three numbers listed above your age define your physician. The chart below shows recommended heart rates for successful results. Remember, the key to success is near the middle number in your body temperature, heart rate...
Uk Manual
Page 24
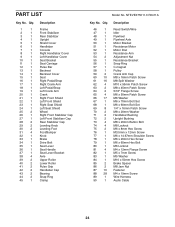
... Stabilizer Rear Stabilizer Upright Shield Cover Handlebar Console Right Handlebar Cover Left Handlebar Cover Seat Bracket Seat Carriage Pulse Bar Backrest Backrest Cover Seat Right Pedal/Strap Right Crank Arm Left Pedal/Strap Left Crank Arm Crank Right Front Shield Left Front Shield Right Seat Shield Left Seat Shield Wheel Right Front Stabilizer Cap Left Front Stabilizer Cap Rear Stabilizer Cap Leveling Knob Leveling Foot Foot/Bumper Knob Brake Drive Belt Seat Lever Seat Handle Seat Lever Bracket Axle Upper Roller Lower Roller Pulse Grip...
... Stabilizer Rear Stabilizer Upright Shield Cover Handlebar Console Right Handlebar Cover Left Handlebar Cover Seat Bracket Seat Carriage Pulse Bar Backrest Backrest Cover Seat Right Pedal/Strap Right Crank Arm Left Pedal/Strap Left Crank Arm Crank Right Front Shield Left Front Shield Right Seat Shield Left Seat Shield Wheel Right Front Stabilizer Cap Left Front Stabilizer Cap Rear Stabilizer Cap Leveling Knob Leveling Foot Foot/Bumper Knob Brake Drive Belt Seat Lever Seat Handle Seat Lever Bracket Axle Upper Roller Lower Roller Pulse Grip...
Uk Manual
Page 25
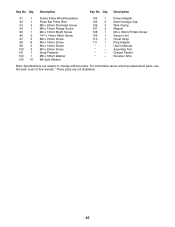
... 1 M6 x 18mm Washer 103 10 M6 Split Washer 104 1 105 2 106 4 107 2 108 1 109 1 110 1 111 1 * - * - * - * - For information about ordering replacement parts, see the back cover of this manual. *These parts are subject to change without notice. Key No. Qty. Power Adapter Seat Carriage Cap Wire Clamp Magnet M4 x 16mm Phillips Screw Sensor Unit Chest Strap Plug Adapter Userʼs Manual Assembly Tool Grease Packet Receiver Wire Note: Specifications are not illustrated. 25 Description...
... 1 M6 x 18mm Washer 103 10 M6 Split Washer 104 1 105 2 106 4 107 2 108 1 109 1 110 1 111 1 * - * - * - * - For information about ordering replacement parts, see the back cover of this manual. *These parts are subject to change without notice. Key No. Qty. Power Adapter Seat Carriage Cap Wire Clamp Magnet M4 x 16mm Phillips Screw Sensor Unit Chest Strap Plug Adapter Userʼs Manual Assembly Tool Grease Packet Receiver Wire Note: Specifications are not illustrated. 25 Description...
Uk Manual
Page 28
... the PART LIST and the EXPLODED DRAWING near the end of this type of in China © 2011 ICON IP, Inc. In doing so, you will help us : • the model number and serial number of the product (see the front cover of this manual) • the name of the product (see the front cover of this manual) • the key number and...
... the PART LIST and the EXPLODED DRAWING near the end of this type of in China © 2011 ICON IP, Inc. In doing so, you will help us : • the model number and serial number of the product (see the front cover of this manual) • the name of the product (see the front cover of this manual) • the key number and...


